
Web send
This page explains how to send messages directly from the Bizgo console without writing any code.
Address book
You can register and manage the contact details of recipients you send to often.
Registration limit
You can register up to 100,000 recipients.
Register contacts
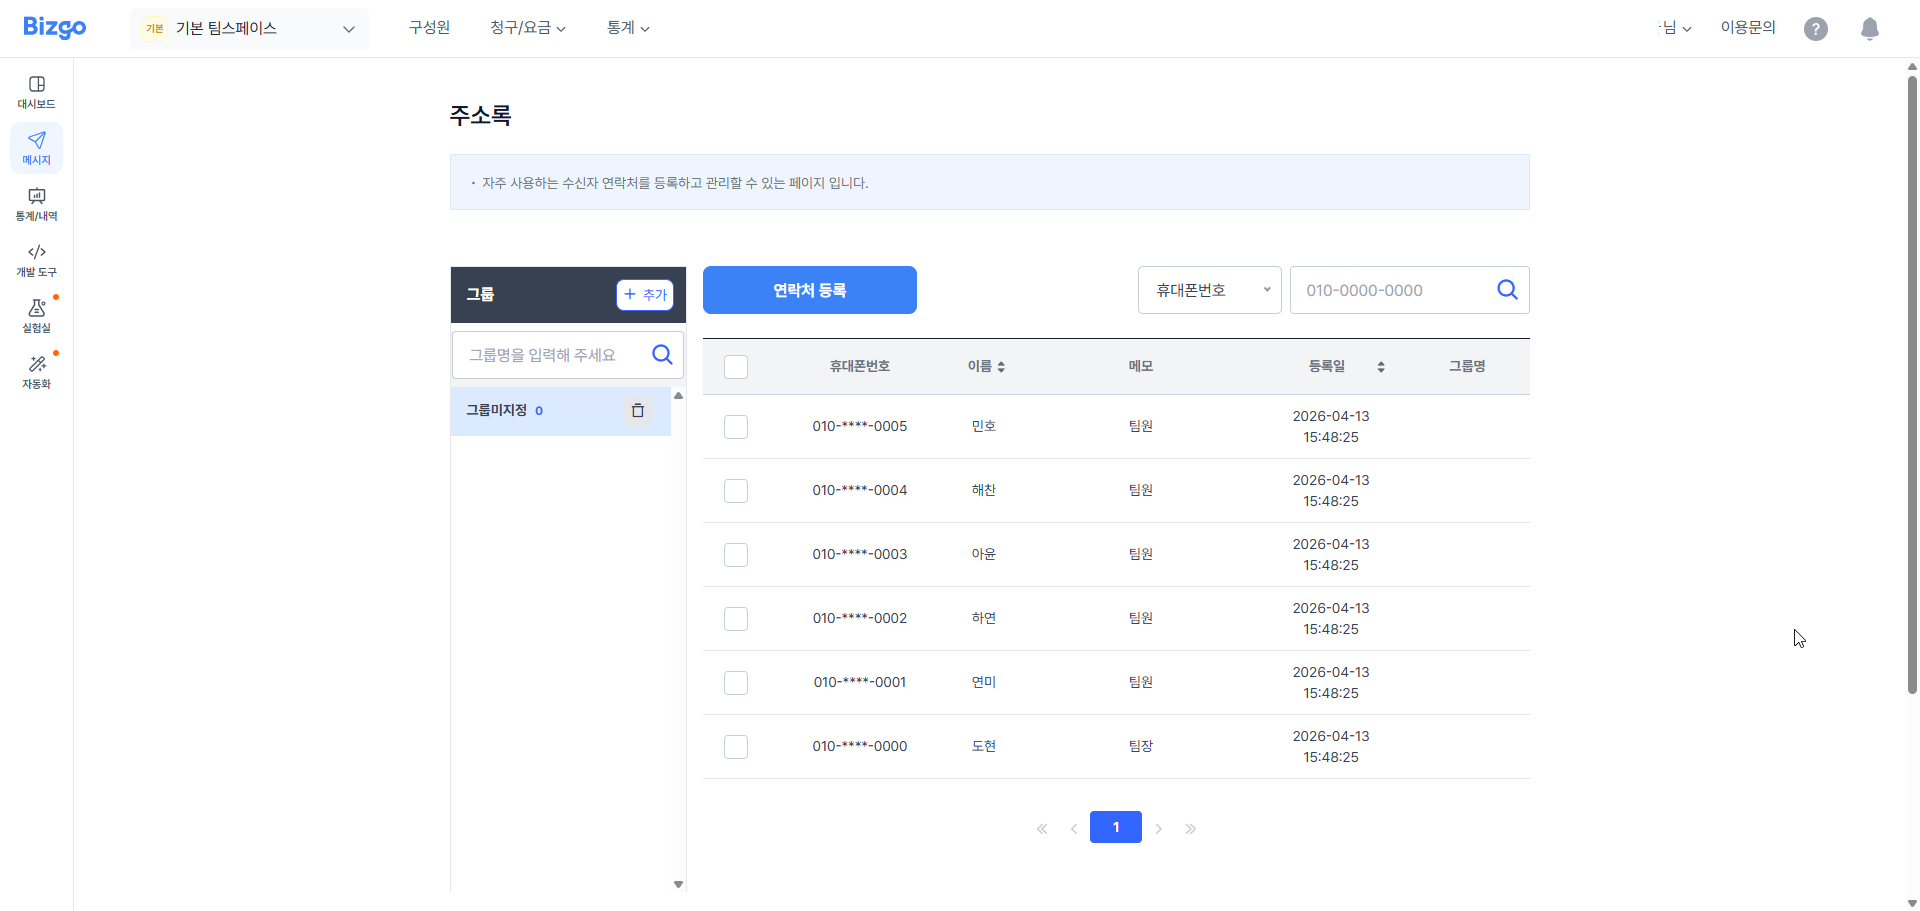
Step 1 — Open your team space, then click Web send (웹 발송) > Address book (주소록) in the left menu.
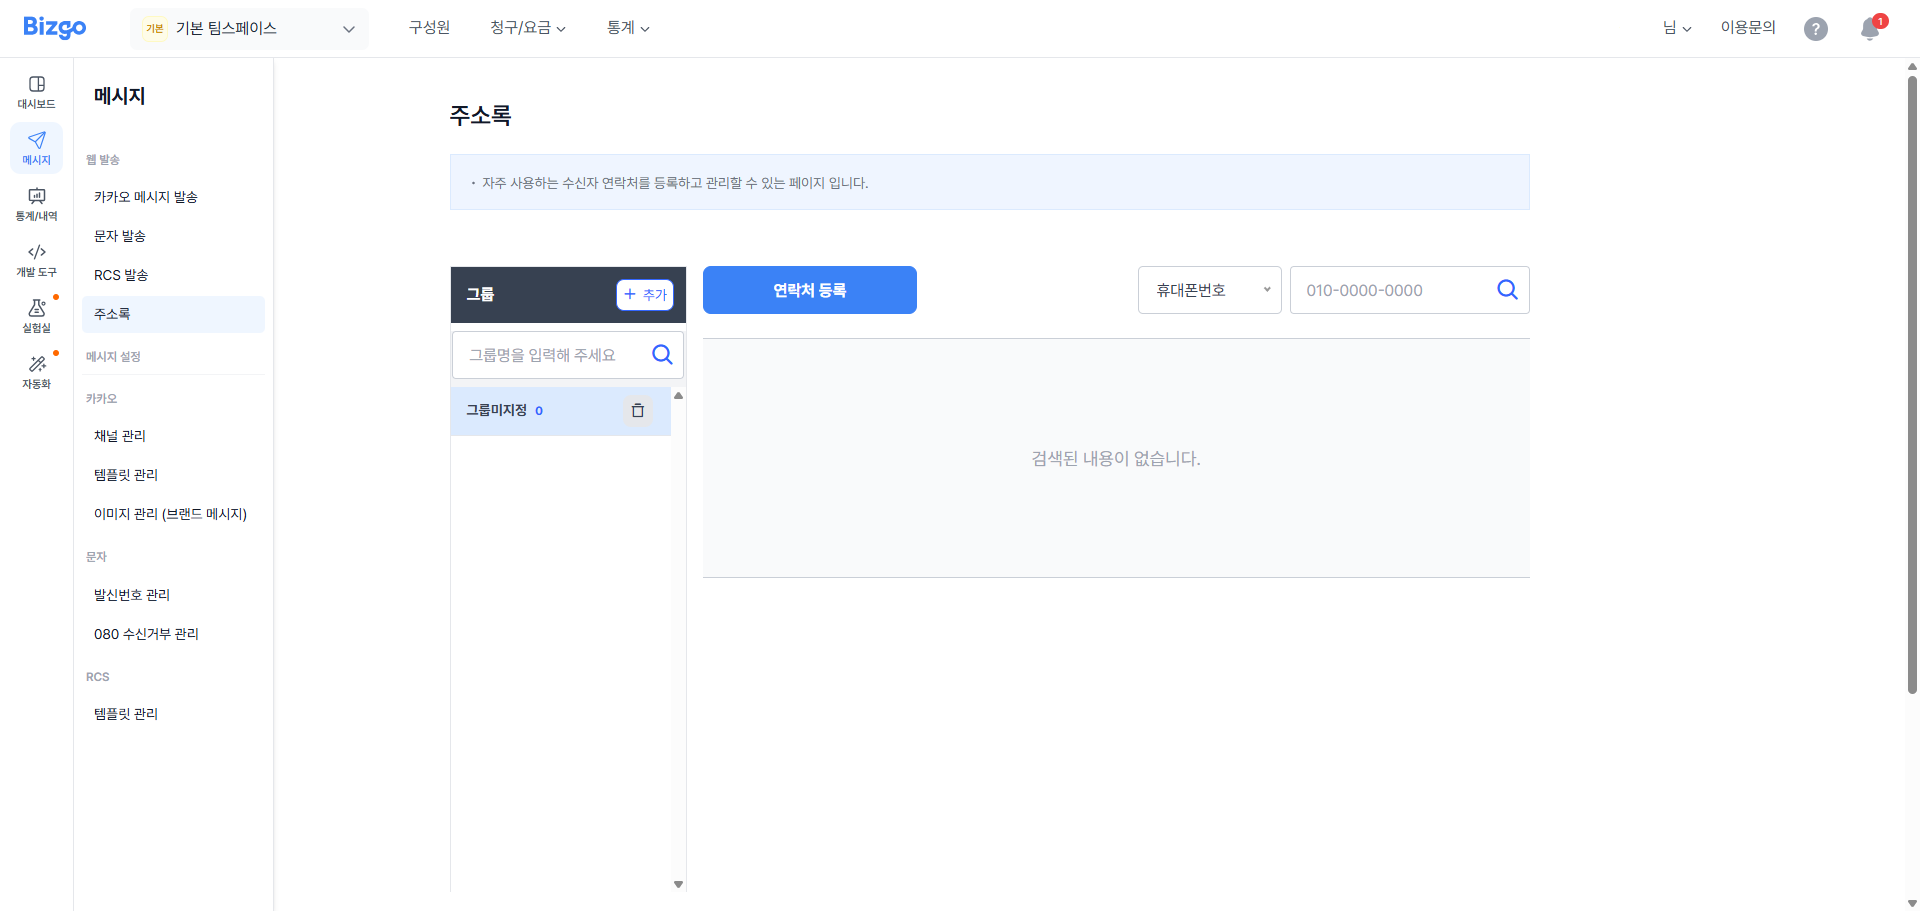
Step 2 — Click the Register contacts (연락처 등록) button.
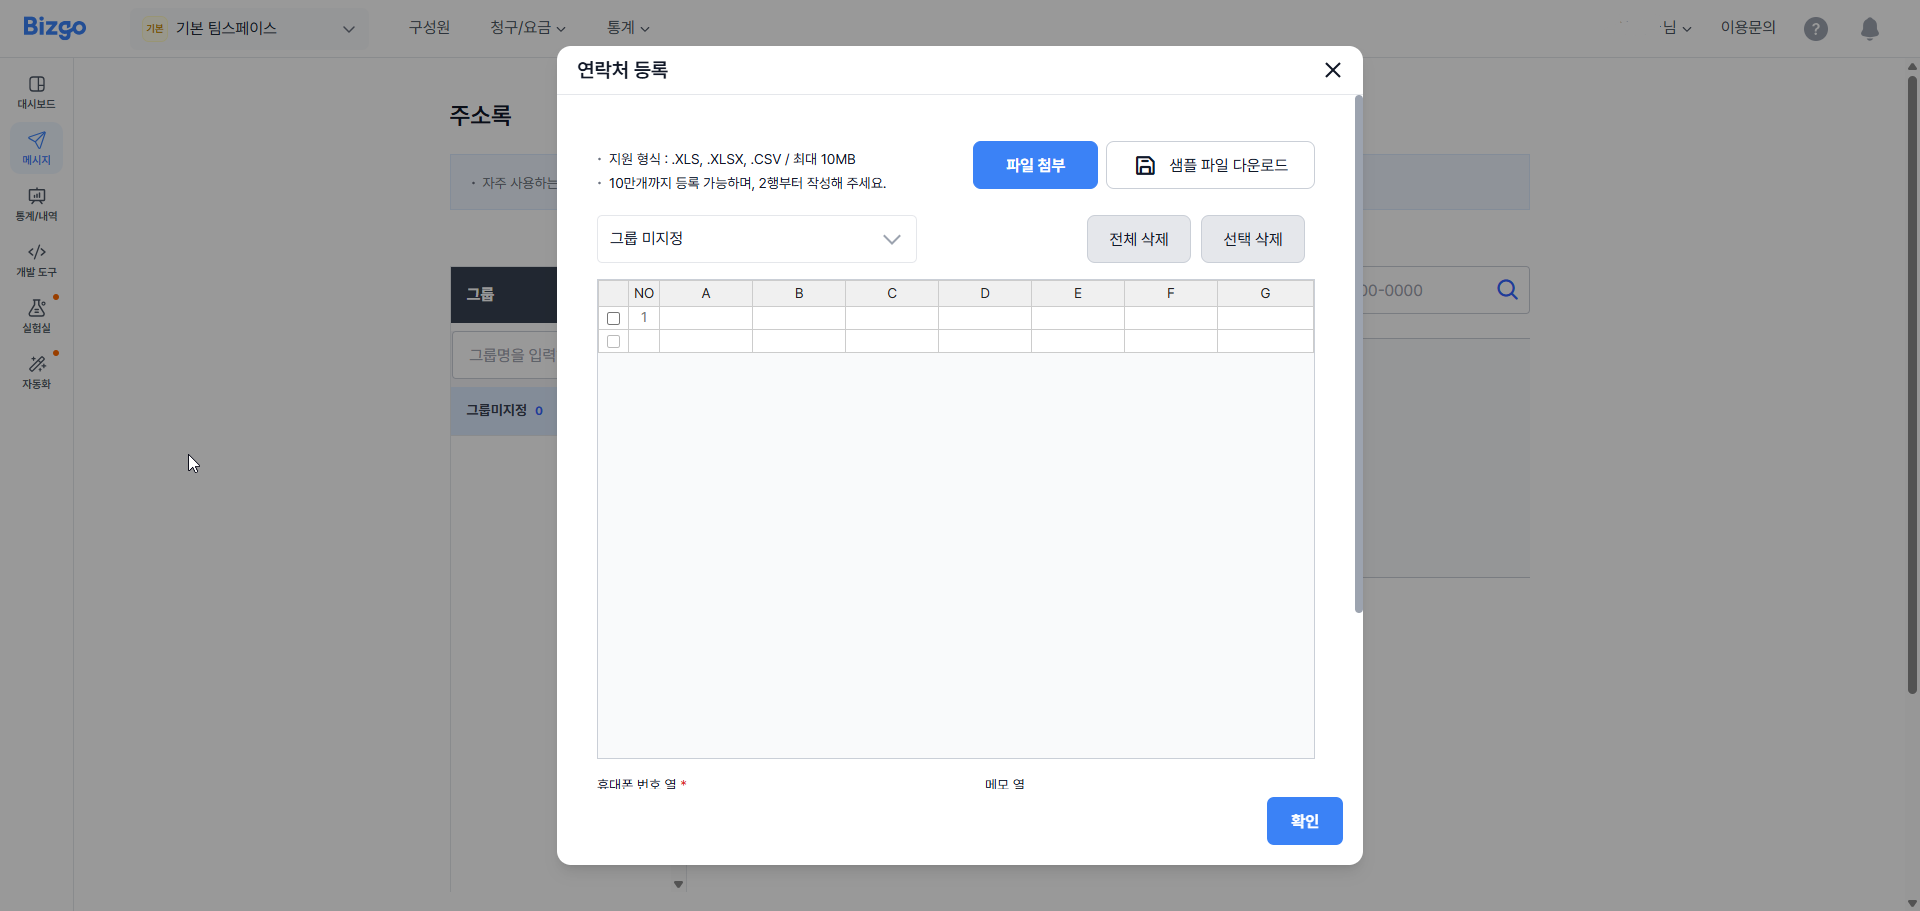
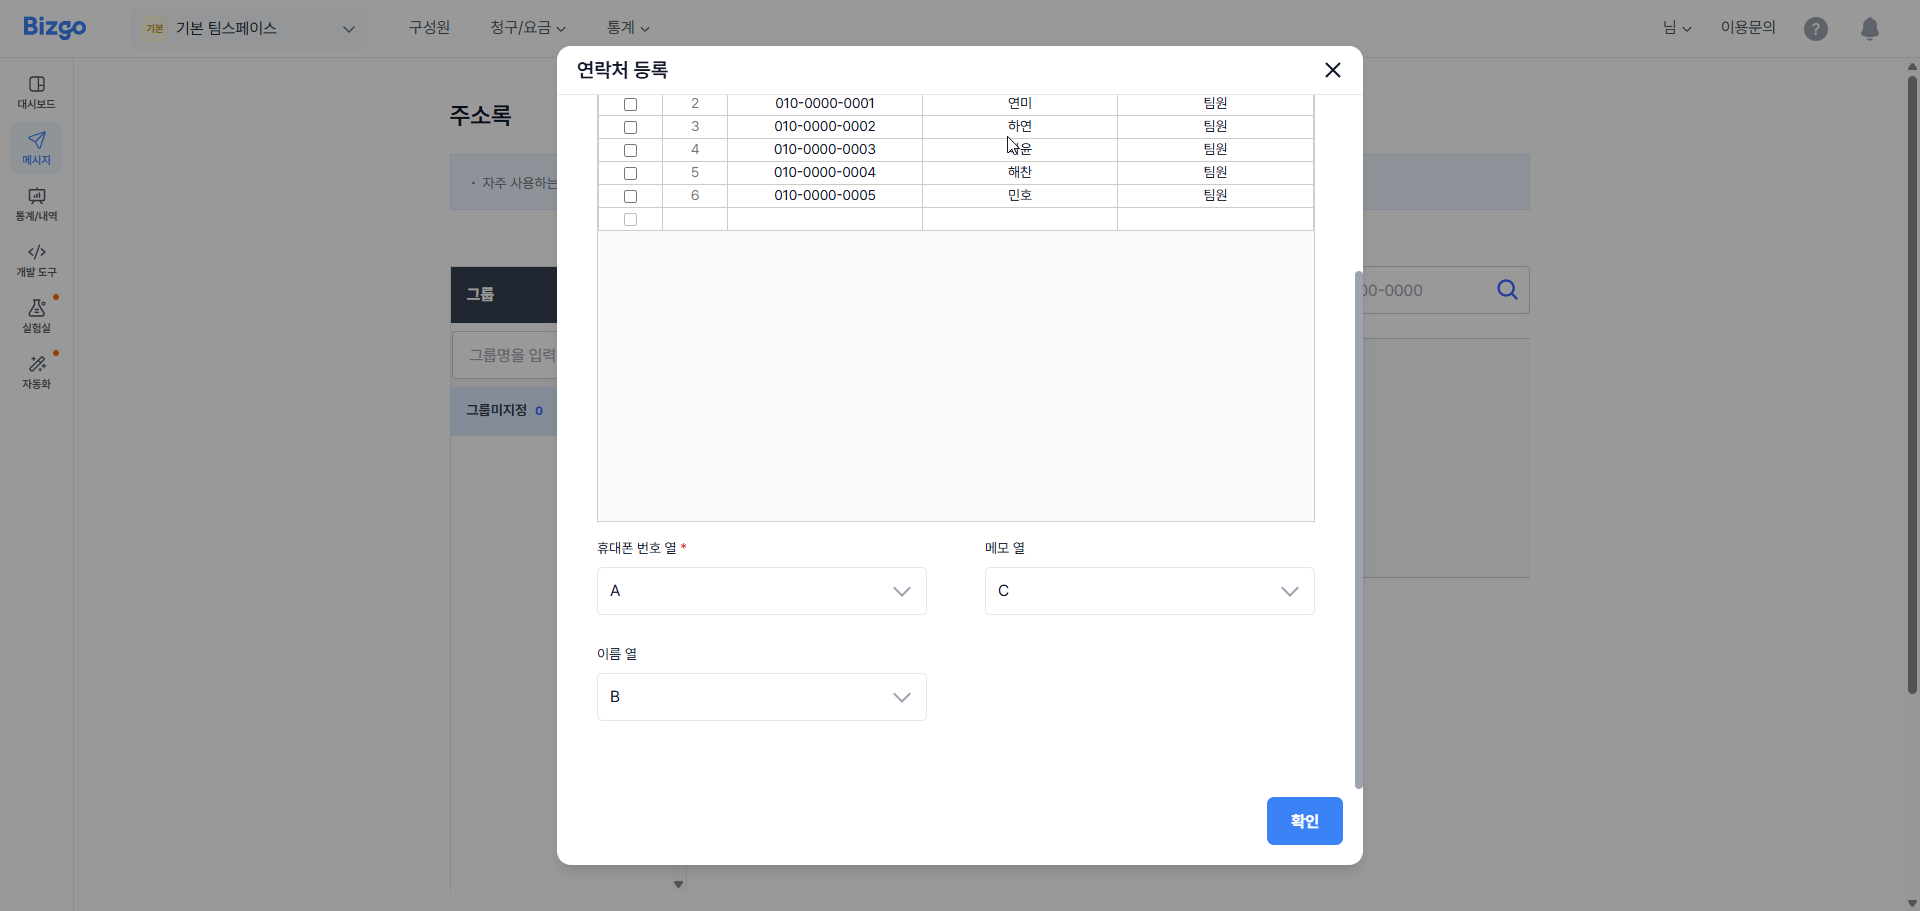
Step 3 — Either type the contact details directly into the table, or click the Download sample file (샘플 파일 다운로드) button, fill in the contact details in the Excel file as the guide describes, and attach the file.
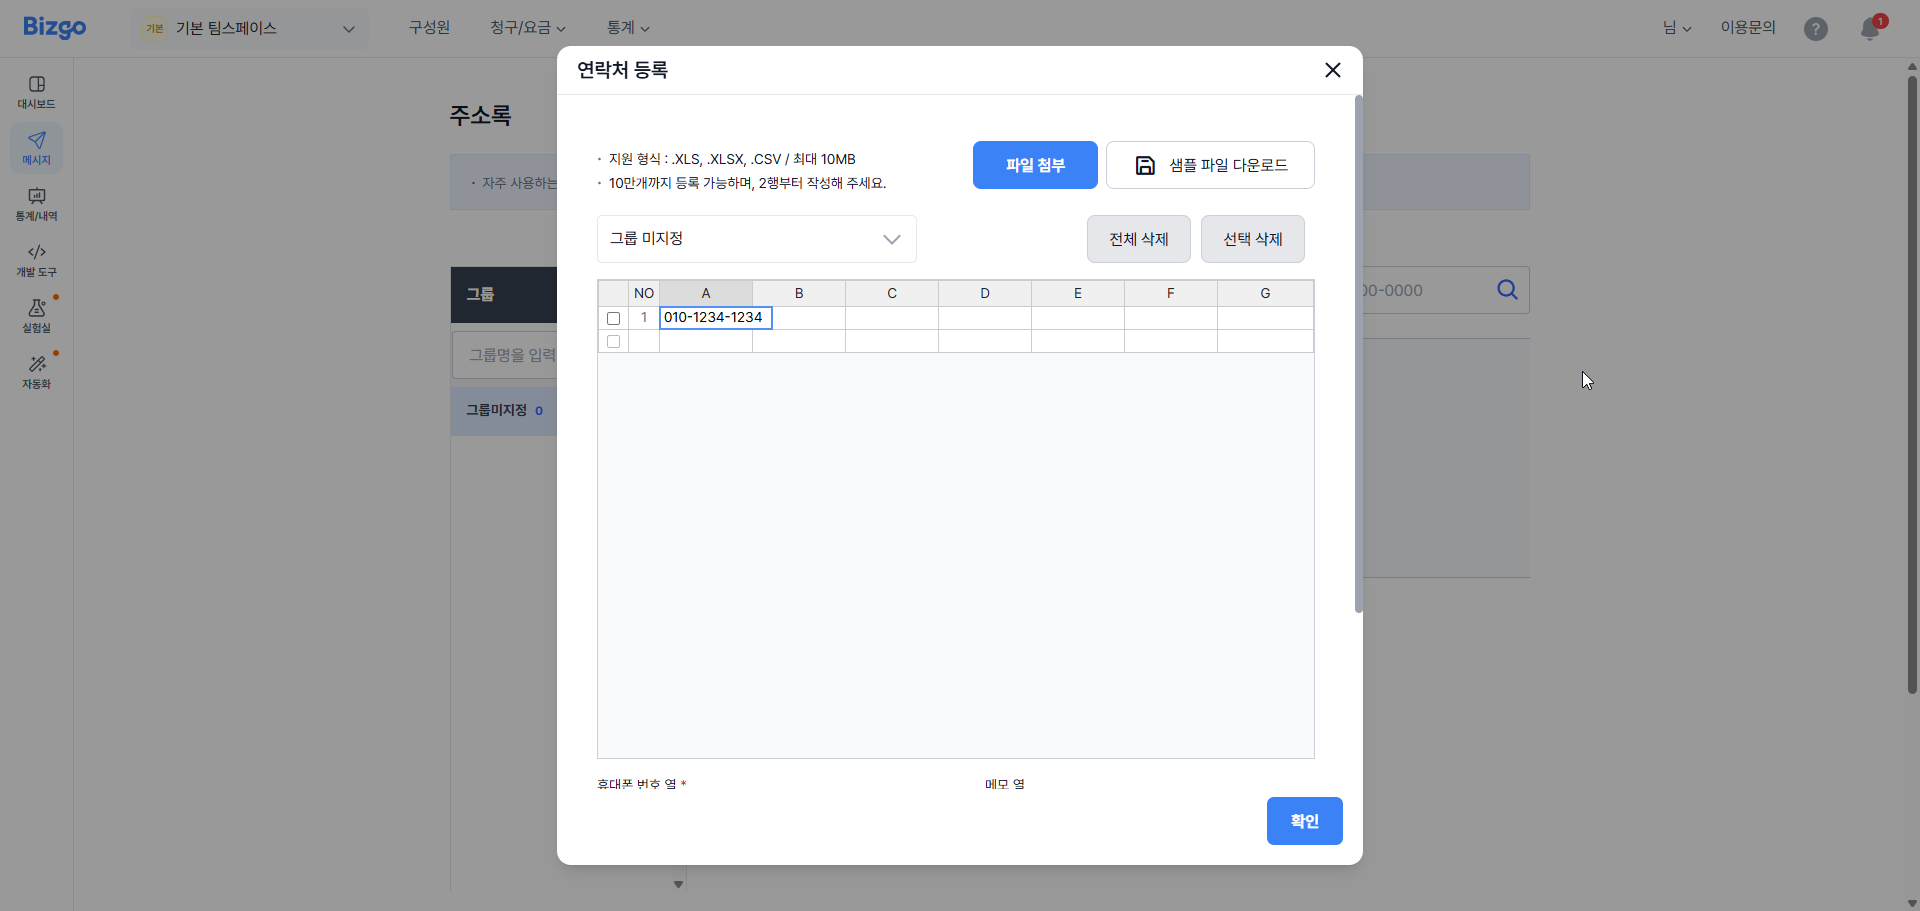
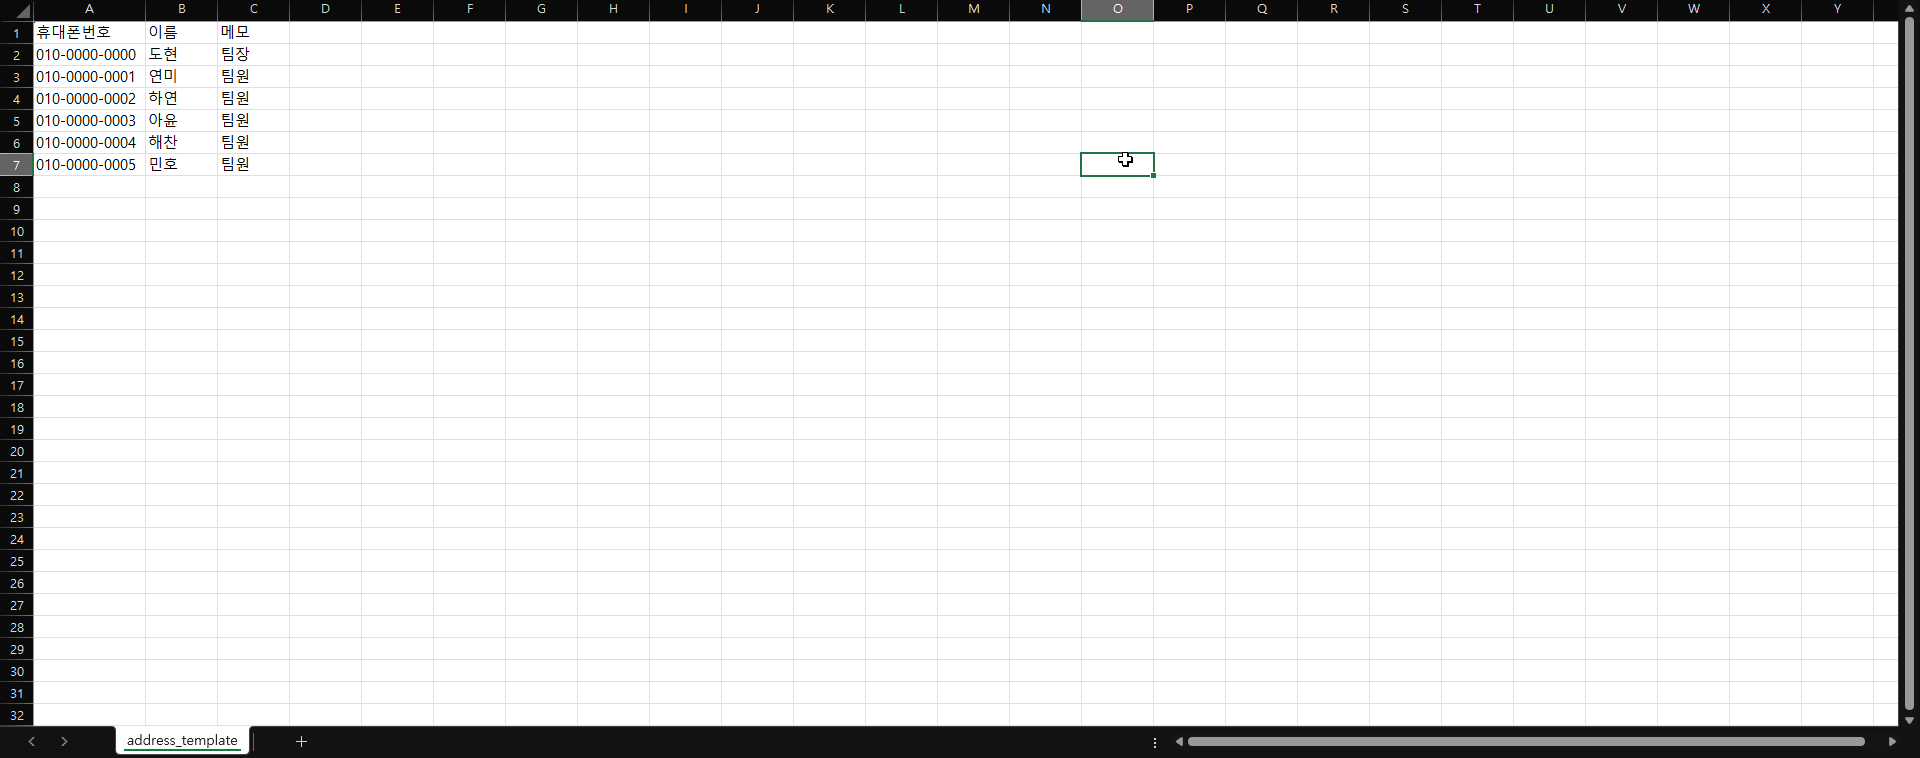
Step 4 — Once the contact details appear in the table, specify the group to register them to along with the mobile number, name, and memo columns, then click the Confirm (확인) button to save.
Send an SMS/LMS/MMS message
1. Select sender information
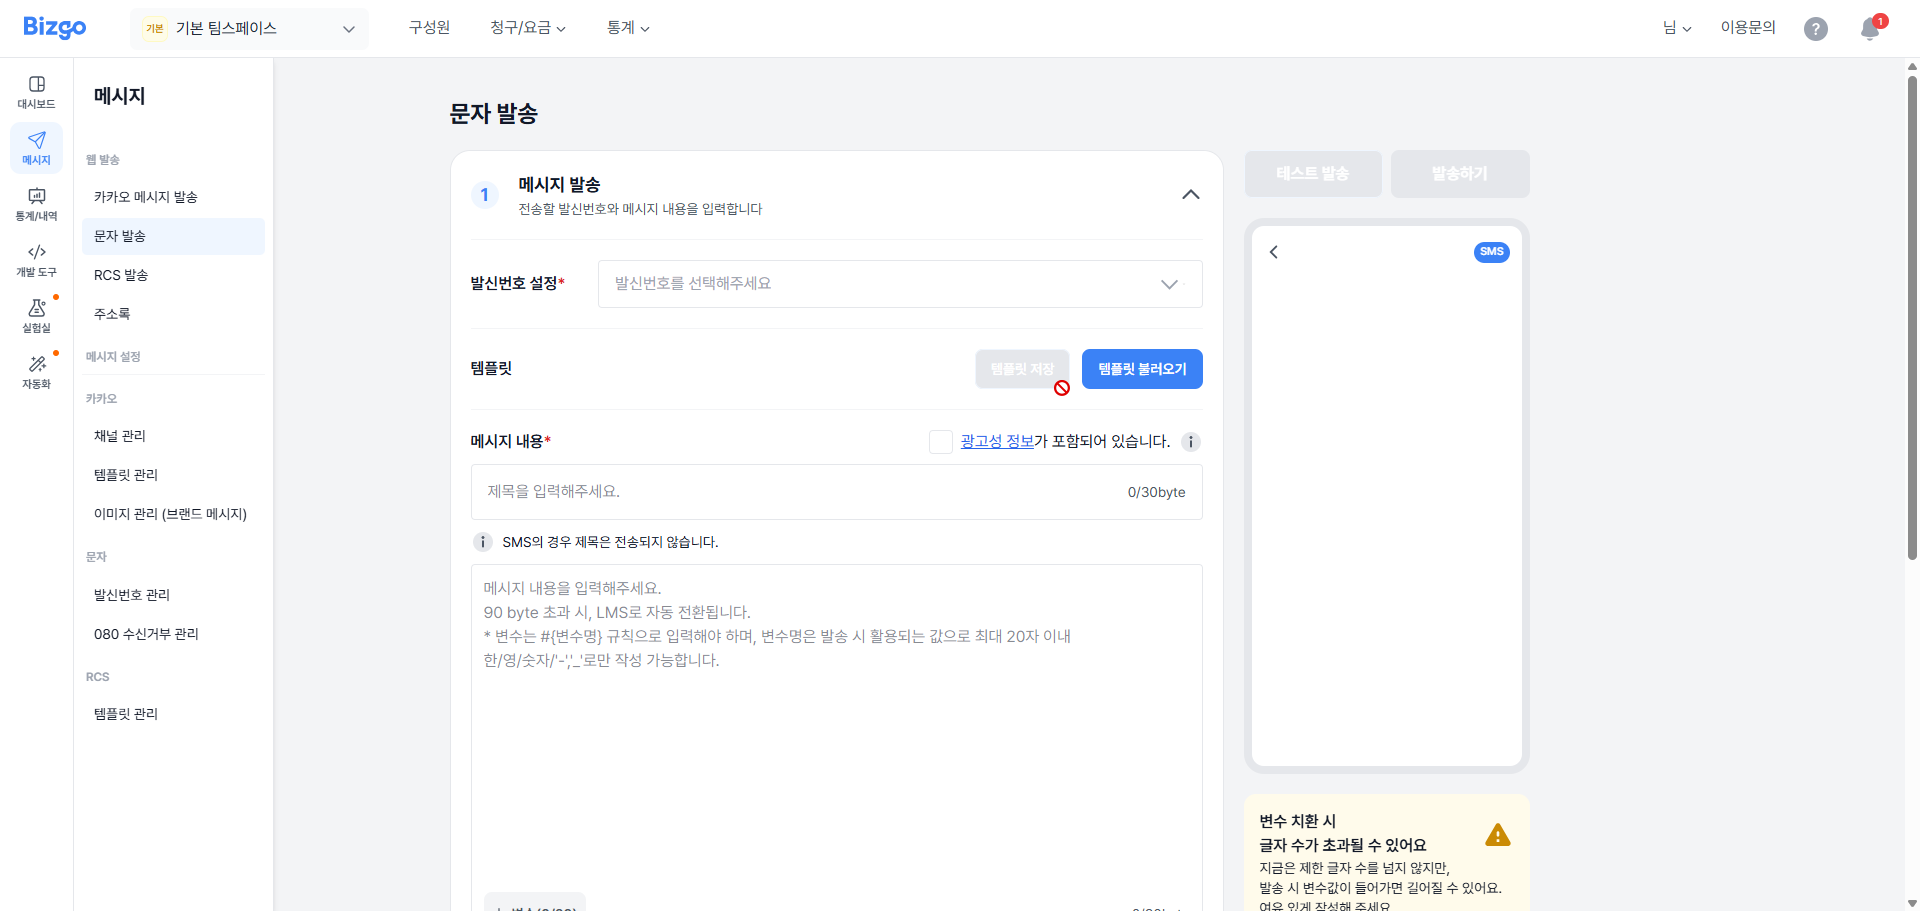
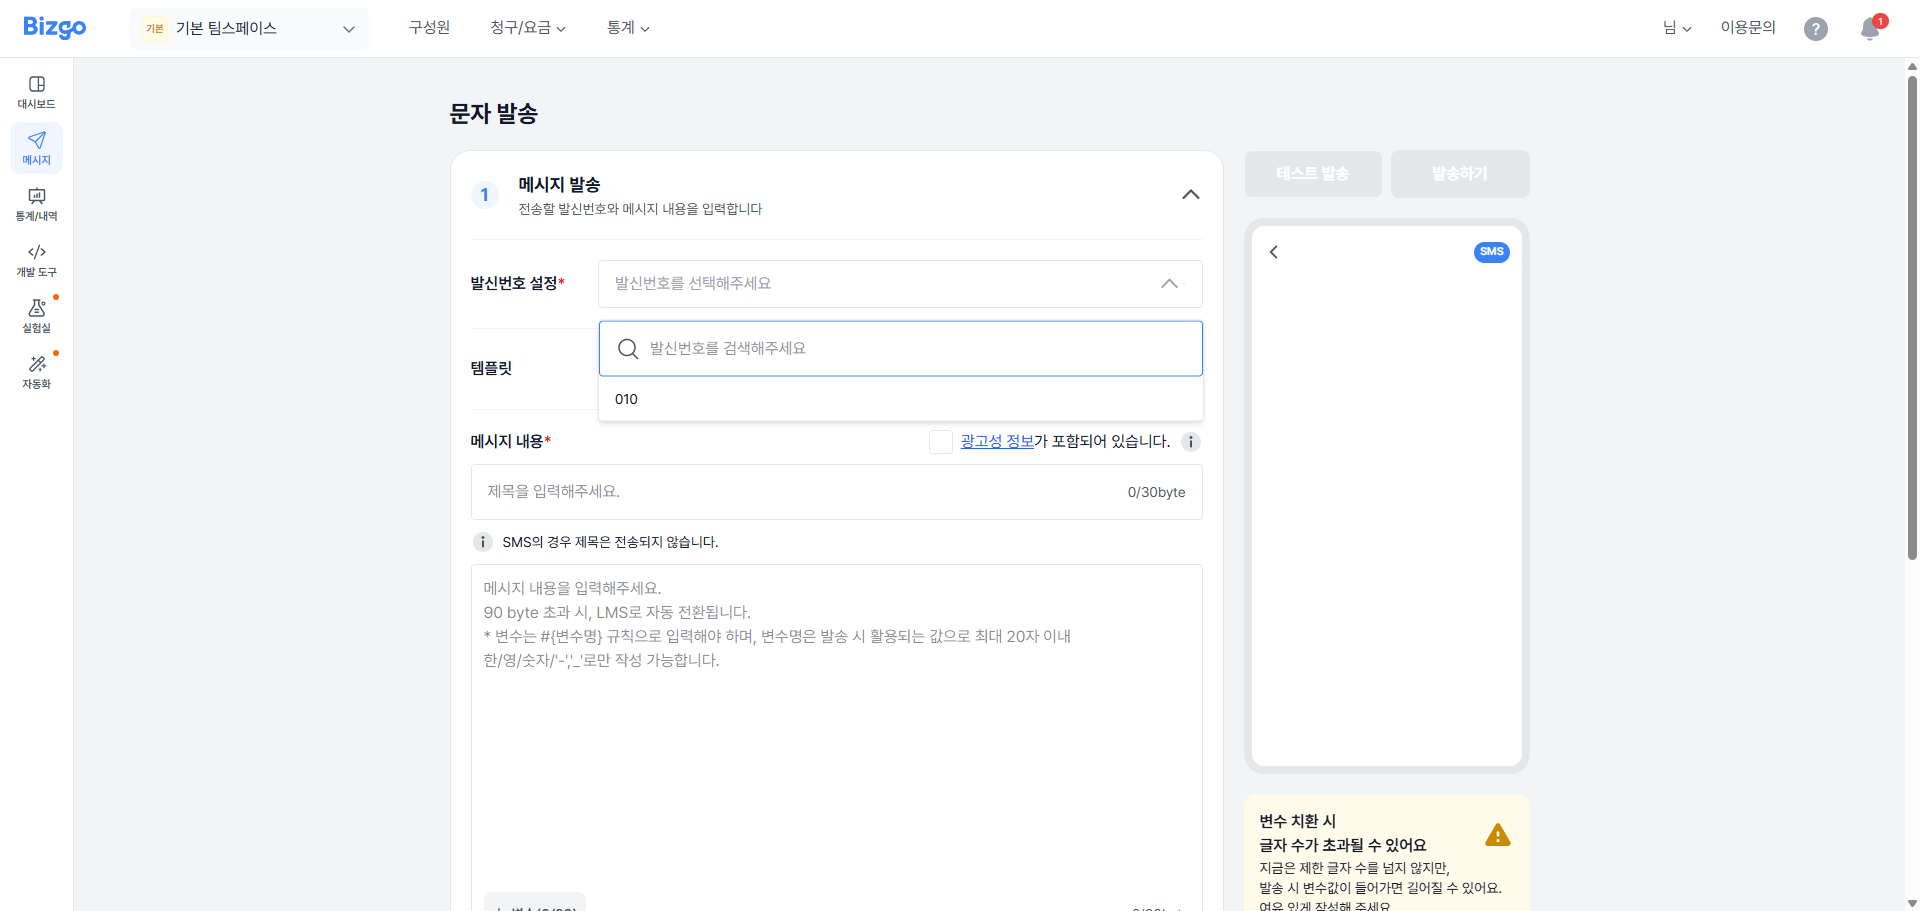
To send an SMS/LMS/MMS message, click Web send > Send (발송) in the left menu of your team space, then click the Text (문자) tab at the top of the page. Next, select a sender number under the sender information section.
2. Enter the message content
Choose whether the message content is promotional or informational.
Informational message — You can enter any message content you like.
Promotional message — The message content field is pre-filled so that you can comply with the rules in the Korea Internet & Security Agency (KISA) guide to the Network Act on preventing illegal spam (불법스팸방지를 위한 정보통신망법 안내서): the (광고) ("advertisement") label at the start of the body, the sender's company name, and a toll-free opt-out method.
Promotional message rules
If you do not comply with the promotional message rules, your message delivery may be suspended and you may be subject to penalties such as fines under the Korean Network Act (정보통신망법).
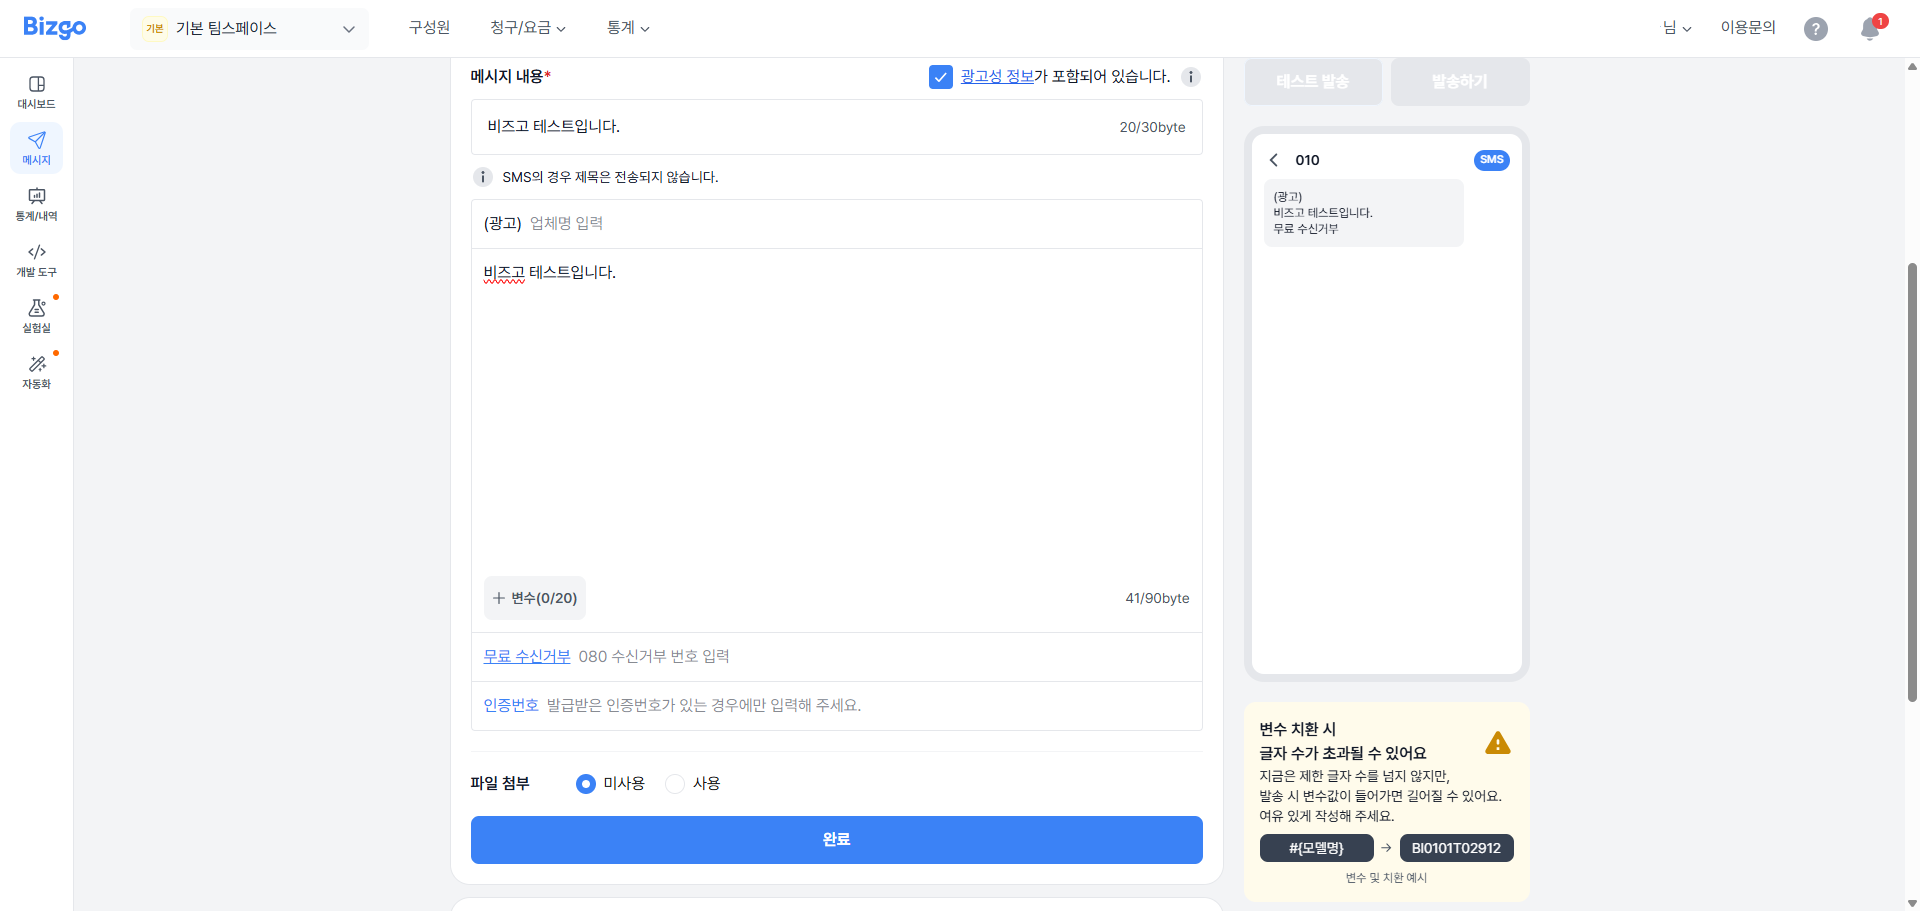
Next, enter the message title and the message content. To deliver personalized content per recipient — such as a name or a coupon number — click the Variable (변수) button and specify a variable.
Variable usage example
#{이름}님, #{1} 포인트가 적립되었습니다.
As soon as you enter a message title, the message type changes automatically to LMS, or to MMS if you attach an image. For an MMS send, click the Add image (이미지 추가) button to attach an image. You can attach up to 3 images.
3. Enter recipient information
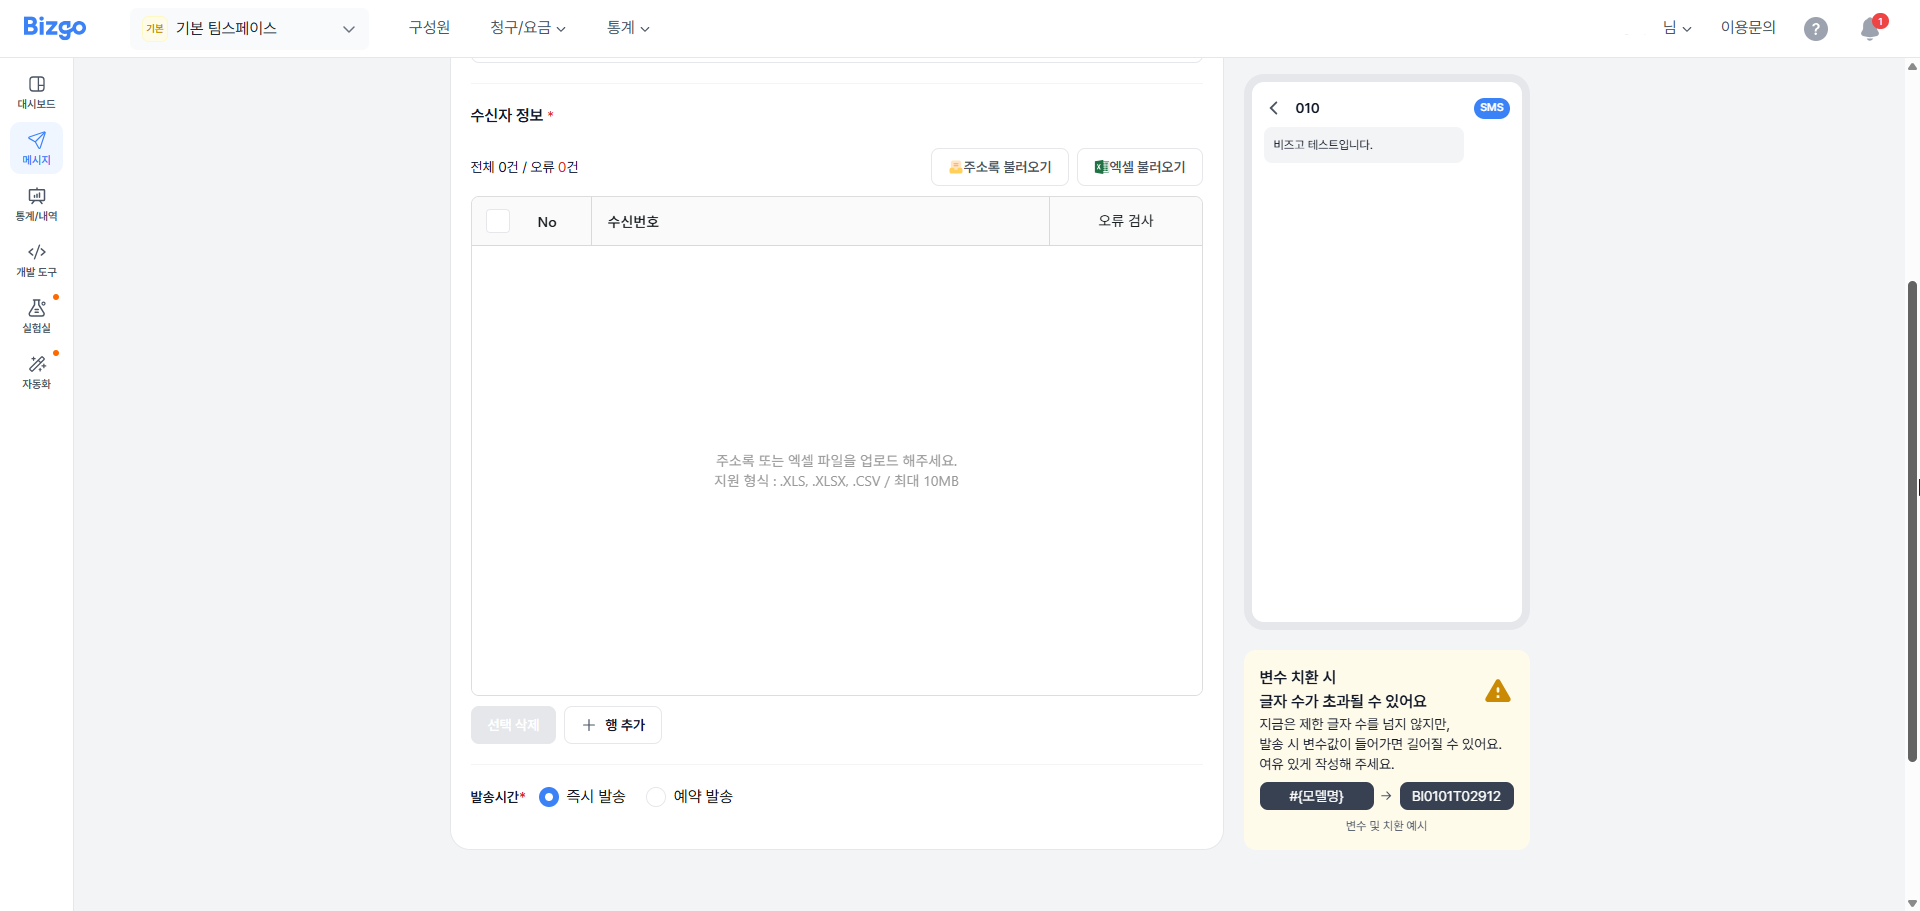
Enter the information for the recipients you want to send to. Click Error check (오류 검사) to see why delivery is not possible for each recipient.
| Error status | Description |
|---|---|
| 번호없음 (No number) | The recipient's mobile number was not entered |
| 번호오류 (Invalid number) | The recipient's mobile number is in the wrong format |
| 중복번호 (Duplicate number) | The recipient's mobile number and variables are duplicated |
| 변수없음 (Missing variable) | A variable used in the message content was not entered in the recipient information |
| 길이초과 (Length exceeded) | The combined message content and variables exceed the byte limit for the message type |
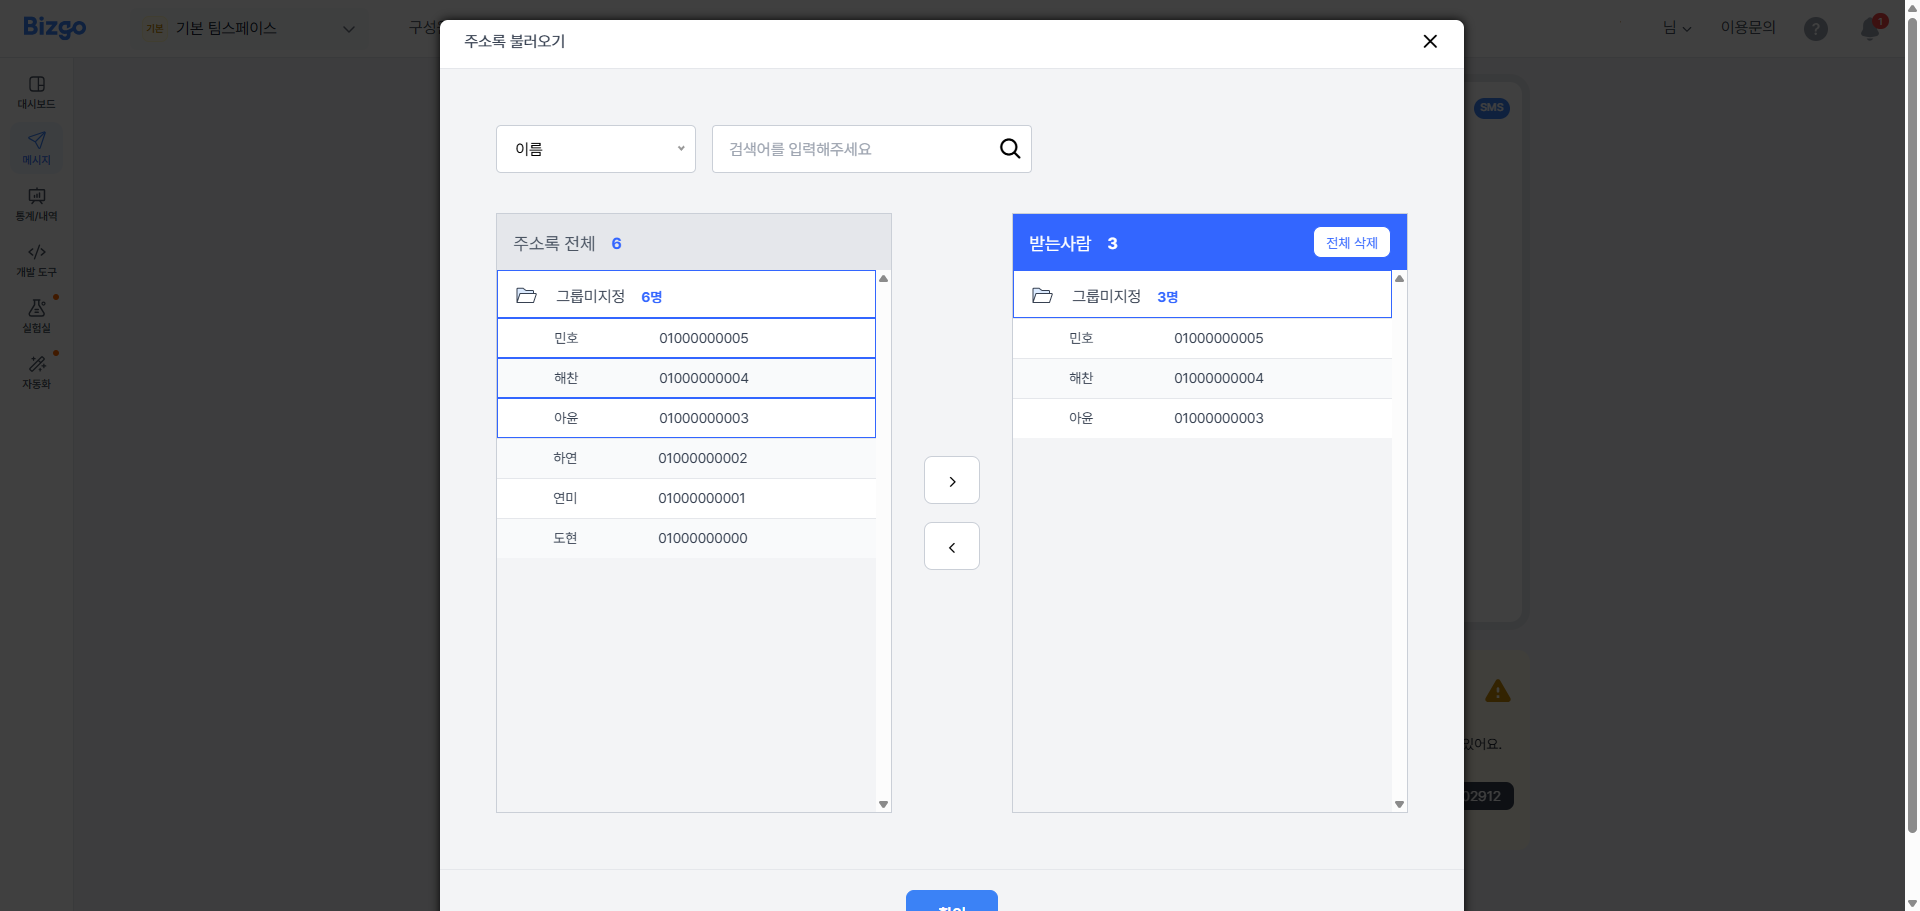
Click the Load from address book (주소록 불러오기) button to pull contacts registered in the address book into the recipient information.
Click the Load Excel file (엑셀파일 불러오기) button to pull contacts you entered in Excel into the recipient information. Click the Download sample file button, enter the contact details following the input template, then click the Attach file (파일 첨부) button to register them. Once the Excel file data is loaded, select the columns to use as the mobile number and the variables, then click the Confirm button to finish registering the recipient information.
Excel file upload
An Excel file can hold up to 100,000 records, and data is read starting from row 2.
4. Configure the reservation
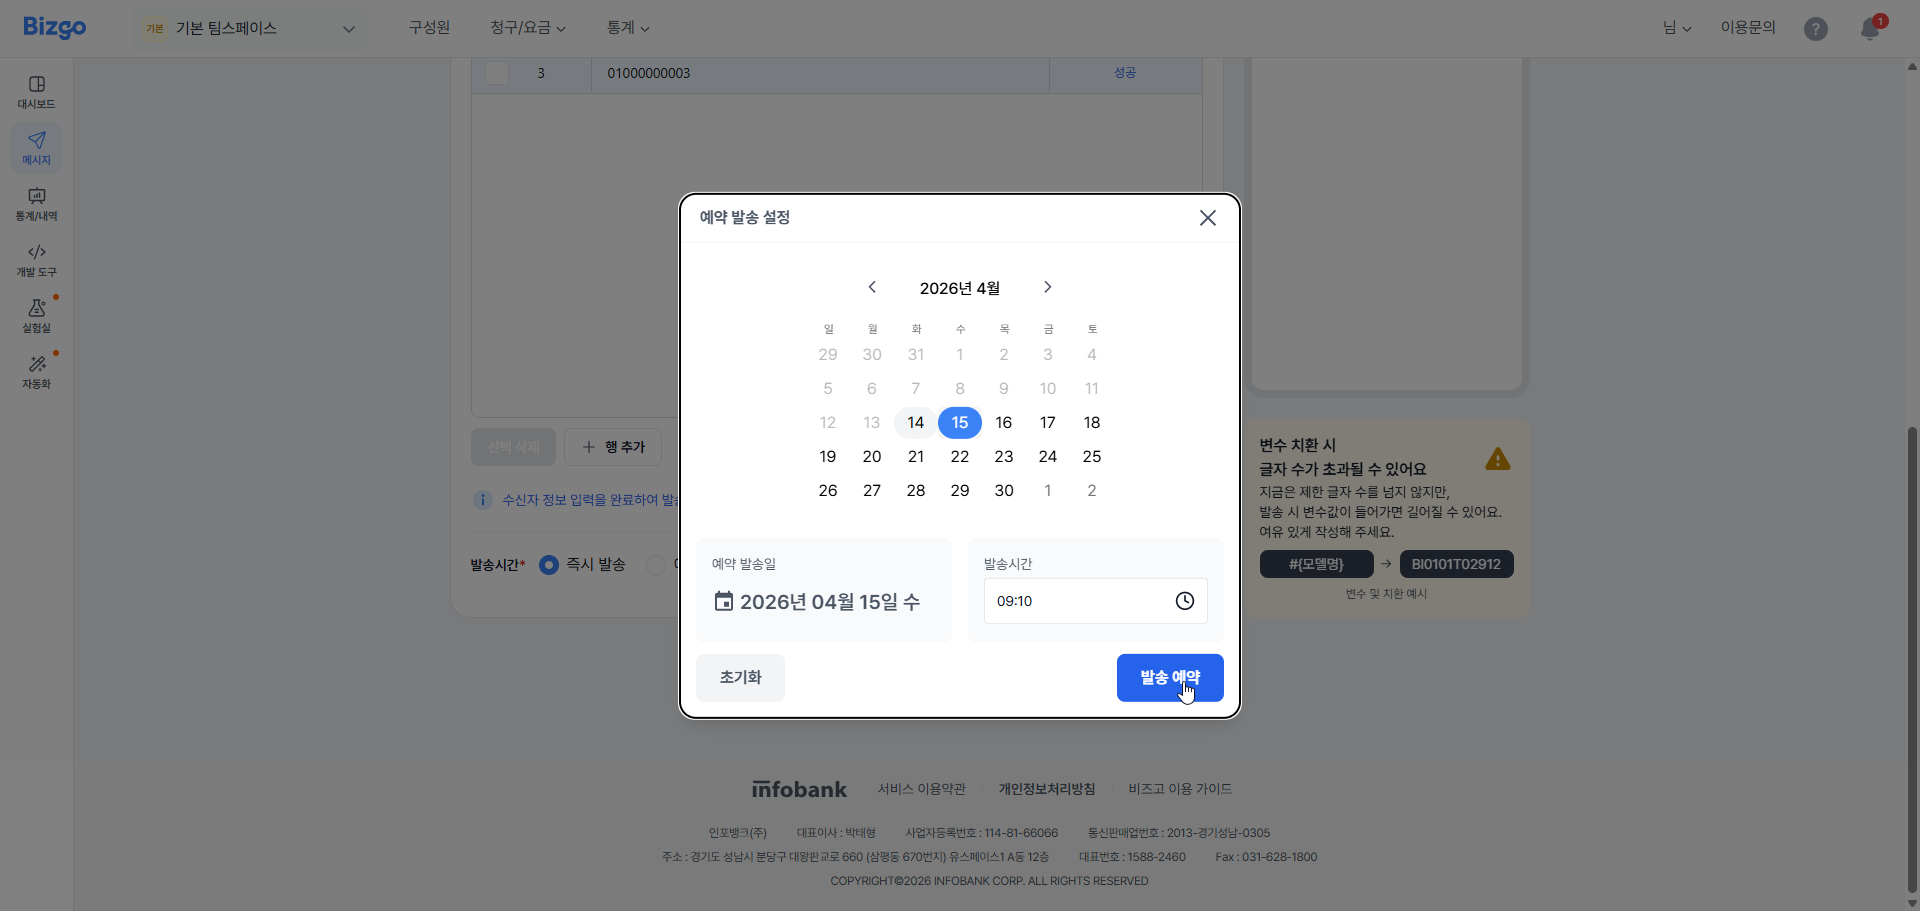
You can send the message immediately or schedule it for a specific time. To schedule it, select Reservation send (예약 발송) and choose the send date and time.
5. Send
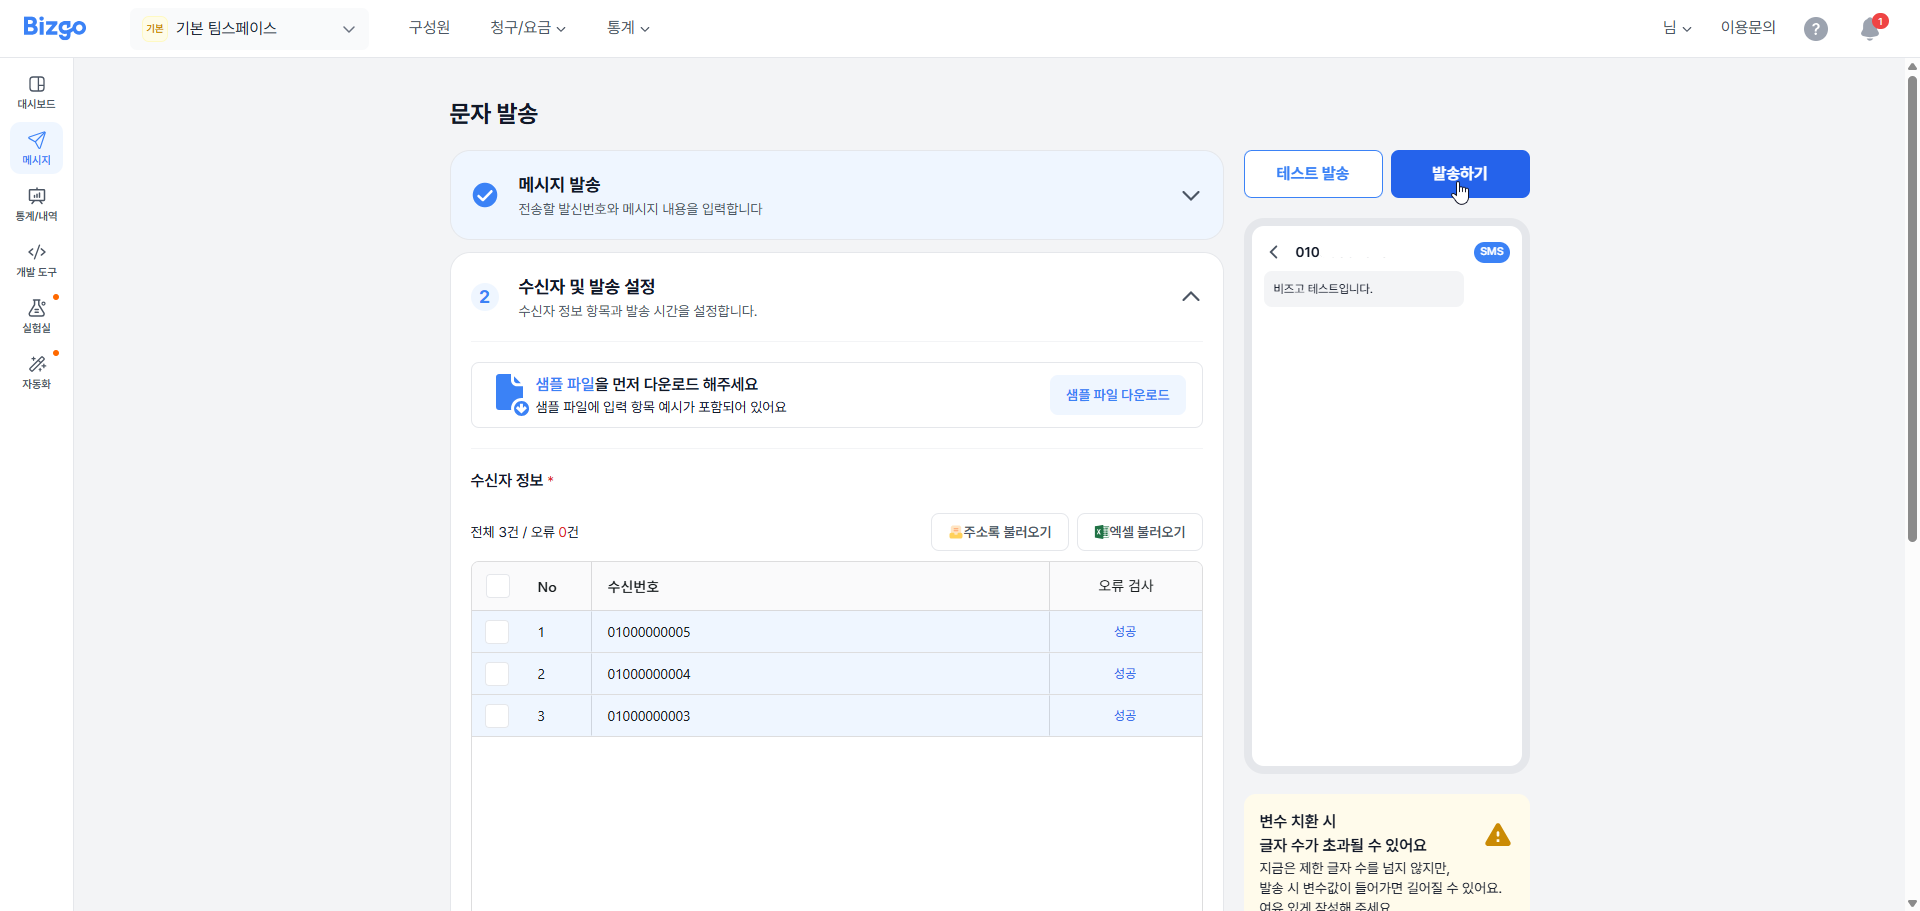
When you have finished entering everything, click the Send button. Check the total recipient count and the message type once more, then click the Send button to complete the send.
Send an Alimtalk message
1. Select the message send channel
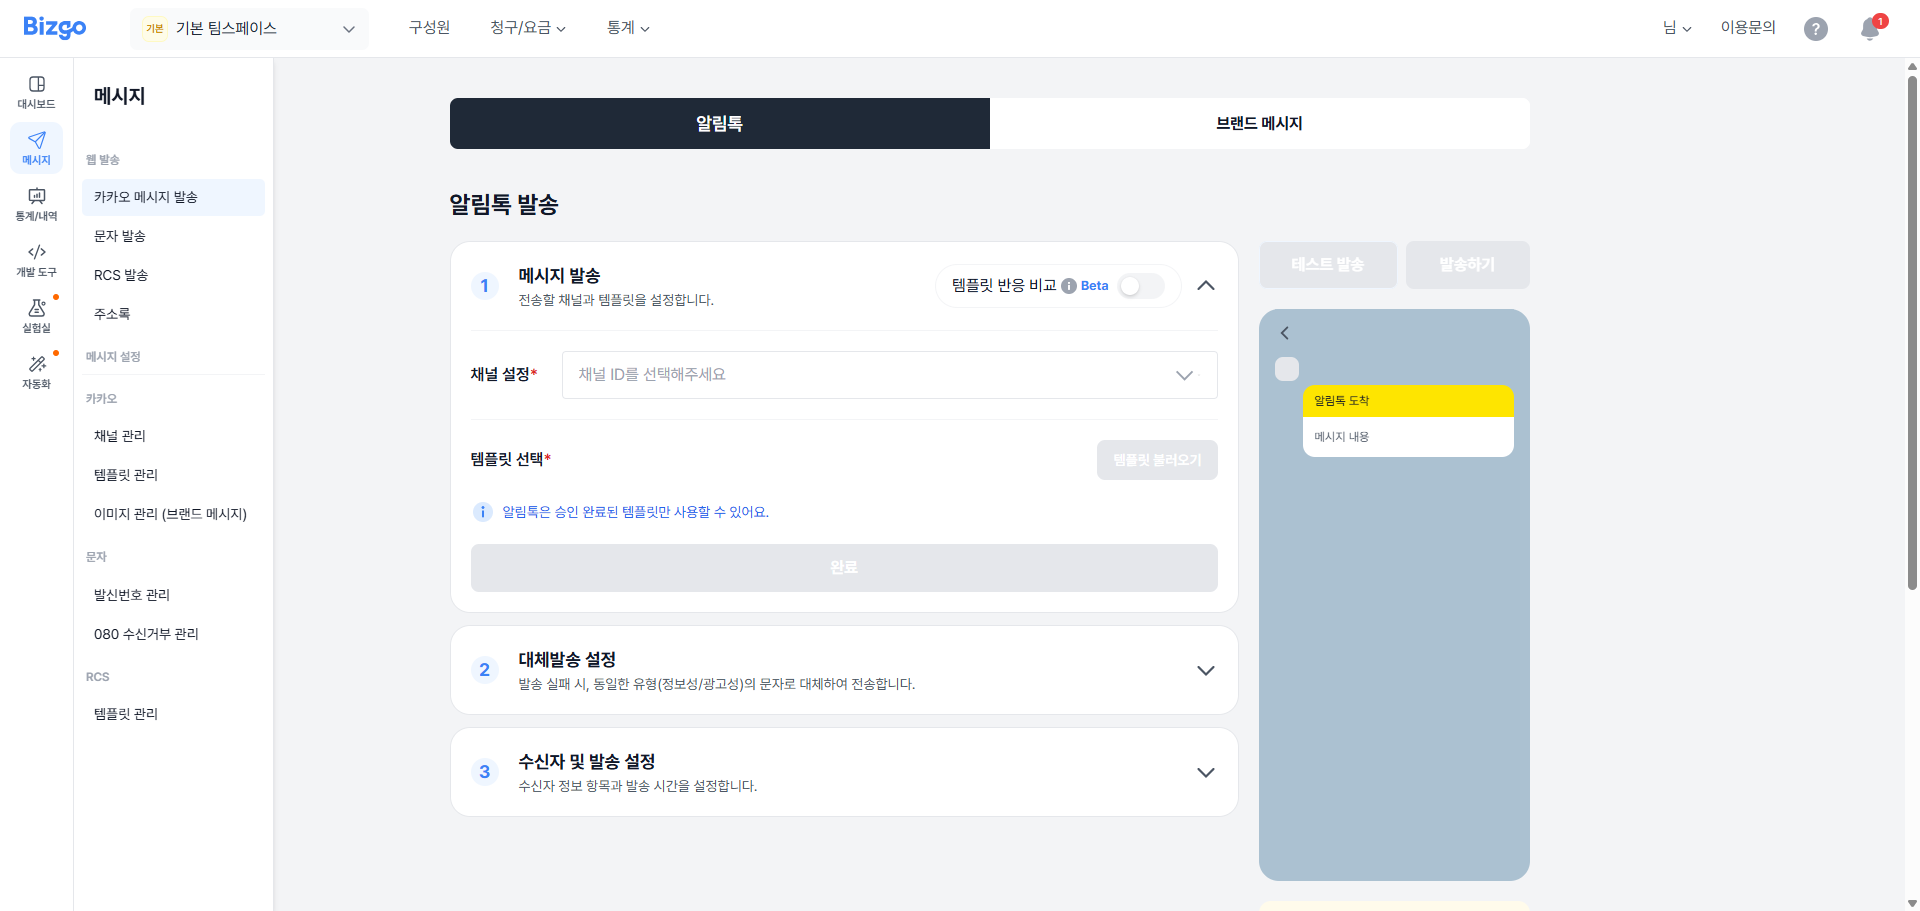
To send an Alimtalk template, click Web send > Kakao message send (카카오메시지발송) in the left menu of your team space.
Select the Kakao channel ID you want to send the Alimtalk from. You can load the templates registered to that channel and send an Alimtalk with them.
Template approval
Alimtalk only works with templates that have been approved.
Review-pass templates
You can send using review-pass templates, which are pre-approved in advance.
2. Load a template
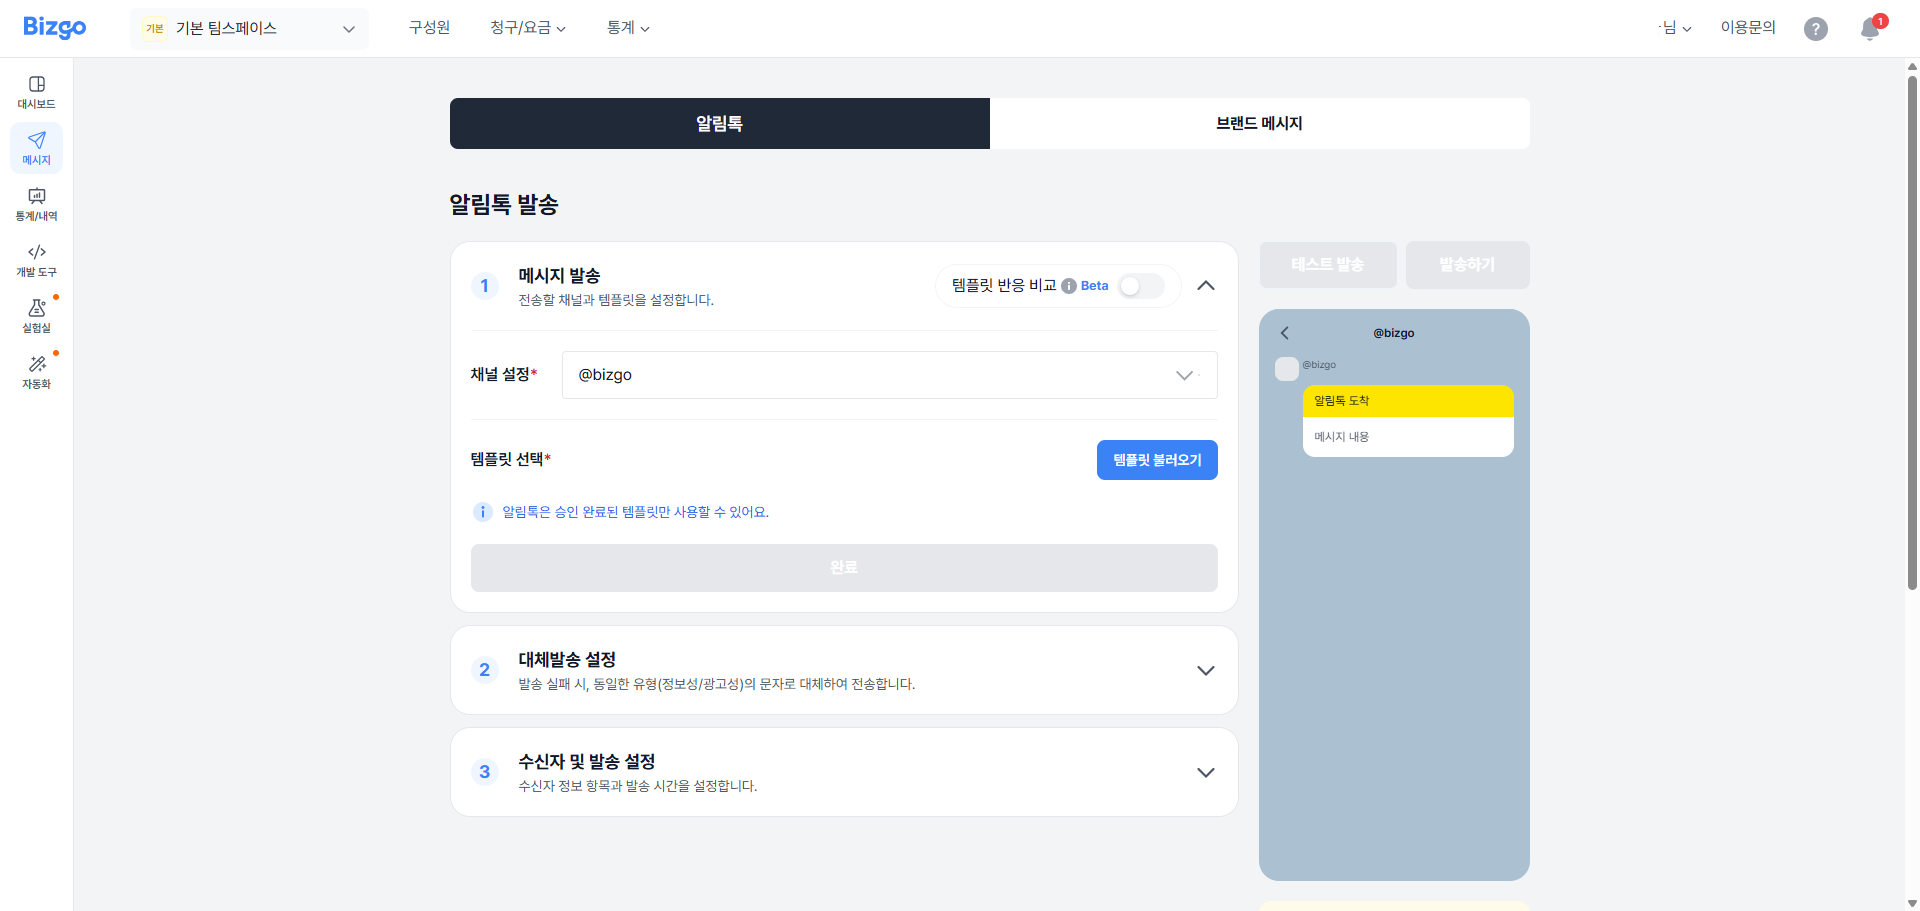
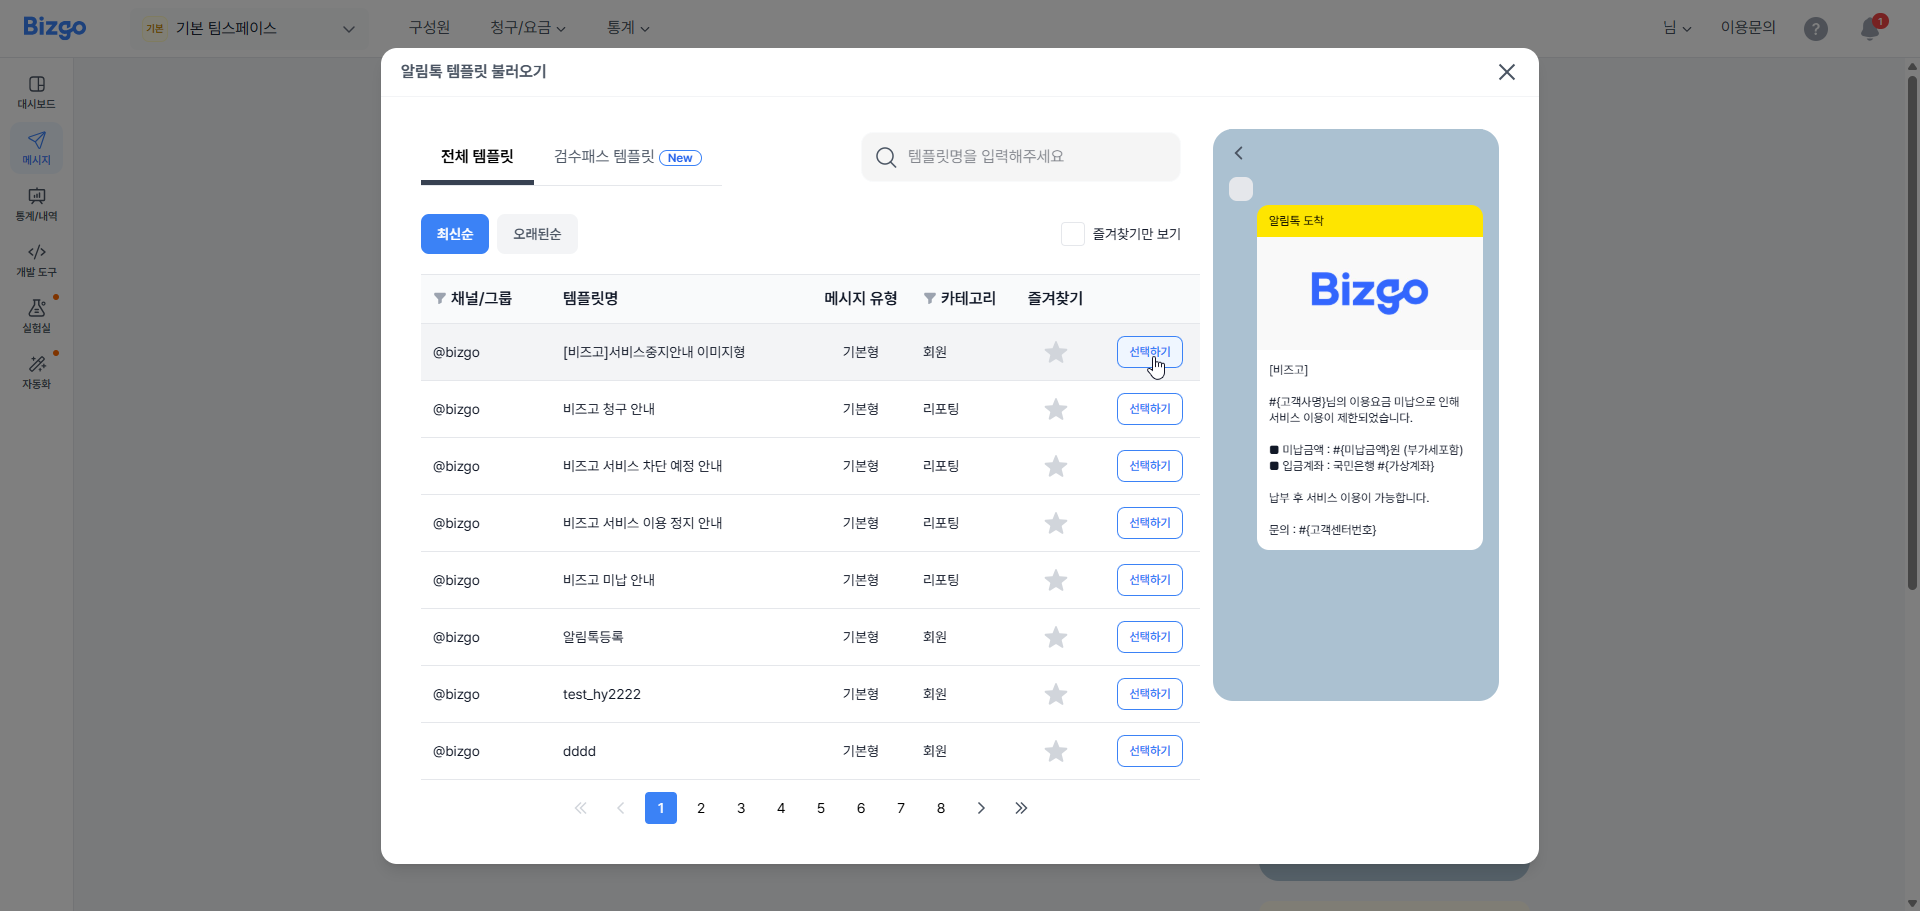
Click the Load template (템플릿 불러오기) button.
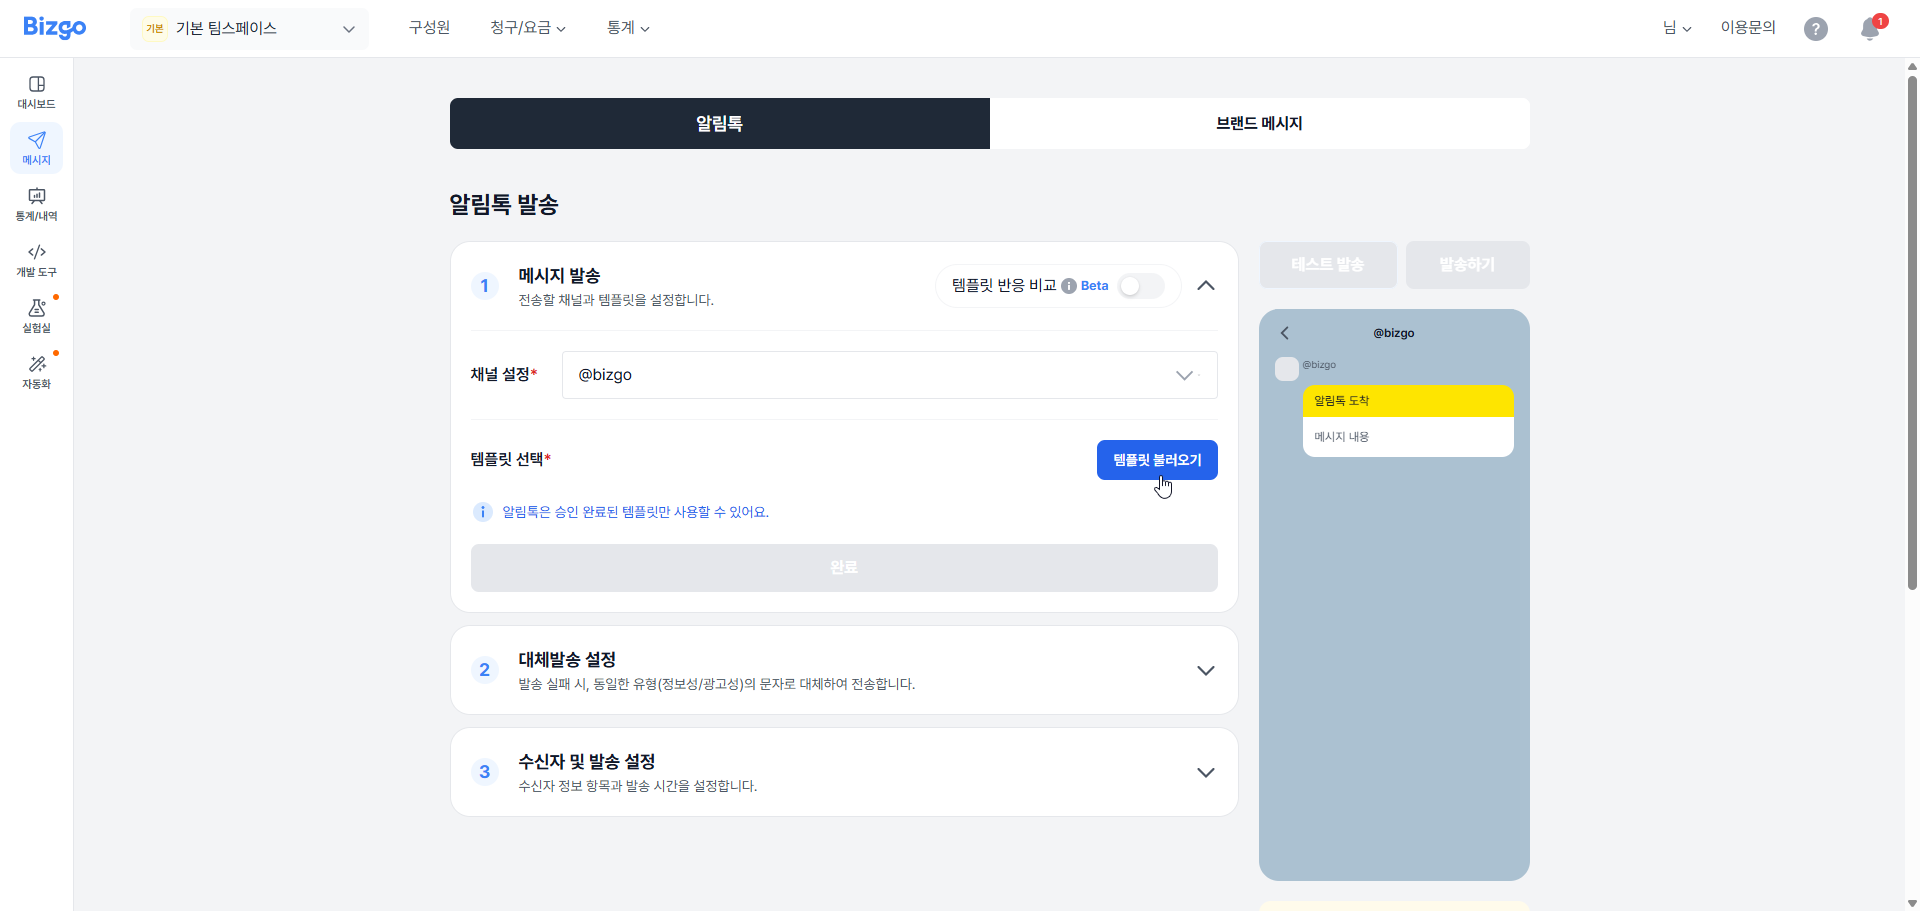
In the load message pop-up, click the Select (선택하기) button on the template you want to send. You can mark templates you use often with Favorites (즐겨찾기).
3. Review the template content
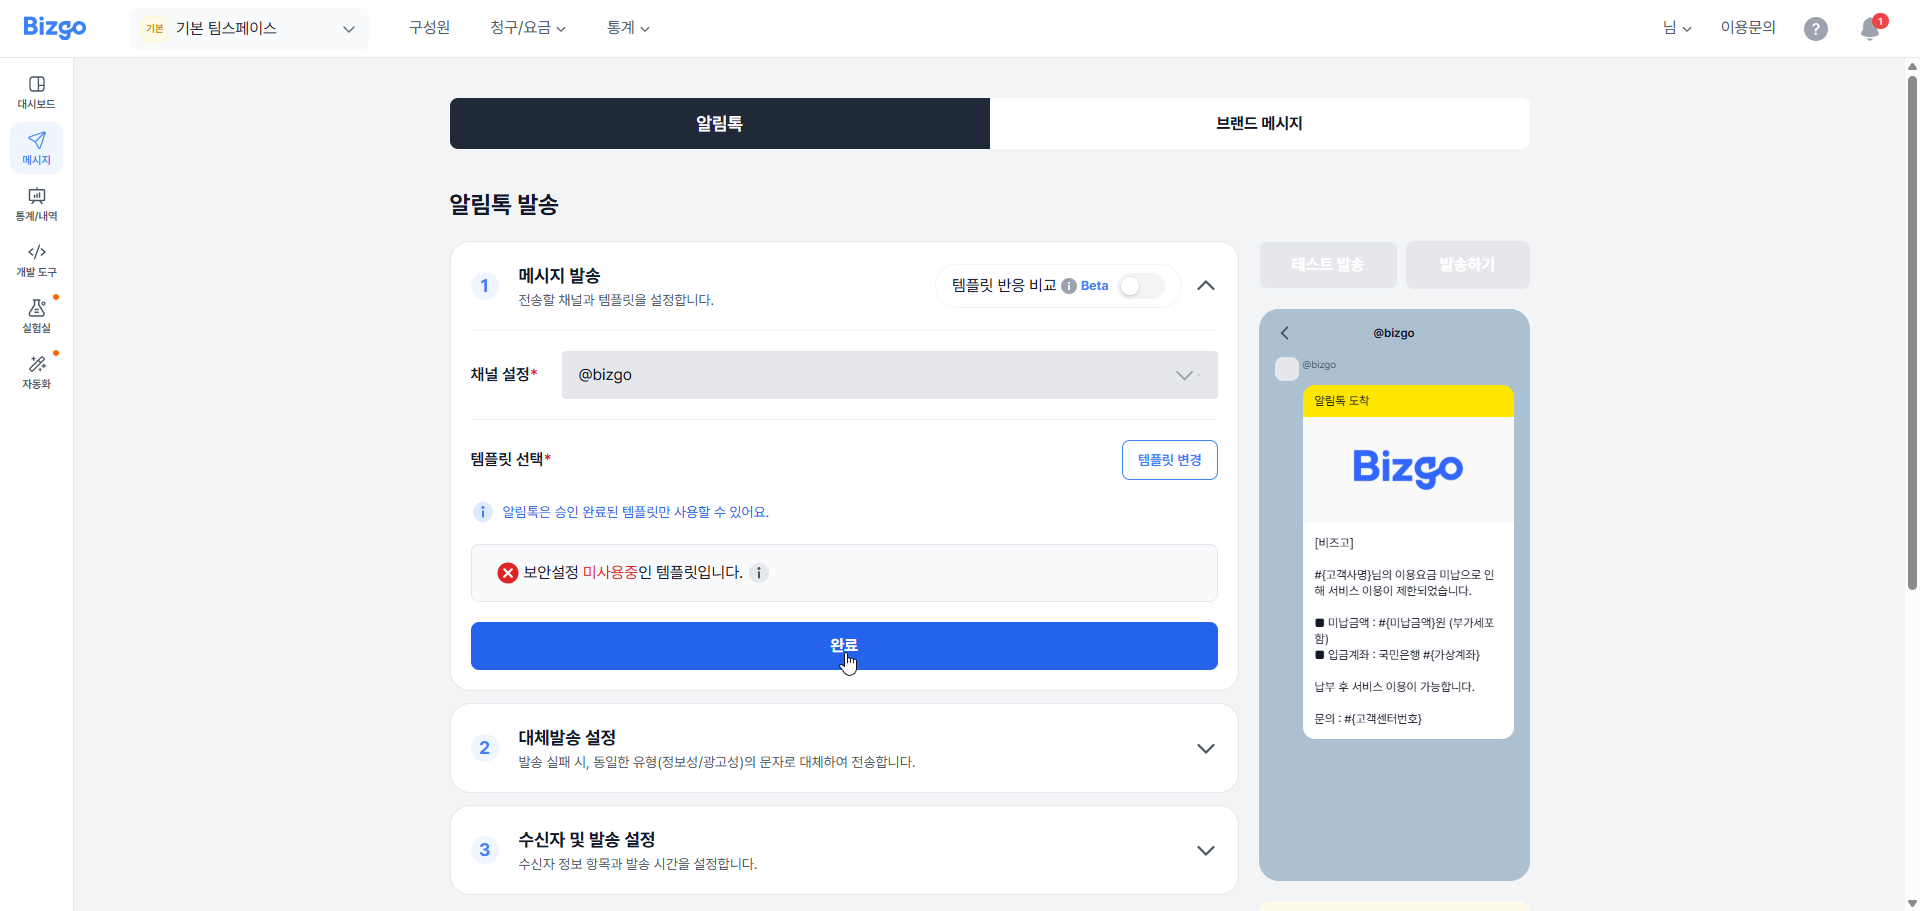
Review the content and the mockup of the selected template, then click the Confirm button to finish choosing the Alimtalk to send.
4. Configure failover text
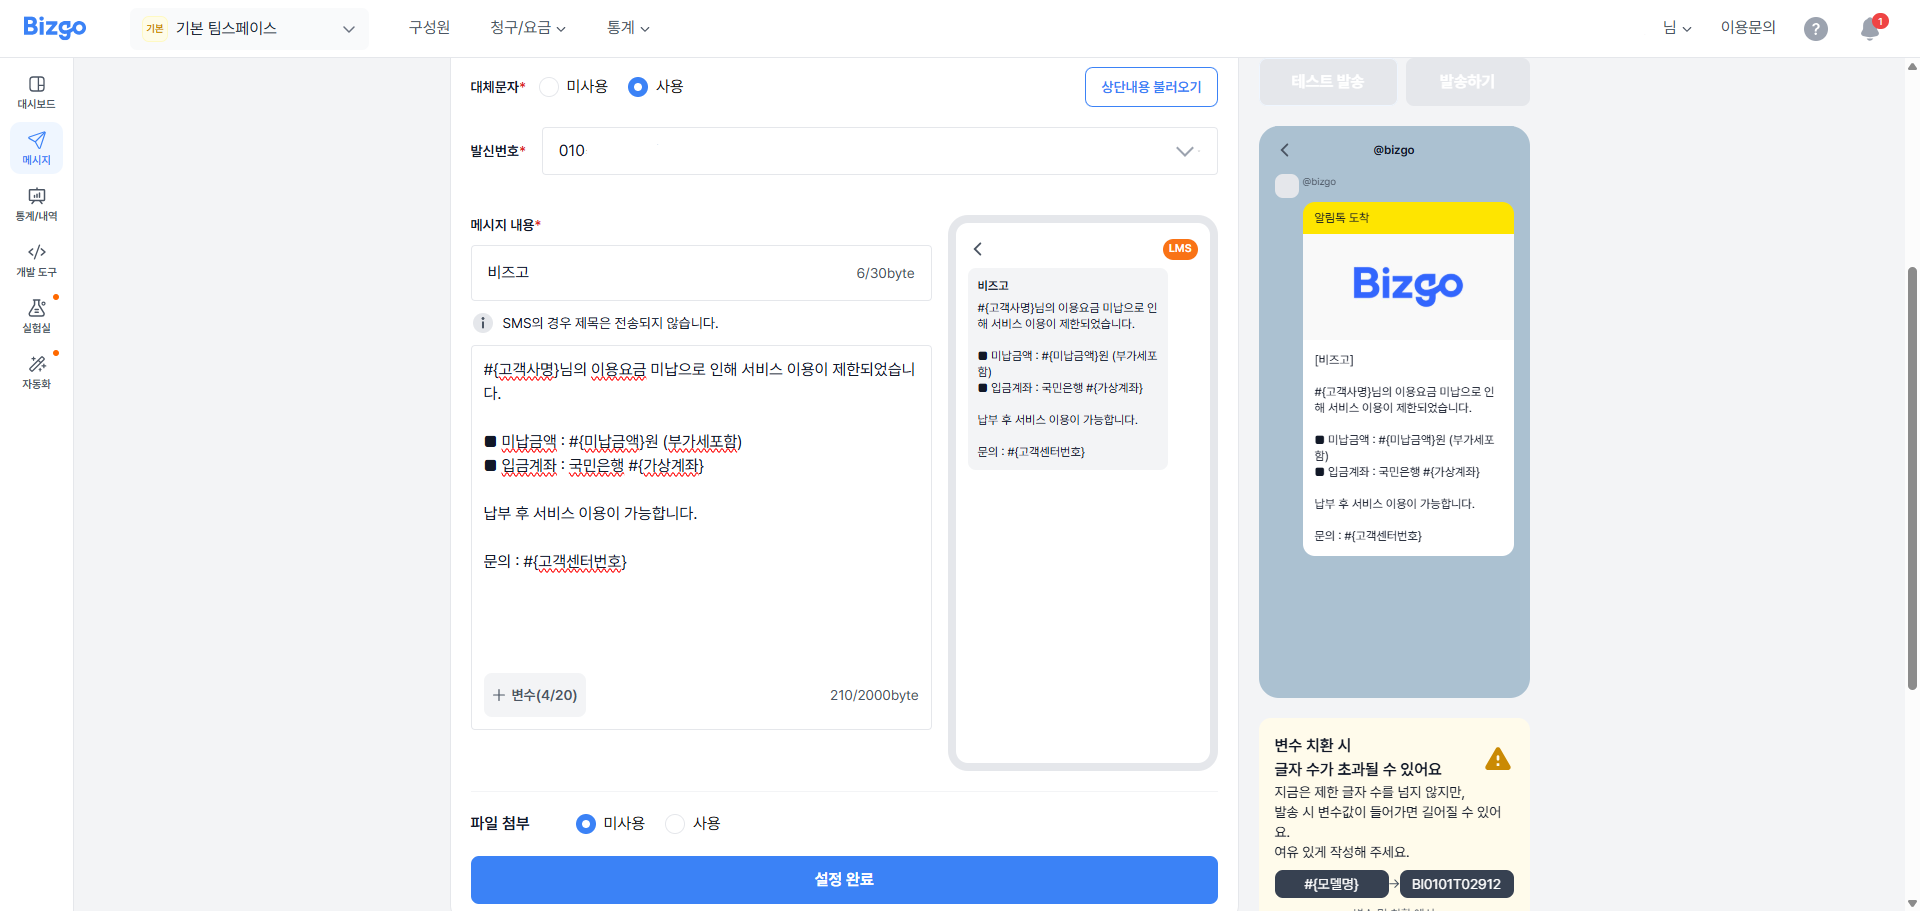
Choose whether to send a failover SMS/LMS/MMS when the Alimtalk send fails. If you enable it, enter the sender number and the message details.
5. Configure recipients and delivery
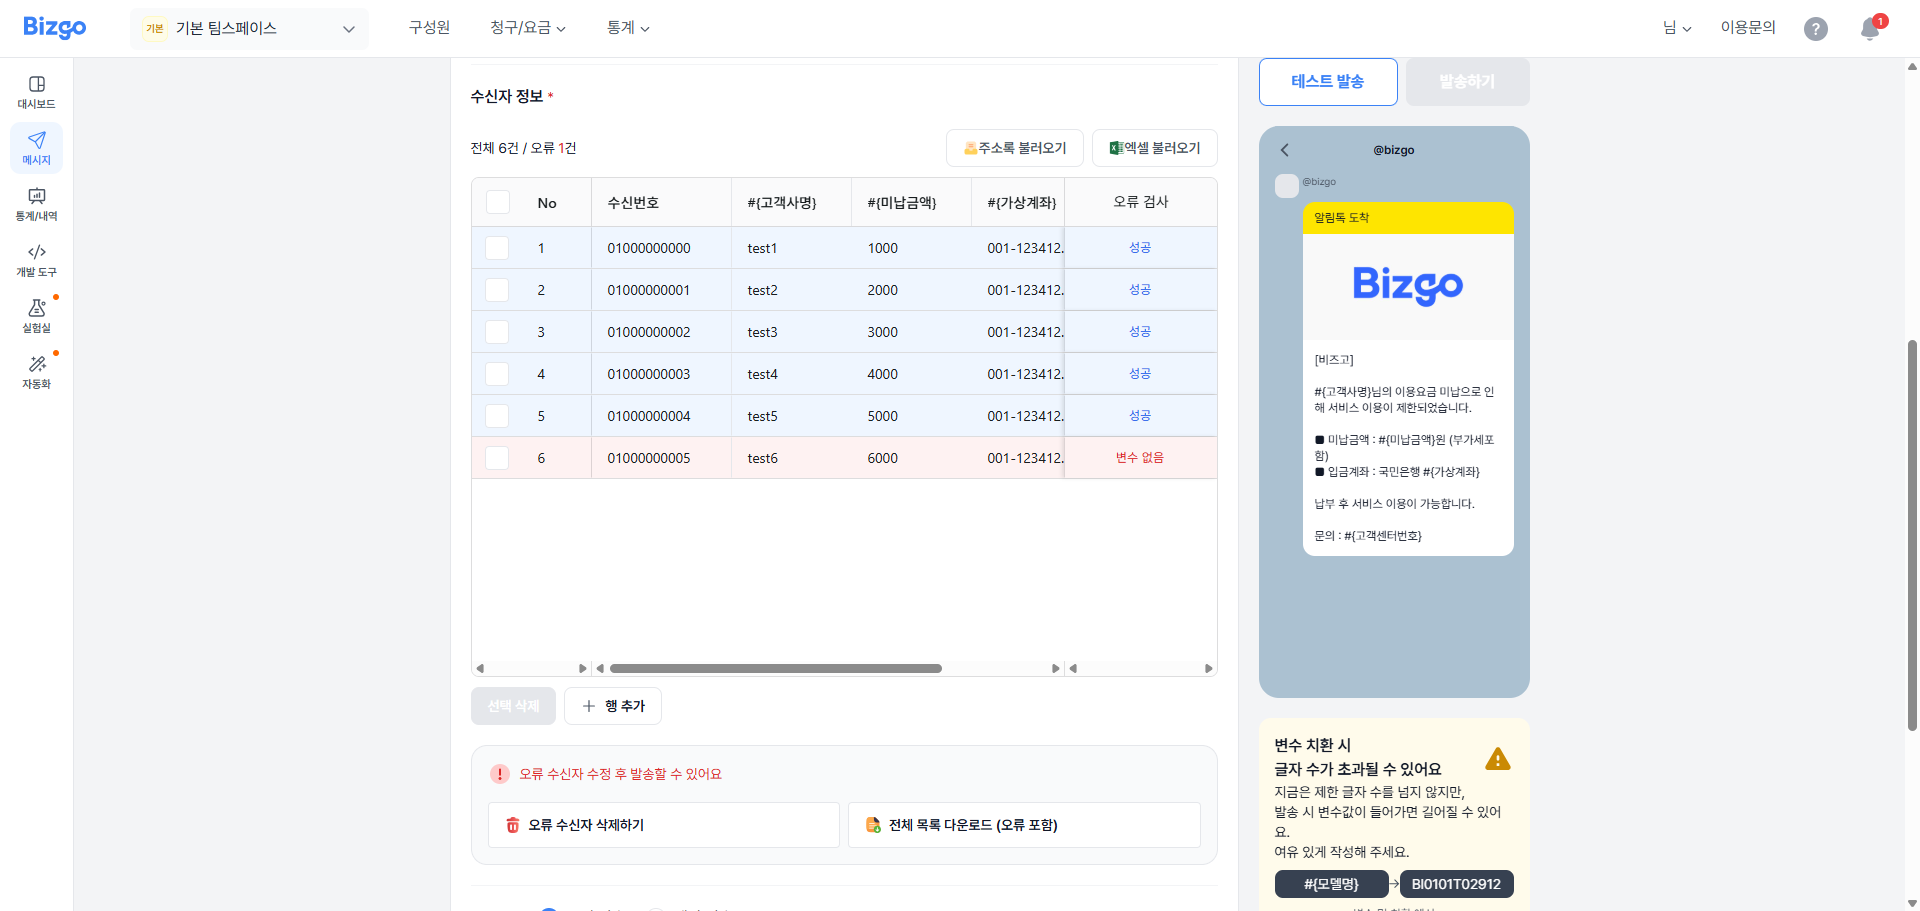
Enter the information for the recipients you want to send to.
| Error status | Description |
|---|---|
| 번호없음 (No number) | The recipient's mobile number was not entered |
| 번호오류 (Invalid number) | The recipient's mobile number is in the wrong format |
| 중복번호 (Duplicate number) | The recipient's mobile number and variables are duplicated |
| 변수없음 (Missing variable) | A variable used in the message content was not entered in the recipient information |
| 길이초과 (Length exceeded) | The combined message content and variables exceed the byte limit for the message |
- Edit the cell directly to fill in the missing value and clear the error.
- If there are many errors, download the list with Download full list (including errors) (전체 목록 다운로드(오류 포함)), correct them in bulk in Excel, and re-upload.
- Remove unneeded error rows all at once with Delete error recipients (오류 수신자 삭제하기).
Requirements for sending
Every error must be resolved before you can send. Check that the "오류 수신자 수정 후 발송할 수 있어요" ("You can send once you fix the recipients with errors") notice at the bottom of the screen disappears.
Click the Load from address book button to pull contacts registered in the address book into the recipient information.
Click the Load Excel file button to pull contacts you entered in Excel into the recipient information. Click the Download sample file button, enter the contact details following the input template, then click the Load Excel (엑셀 불러오기) button to register them.
Excel file upload
An Excel file can hold up to 200,000 records.
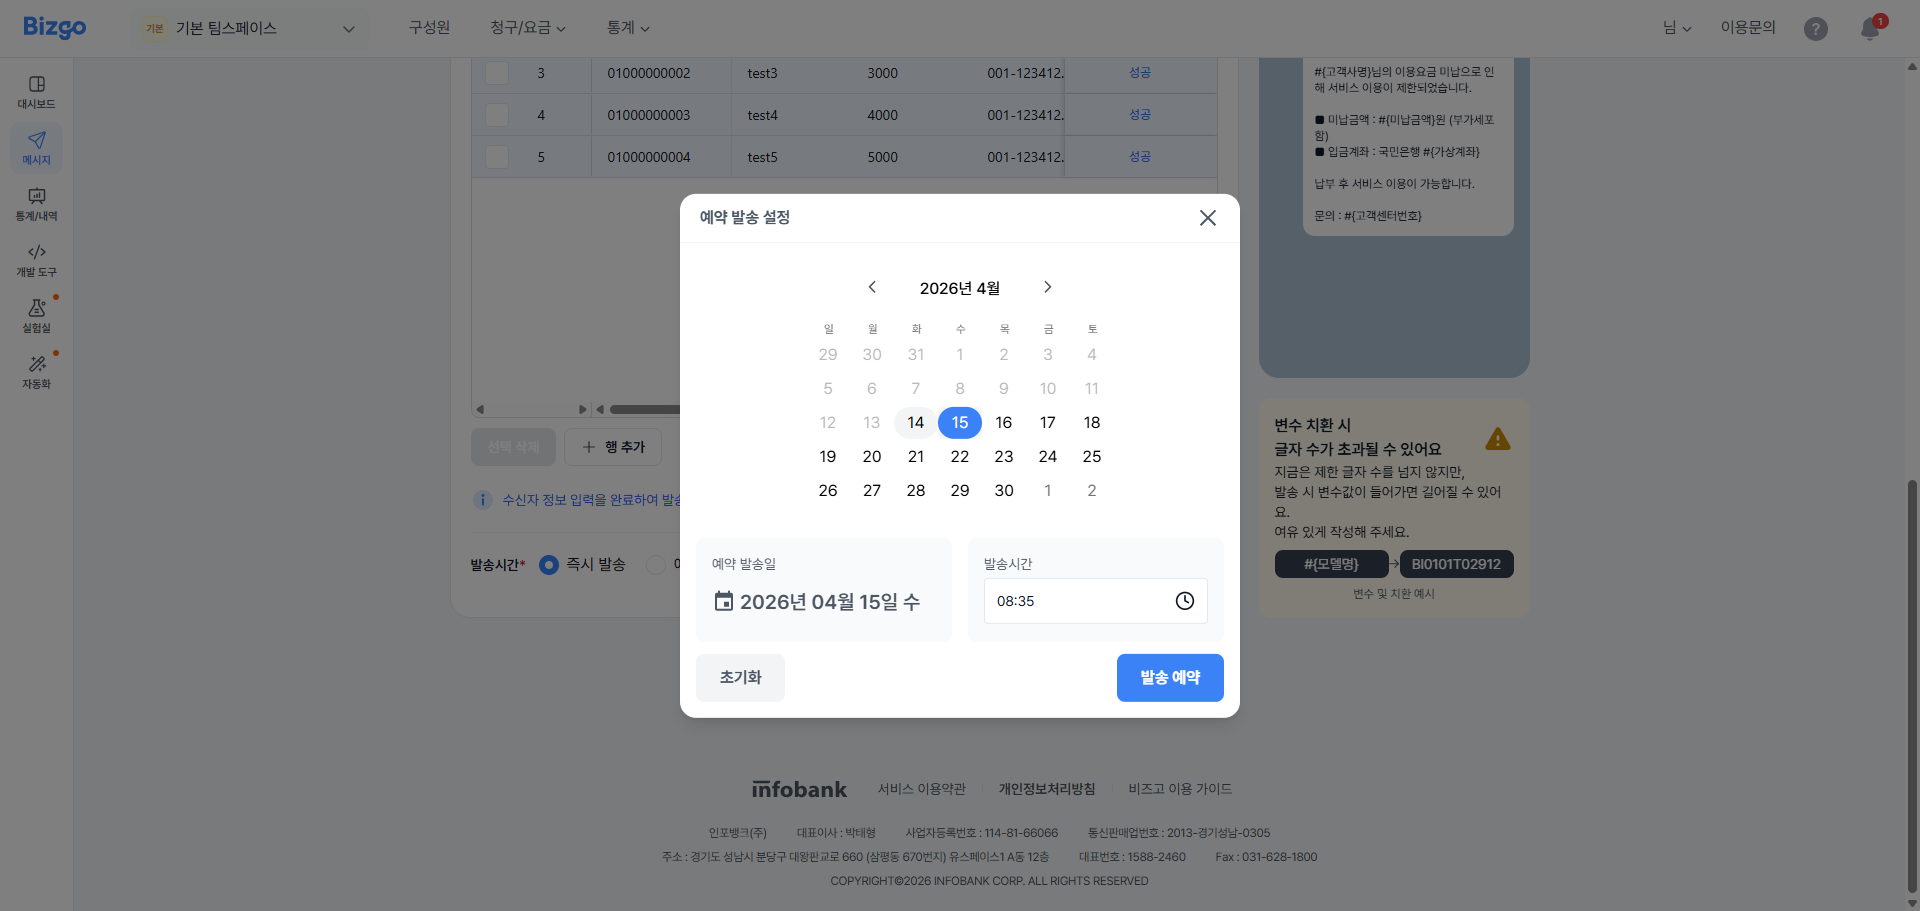
6. Configure the reservation
You can send the message immediately or schedule it for a specific time. To schedule it, select Reservation send and choose the send date and time.
7. Run a test send
Click Test send (테스트 발송) at the top right to send to a small group (up to 5 people) and verify variable substitution, line breaks, links, character counts, and more on a real device.
In the test send pop-up, enter a recipient number, click Add (추가), then choose the send method.
- 알림톡 발송 (Alimtalk send)
- 알톡 + 실패 시 대체발송 (Alimtalk + failover on failure)
About test sends
Clicking Test send sends immediately and is charged.
8. Send
When you have finished entering everything, click the Send button. Check the total recipient count and the message type once more, and if you configured failover text, check the message type that will be used for the failover send as well. After confirming everything, click Send now (발송하기).
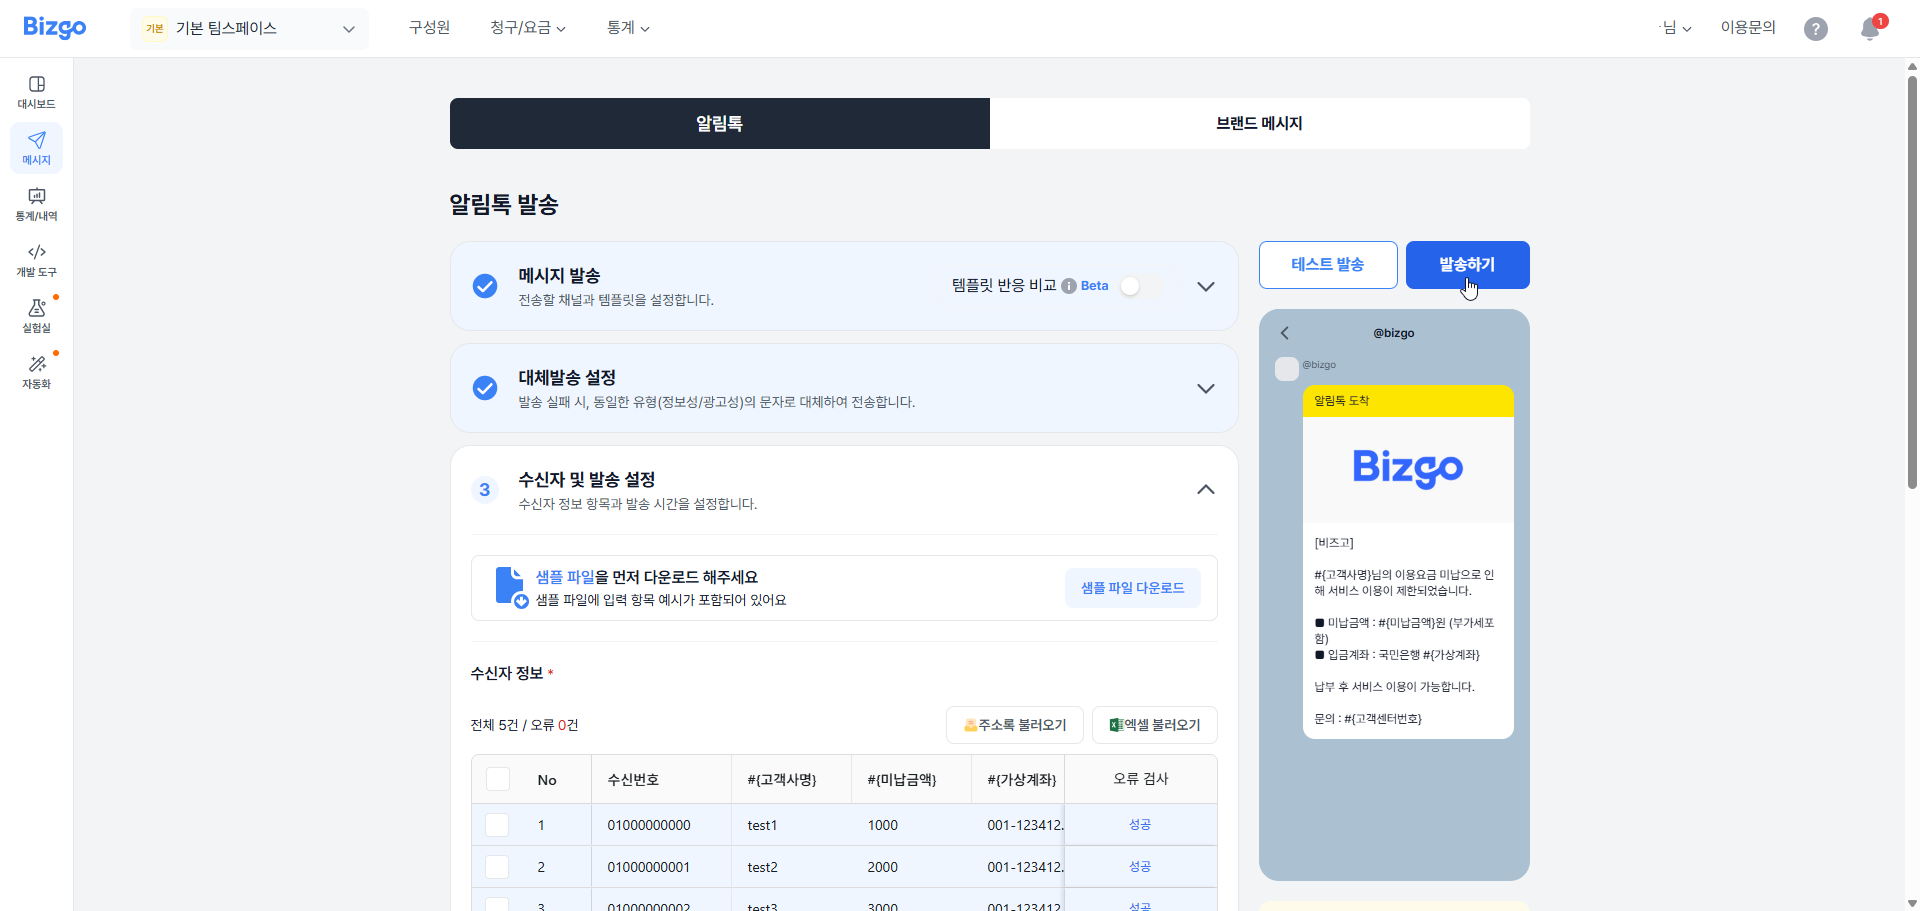
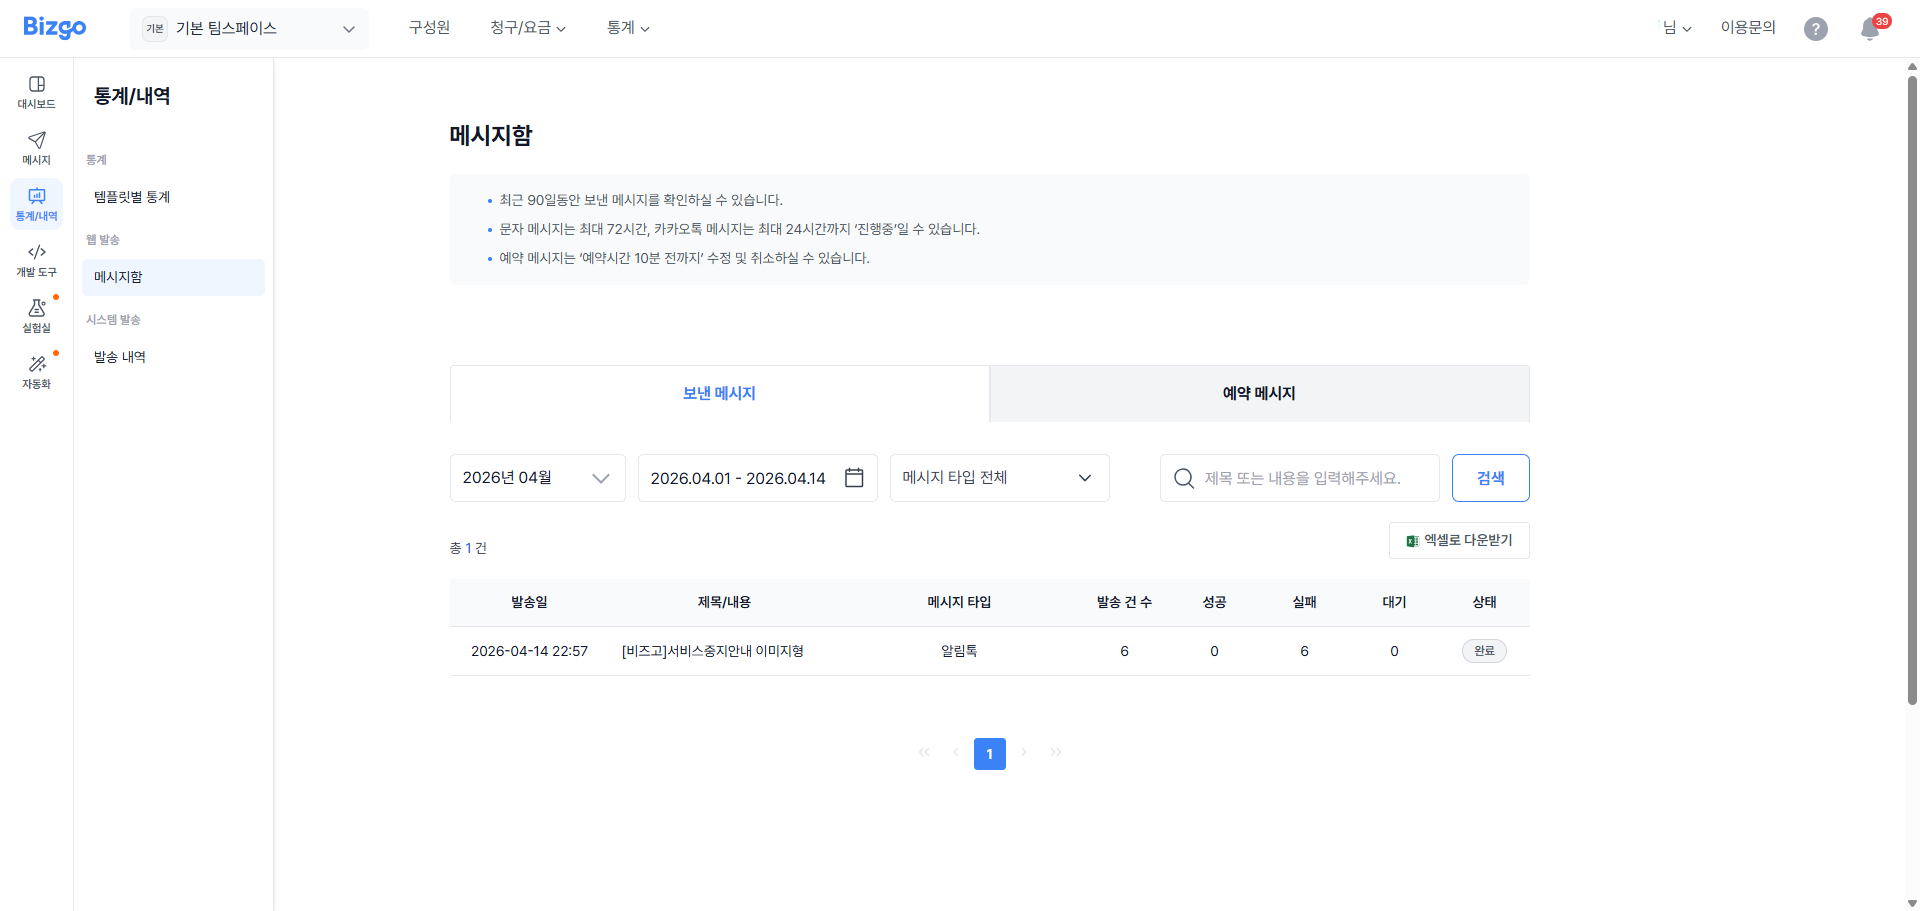
Send request failed — If the message send request fails, you can review the failed records and the reasons. Download the Excel file, check the cause of failure, and then retry the send.
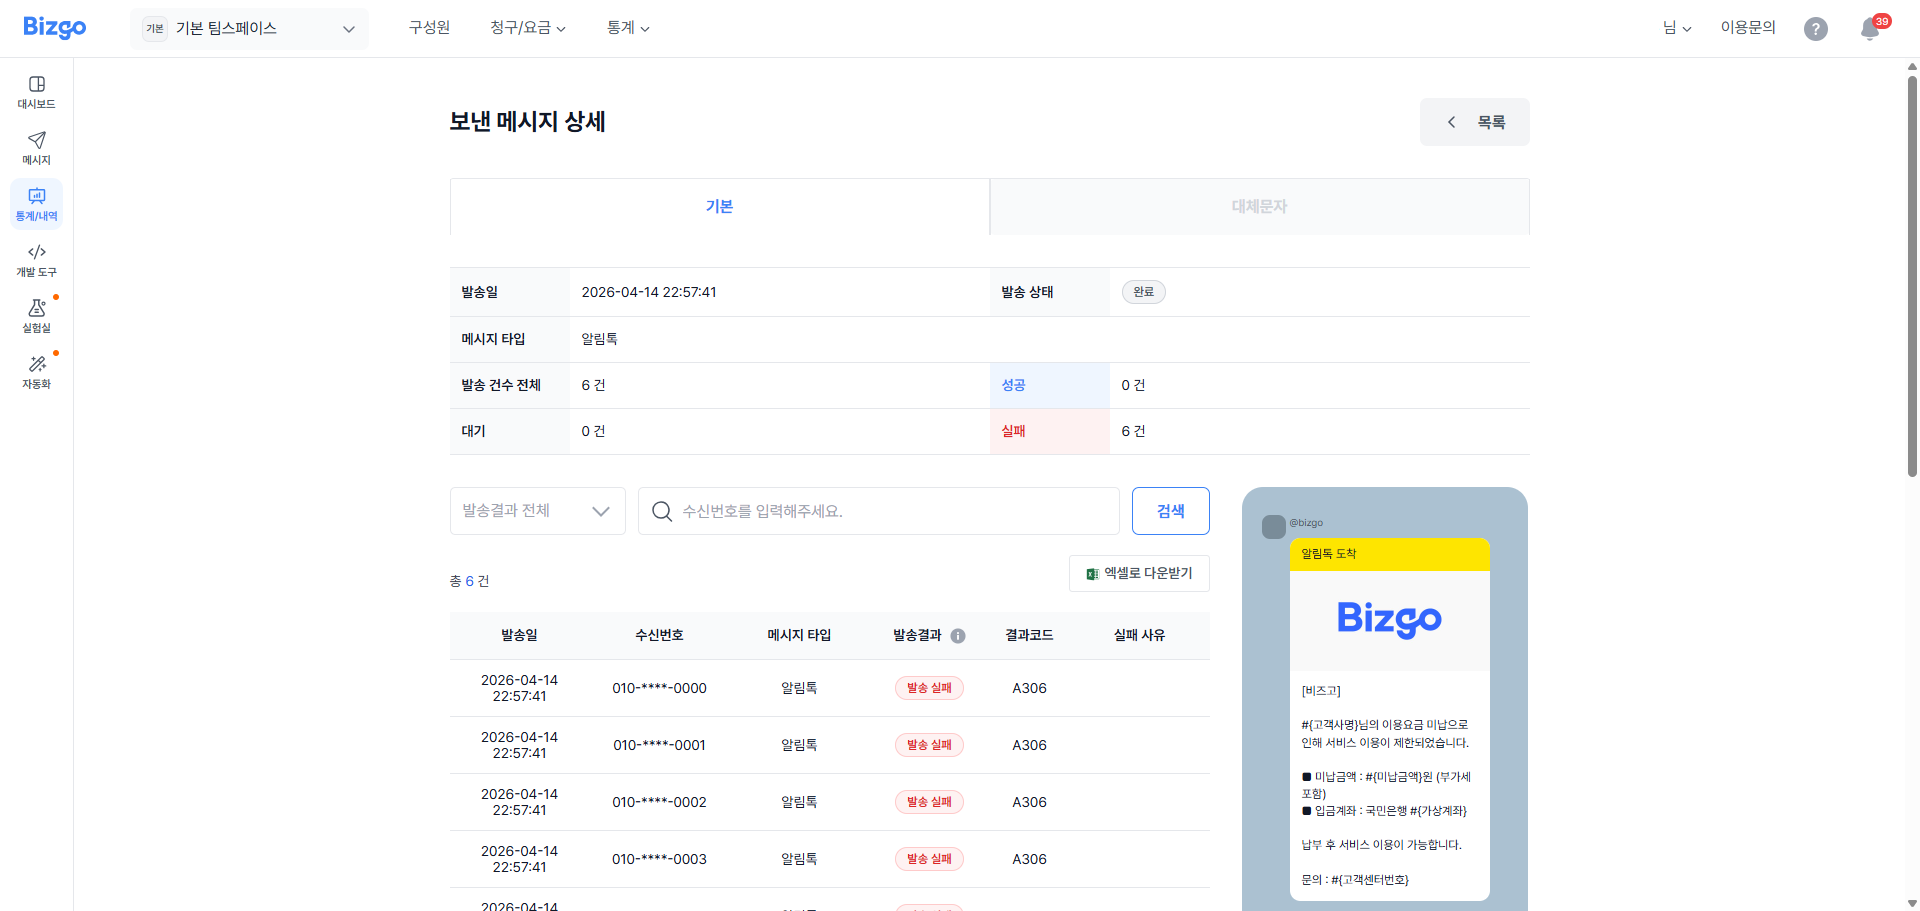
Send request succeeded — When the message send is accepted successfully, an acceptance pop-up appears. You can check the delivery result in the message box.
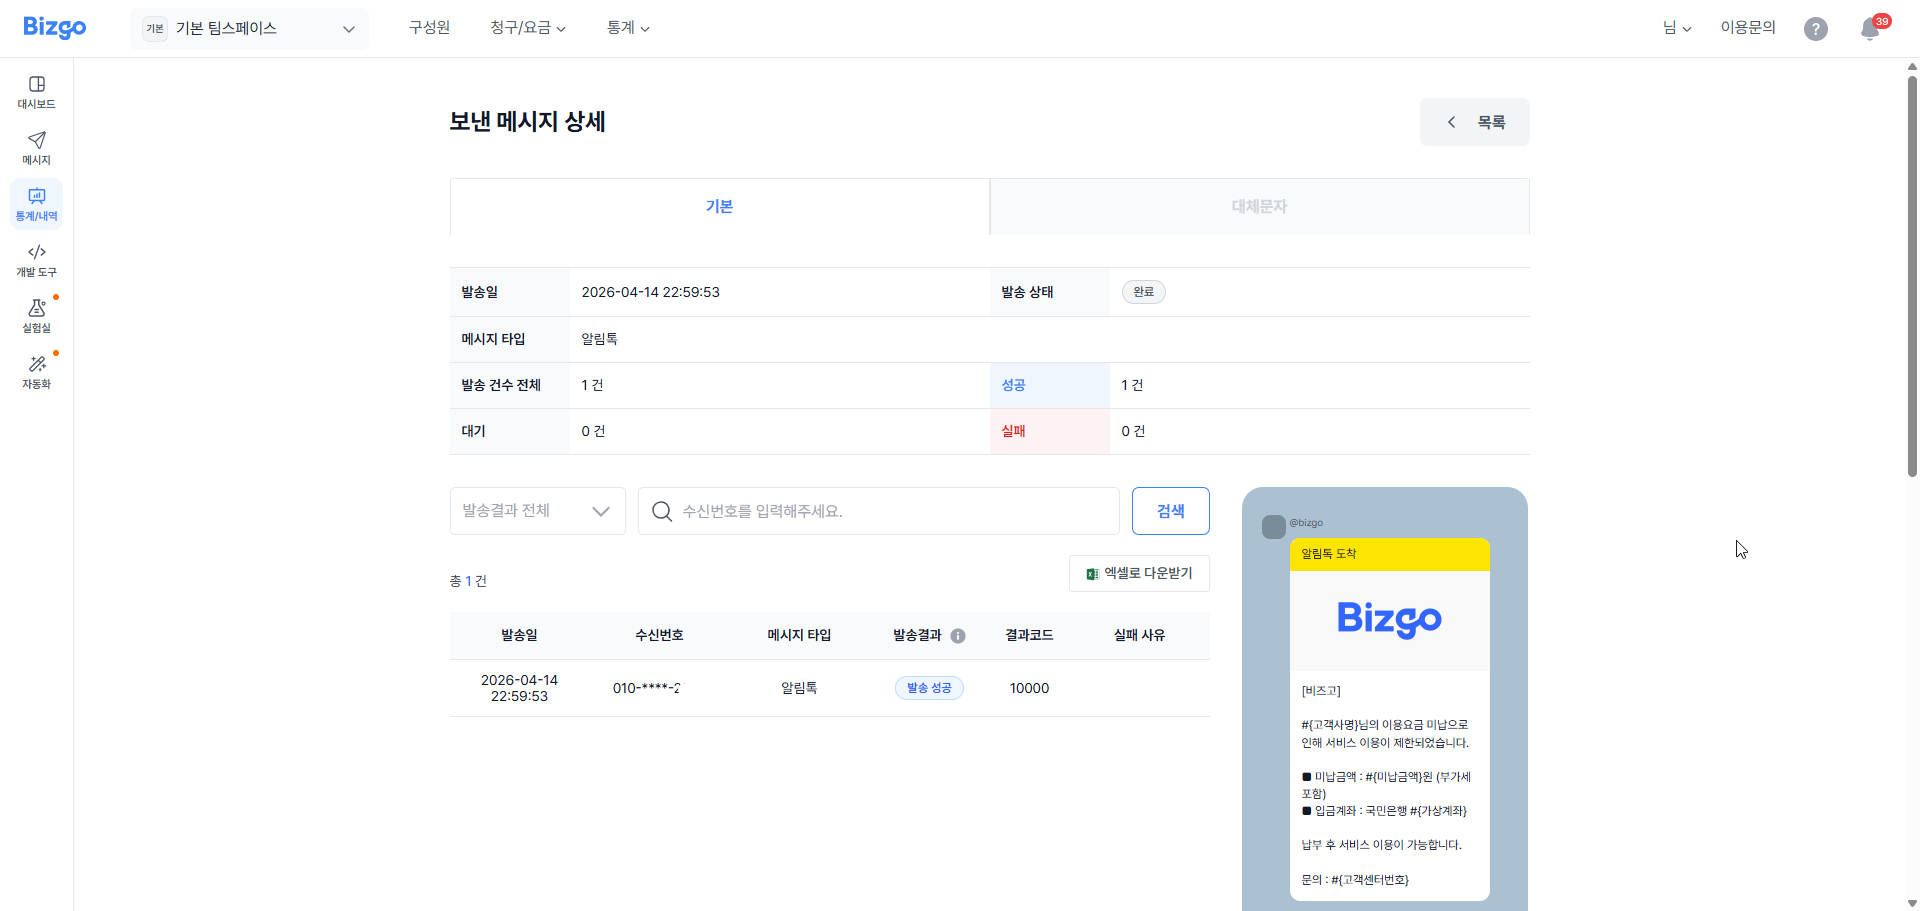
Send a Brand Message
Brand Message offers two send methods: basic (template) send and free-form (compose a new message) send.
Basic (template) send
With this method you load a registered template and send it.
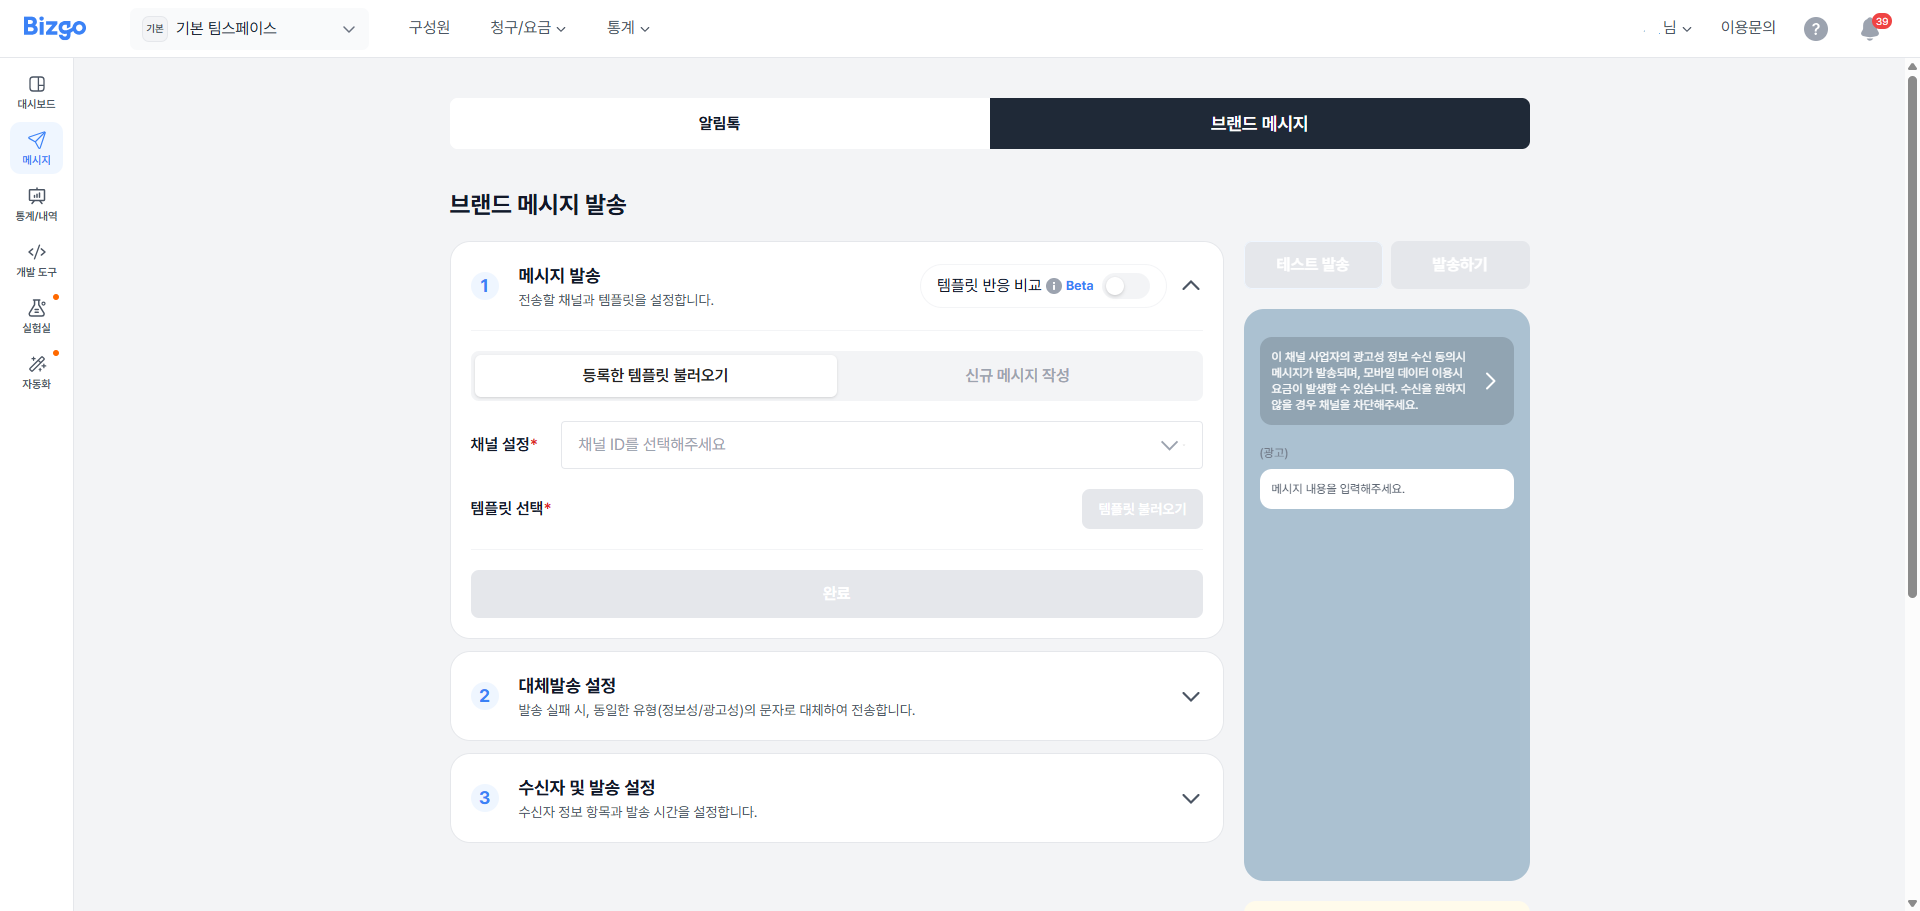
1. Load a template
On the Use template (템플릿 사용하기) tab, select the send channel, then click Load template and choose the template to use.
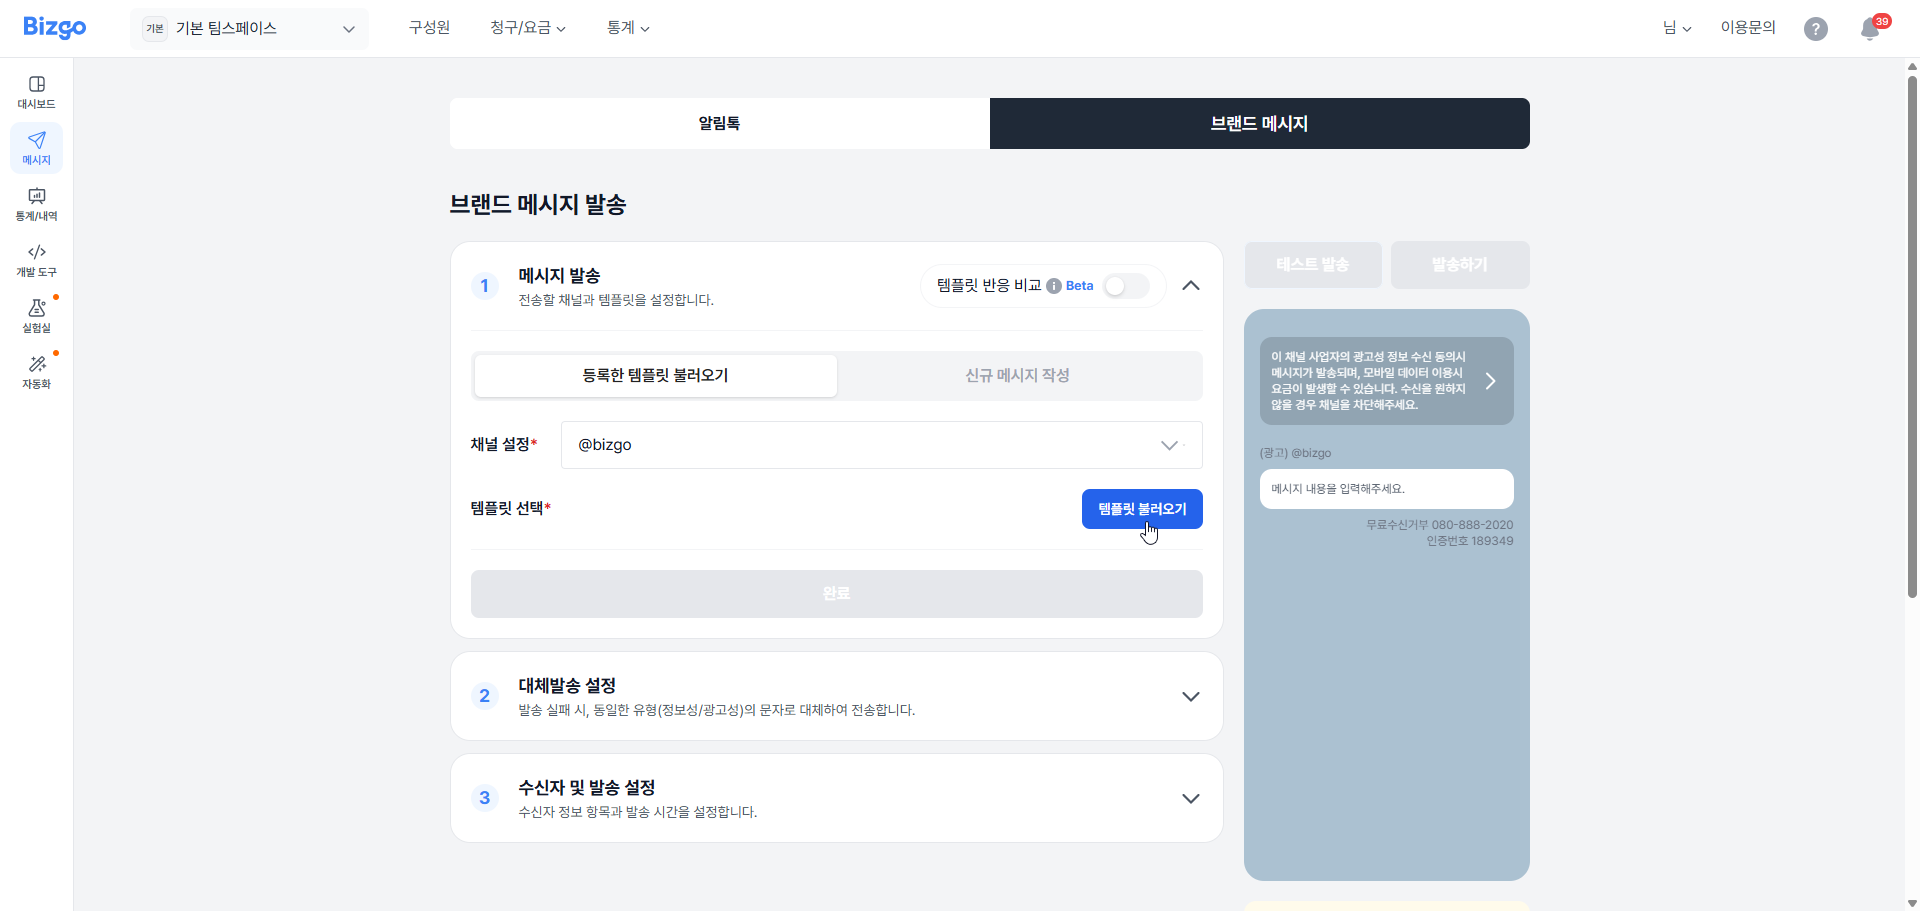
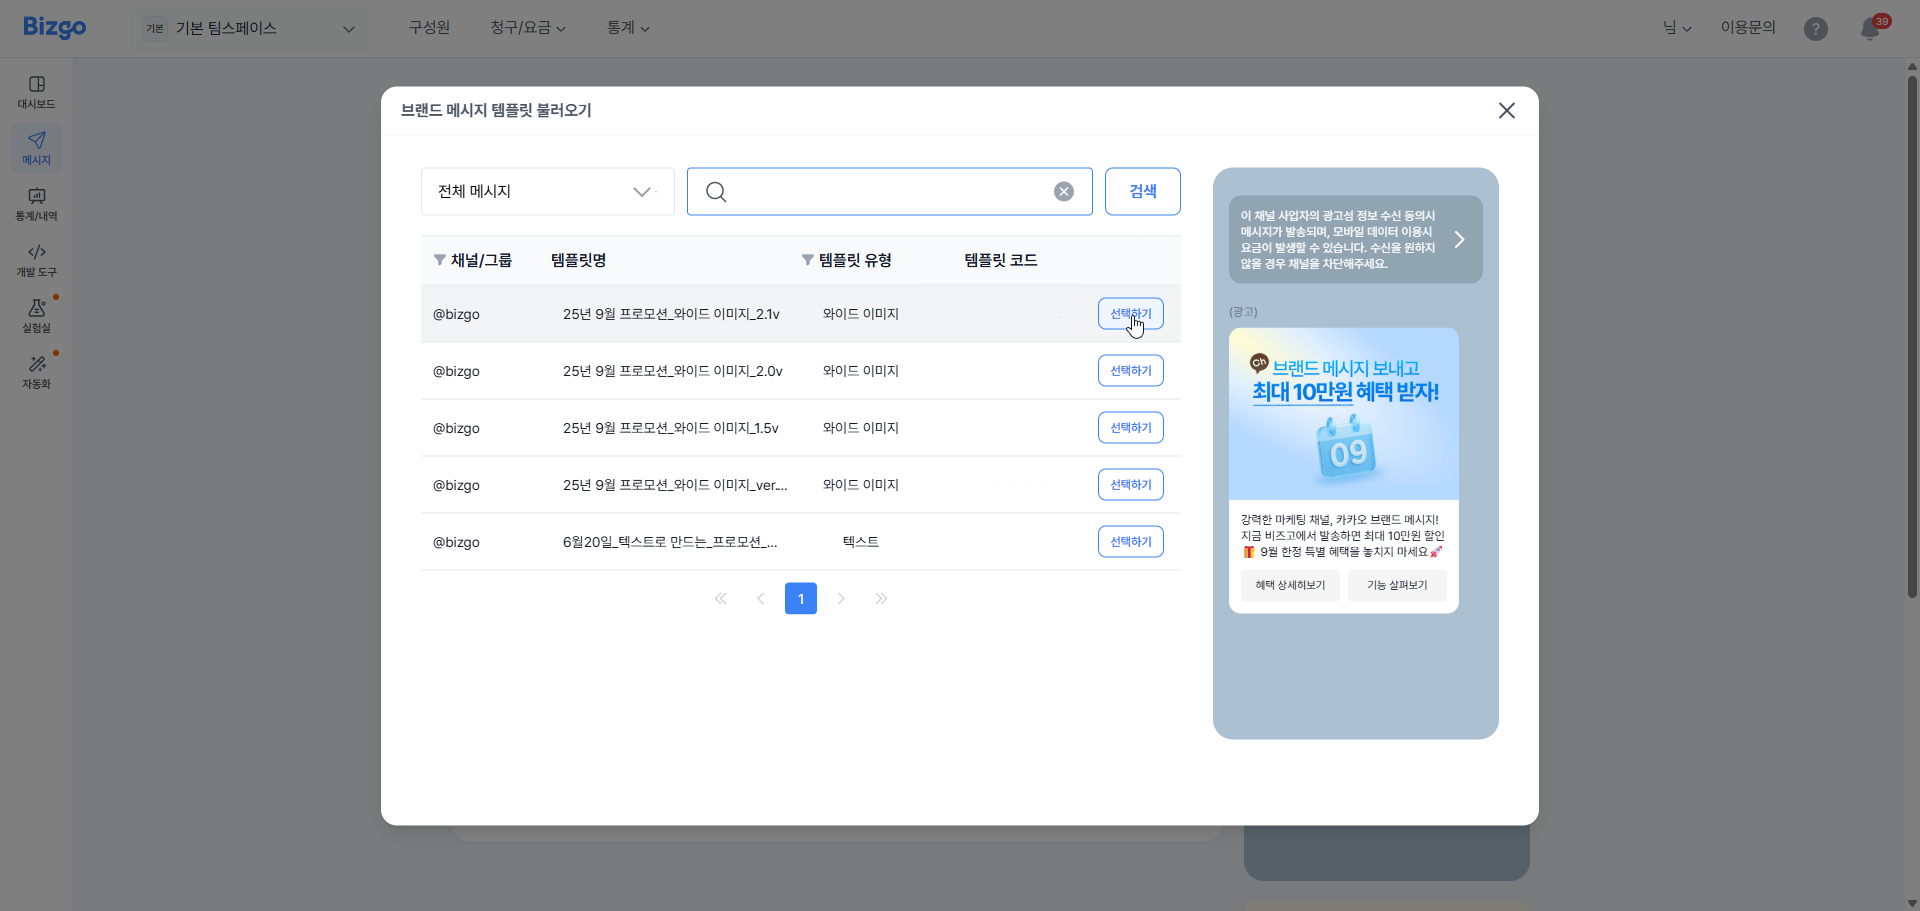
Clicking Load template opens the pop-up shown below. Review the template you want to use, then click the Select button to import it.
Once you select a template, it appears on the screen.
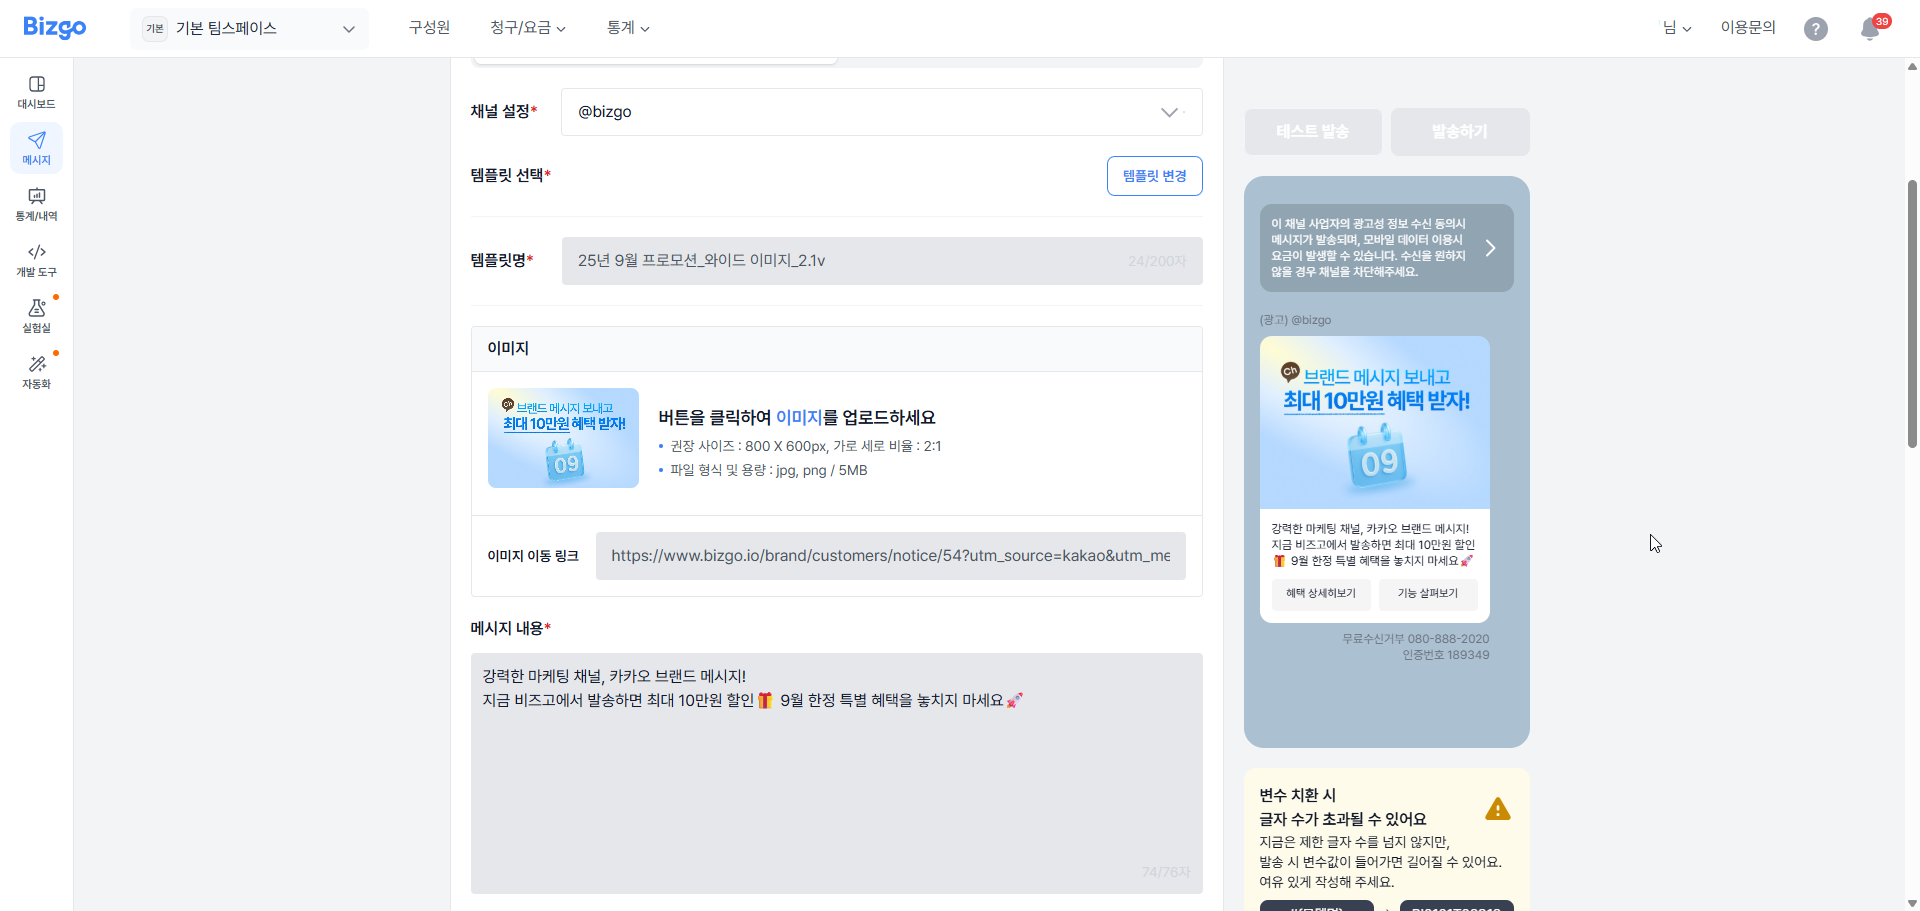
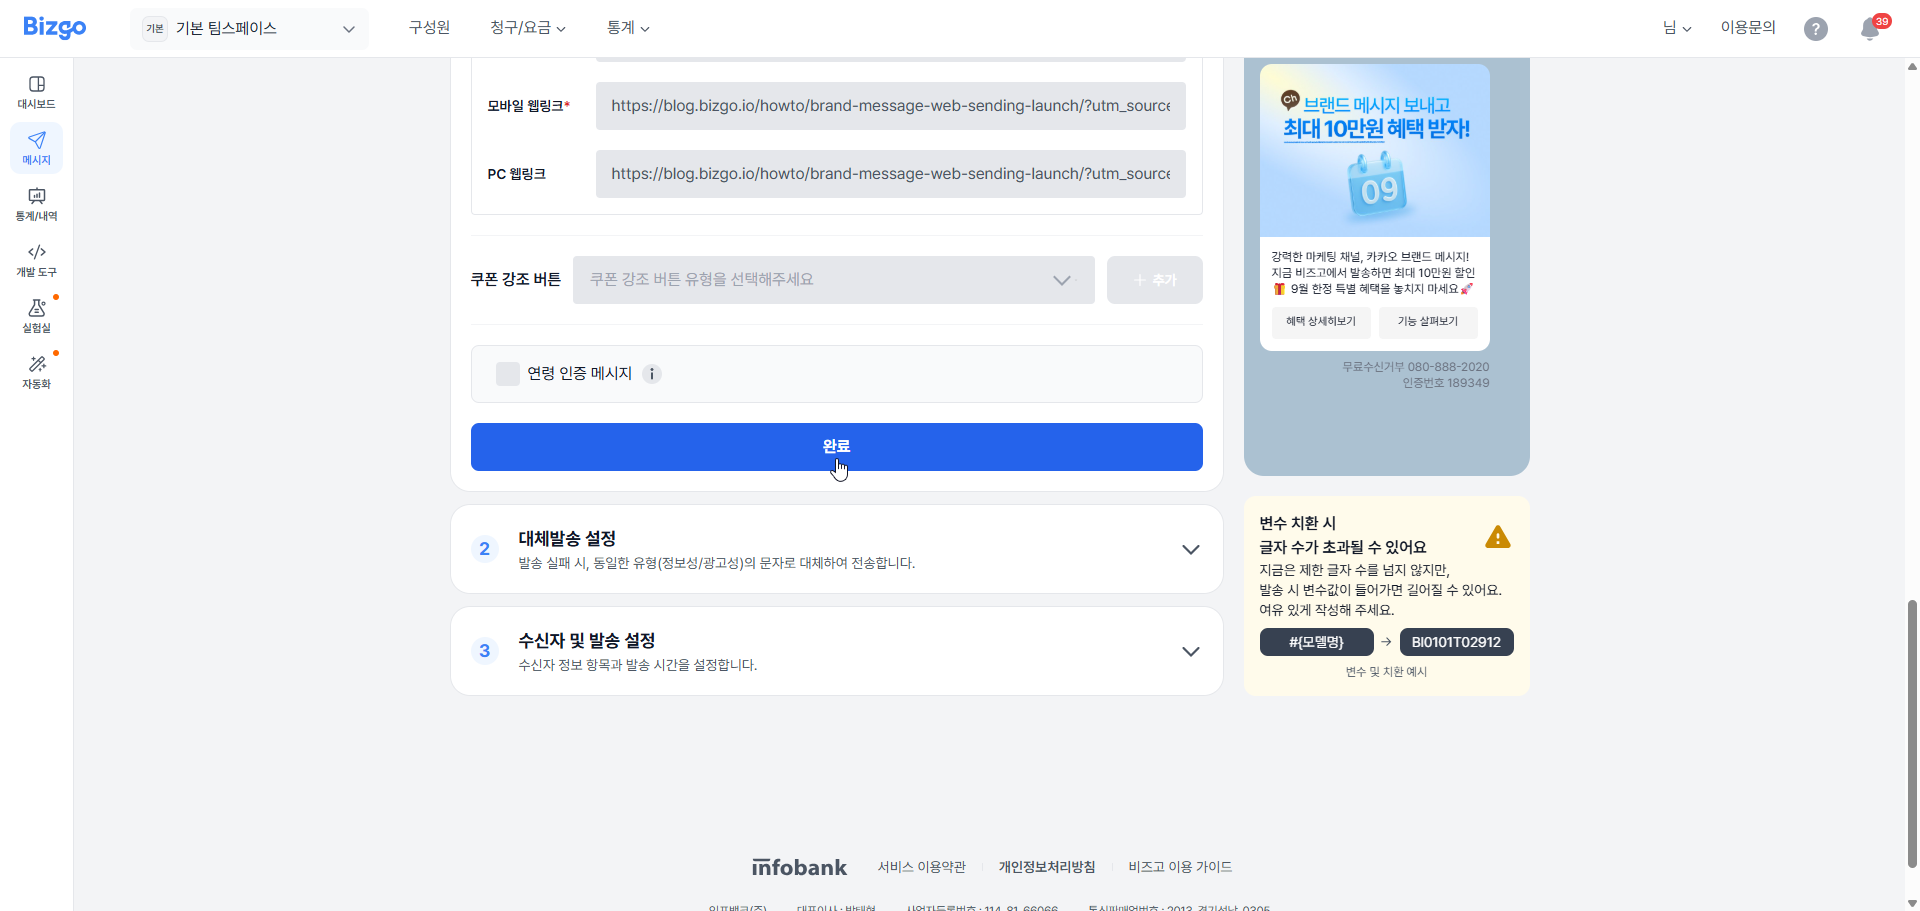
You can change the template. To proceed with the web send using the selected template, click Done (완료) to move on to the next setting.
2. Configure failover delivery
Register in advance the content to be sent as SMS/LMS in case the message delivery fails or is not supported.
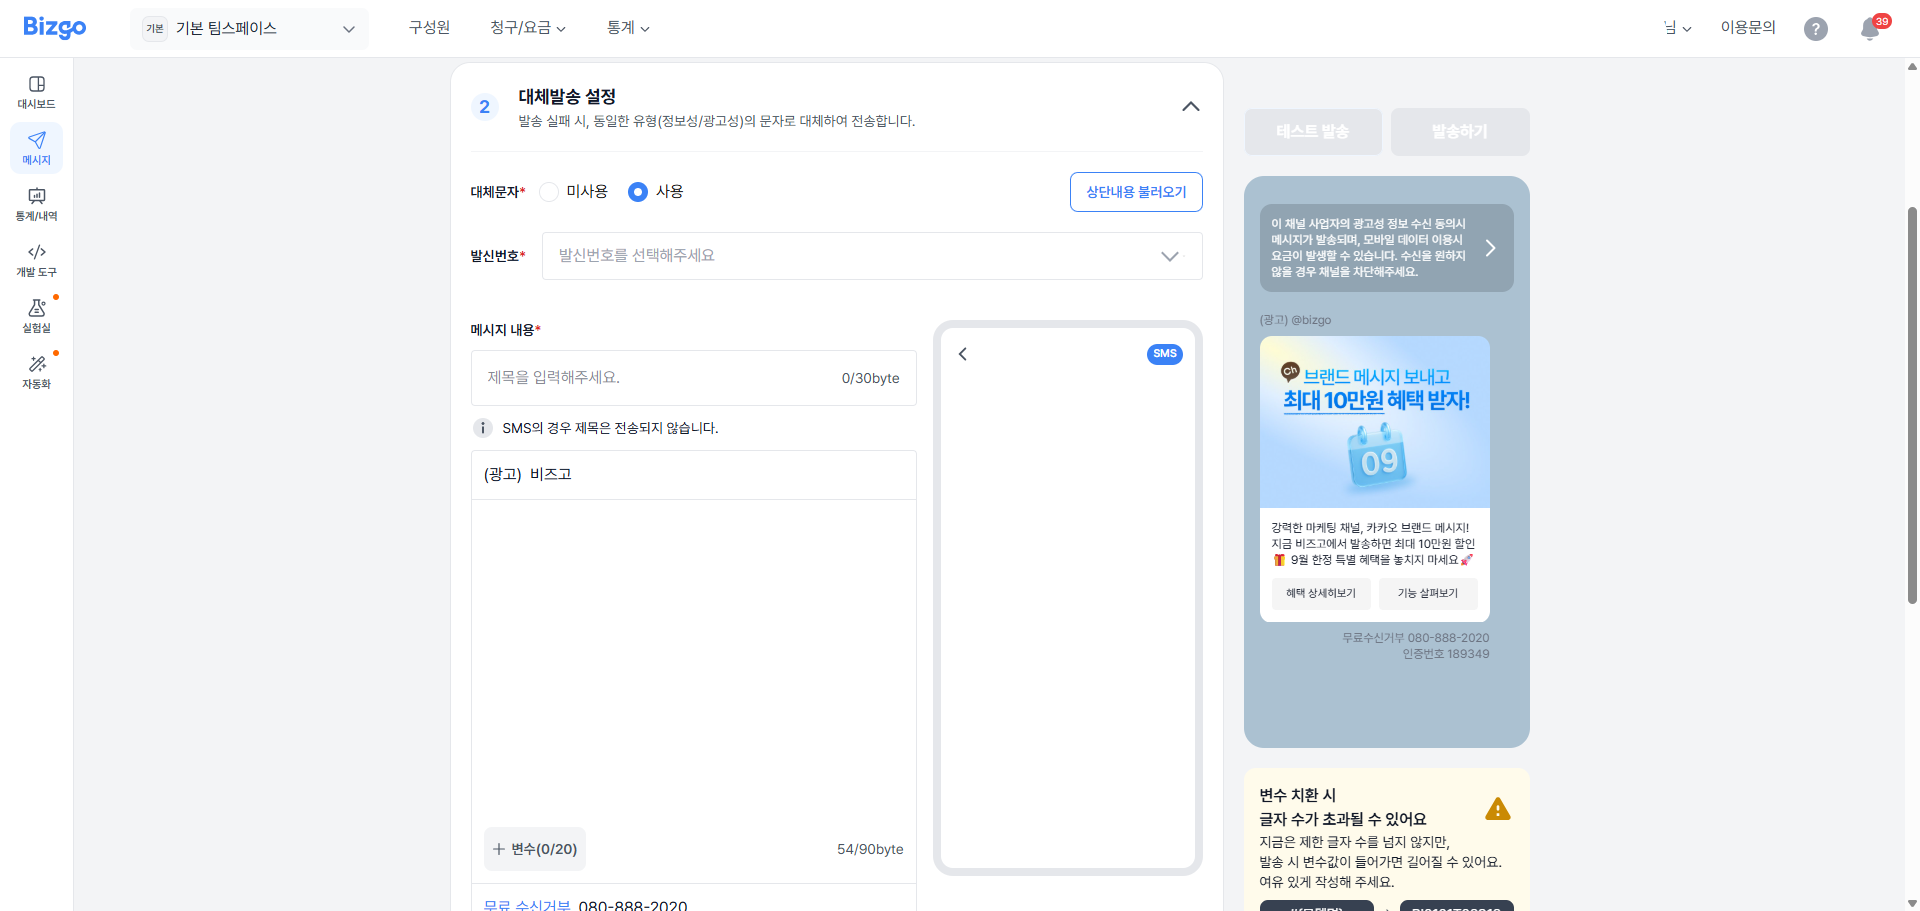
Choose whether to use failover delivery
Choose whether to fall back to SMS or LMS when delivery fails. If you select 미사용 (Do not use), you move straight to the recipient setup step.
Write the failover content
- If you select 사용 (Use), you can pull in the same content as the Brand Message body with Load content (내용 불러오기) at the top.
- For messages with no body, you have to enter the content yourself.
- You can freely edit the content you pulled in.
- Anything over 90 bytes is automatically converted to LMS.
Message composition
- Enter a title (optional) and a body (required)
- You can add variables just as in Brand Message (for example,
#{브랜드명},#{이름}) - The parenthetical indicator (for example,
2/20) means the number of variables currently in use / the maximum number - Variable substitution can increase the actual byte count, so leave yourself some headroom
About promotional messages
Whether a message is promotional or informational follows the nature of the original message, so for Brand Message the failover text is sent as promotional.
Final check
Before saving, always use the preview to check the final content along with any byte or variable warnings. Clicking Finish setup (설정 완료) moves you to the recipient setup step and then the delivery setup step.
3. Configure recipients and delivery
Here you upload and edit recipient information, set the delivery time, and preview the message with variable substitution. Delivery only works correctly if you follow the exact number format and the file upload rules.
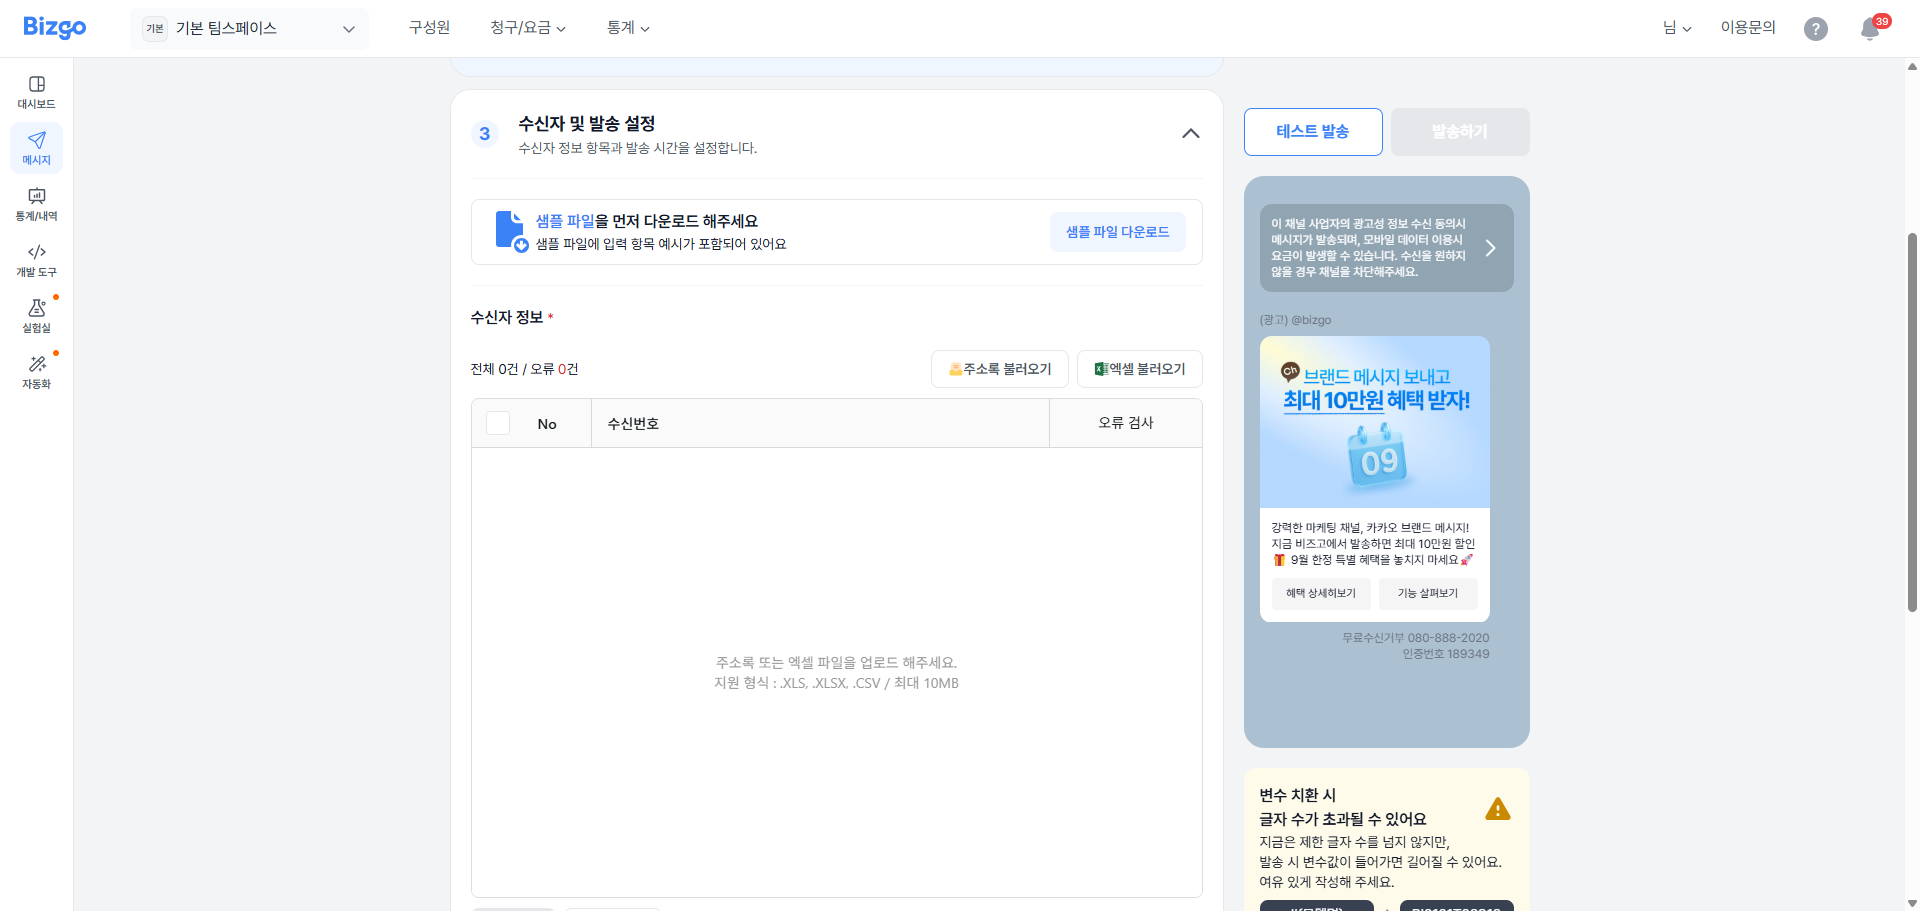
As you scroll down while reviewing the template content, the section for configuring recipient information appears.
There are two ways to provide recipient information: Load from address book and Load Excel.
- Load from address book — See the 주소록 section for a description of this feature.
- Load Excel (
.xls,.xlsx,.csv/ max 10MB / up to 200,000 records) — Click the Download sample file button to download the sample file first, then fill it in. If there are variables, enter the variable values in the order of the variable names. - Click the Add row (행 추가) button to register recipient numbers directly in the grid.
Once recipient information is registered, an error check runs automatically and any problems appear in the error column.
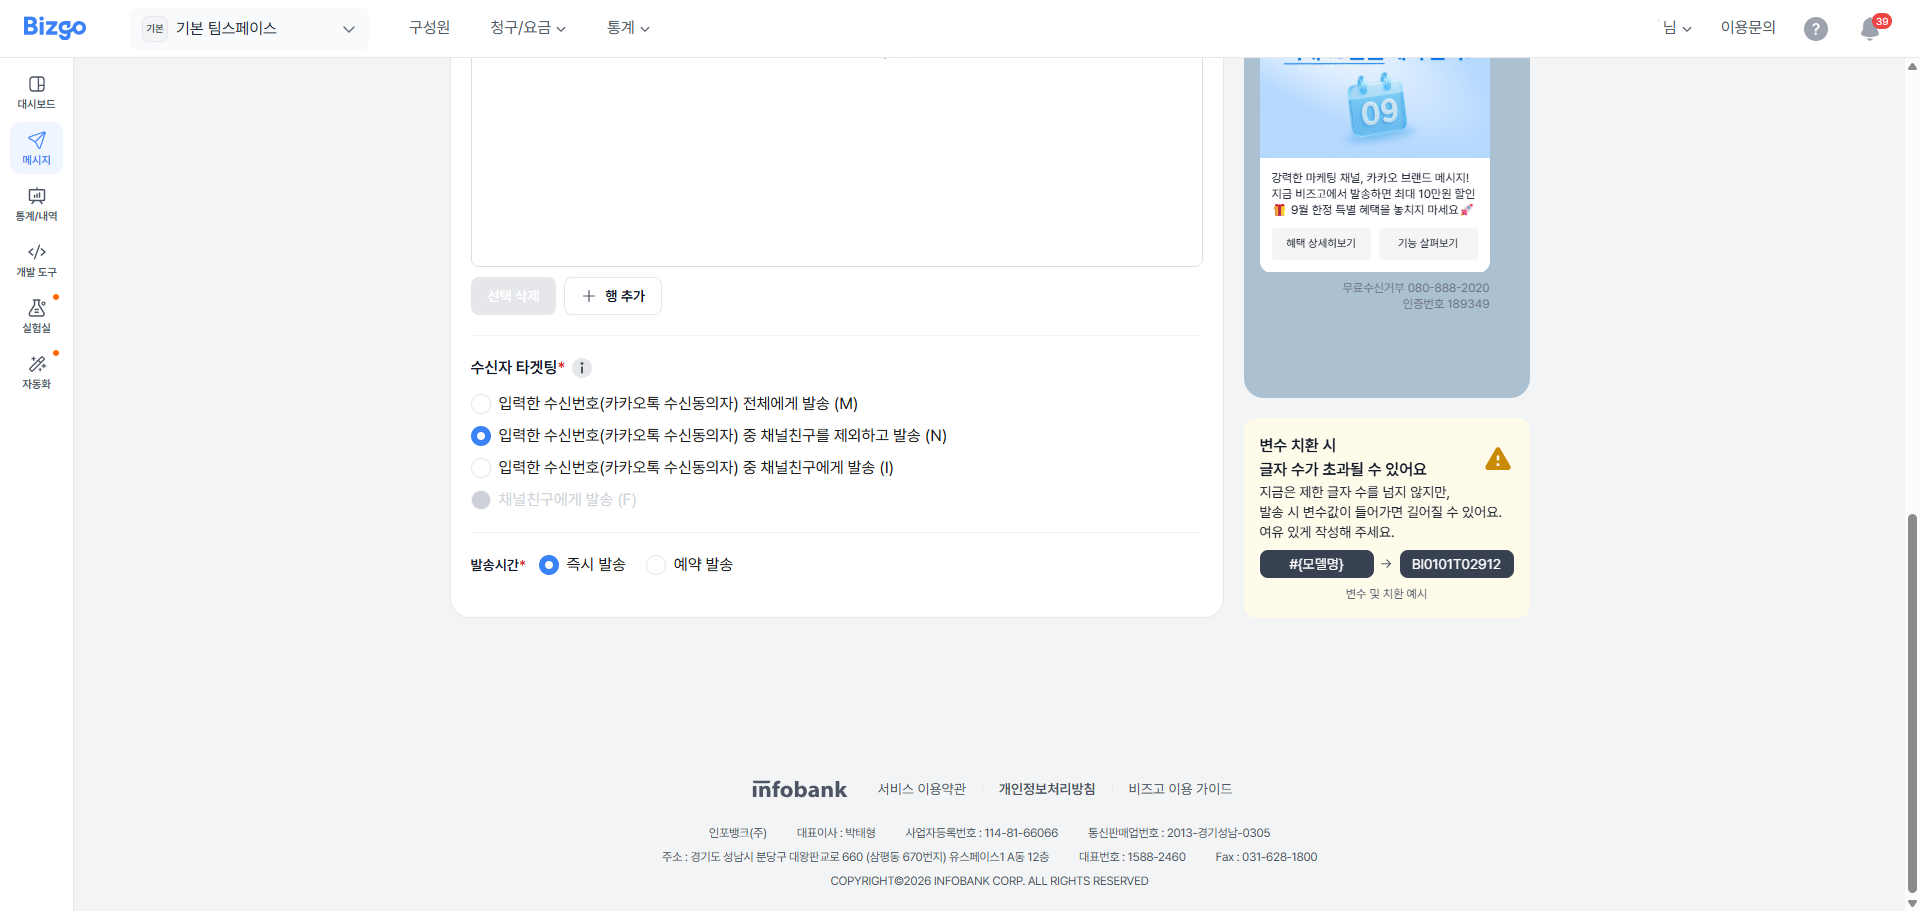
You have to select the targeting customer type for the recipient list before you can send. Three options are currently available: 수신번호 전체 (All recipient numbers), 수신번호 중 친구 아님 (Non-friends among the recipient numbers), and 수신번호 중 친구 (Friends among the recipient numbers).
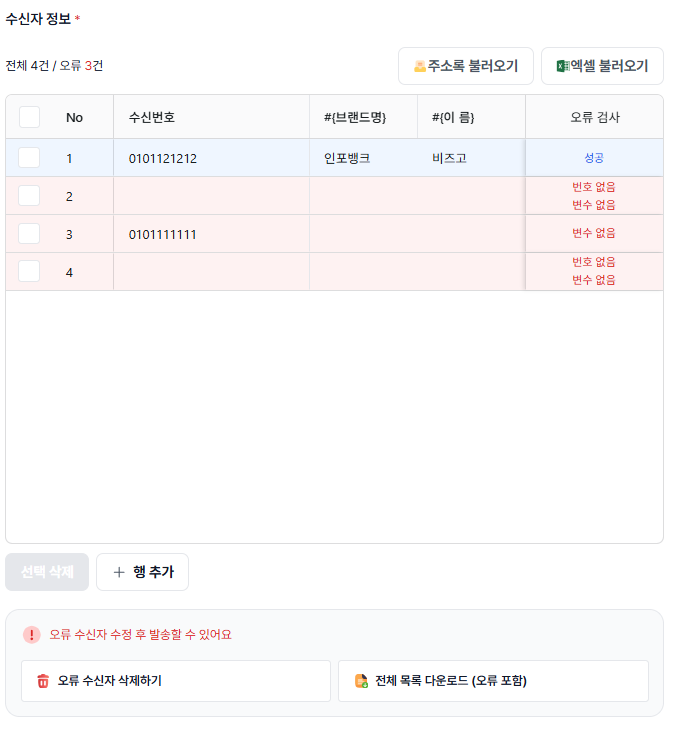
| Error status | How to handle it |
|---|---|
| Cell error | Edit the cell directly to fill in the missing value and clear the error. |
| Bulk errors | Download the list with Download full list (including errors), correct them in bulk in Excel, and re-upload. |
| Delete error rows | Remove unneeded error rows all at once with Delete error recipients. |
Requirements for sending
Every error must be resolved before you can send. Check that the "오류 수신자 수정 후 발송할 수 있어요" ("You can send once you fix the recipients with errors") notice at the bottom of the screen disappears.
4. Run a test send
Click Test send at the top right to send to a small group (up to 5 people) and verify variable substitution, line breaks, links, character counts, and more on a real device.
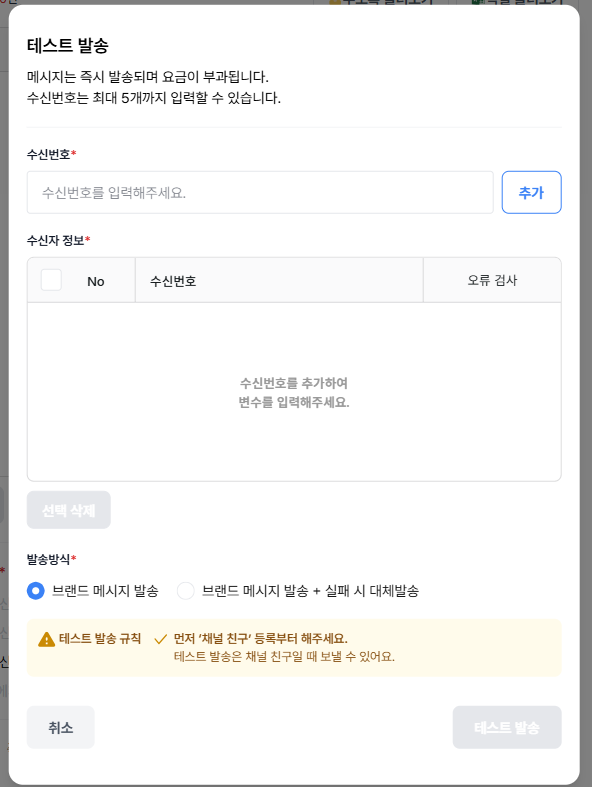
In the test send pop-up, enter a recipient number, click Add, then choose the send method.
- 브랜드 메시지 발송 (Brand Message send)
- 브랜드 메시지 + 실패 시 대체발송 (Brand Message + failover on failure)
About test sends
Clicking Test send sends immediately and is charged. Brand Message can only be test-sent to channel friends, so the recipient must have added the channel as a friend.
After you finish the recipient information error check, choose the send method and run the test send, then verify that the delivered message displays correctly.
5. Set the delivery time
Under delivery time at the bottom, choose one of the following.
- 즉시 발송 (Send immediately) — Sends right away at the current time
- 예약 발송 (Reservation send) — Choose a date and time, then save (you can schedule from 10 minutes after the current time onward)
6. Send the message
After confirming everything, click Send now. A final confirmation pop-up appears before the send.
Send request failed — If the message send request fails, you can review the failed records and the reasons. Download the Excel file, check the cause of failure, and then retry the send.
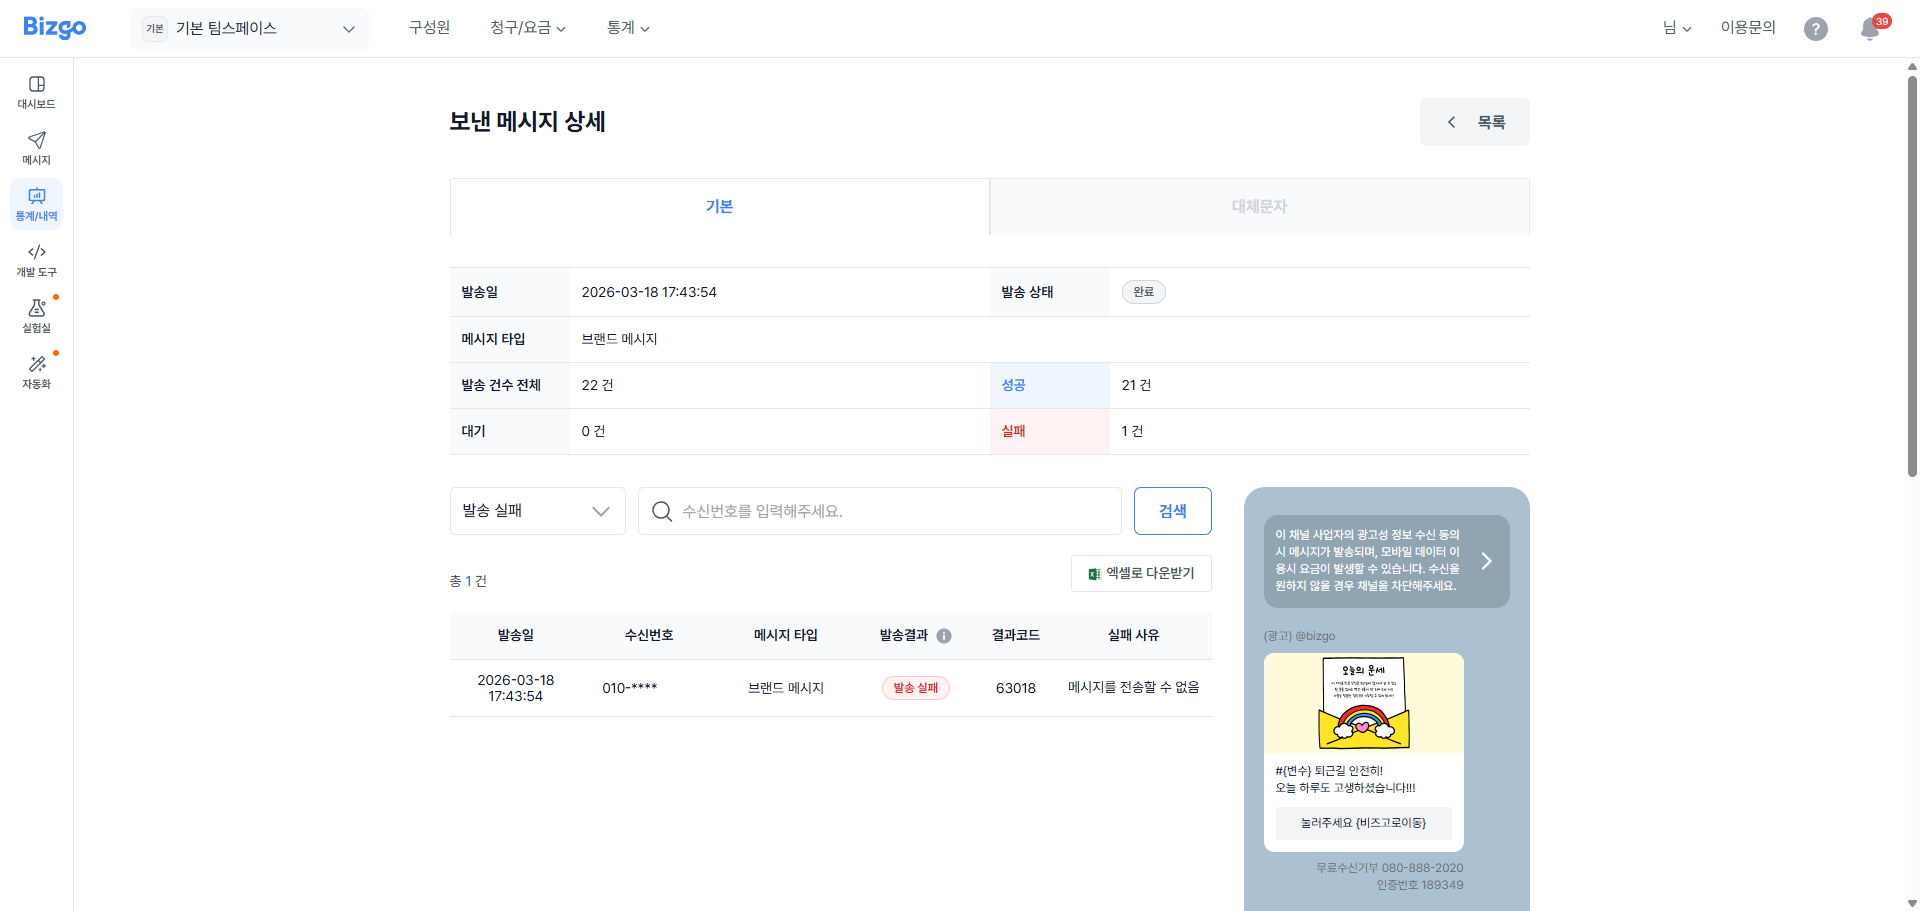
Send request succeeded — When the message send goes through successfully, an acceptance pop-up appears. You can check the delivery result in the message box.
Free-form (compose a new message) send
Compose a new message yourself: without using a template, pick one of eight message types, write the content freely, and send it.
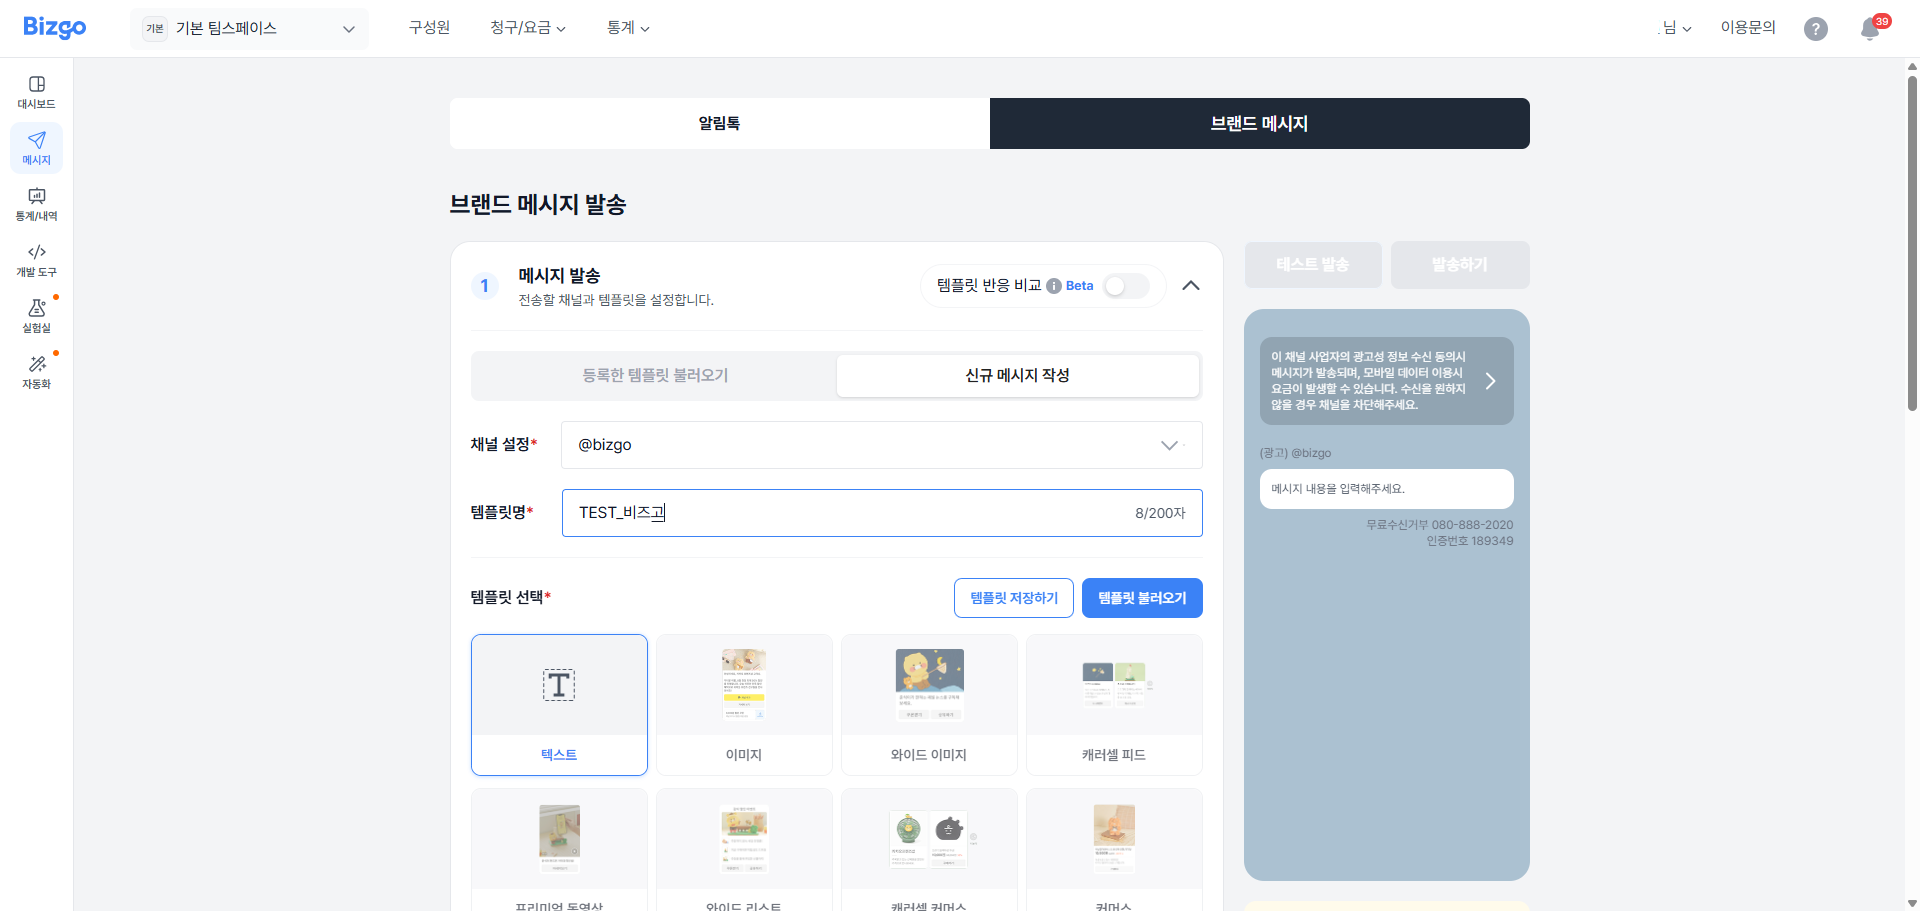
1. Configure the channel and select the message type
Enter the channel ID (채널 ID) to register the template under and the template name (템플릿명) that identifies the template. Only channels registered in Bizgo appear in the channel ID list.
Select the message type you want to write from the eight Brand Message types.
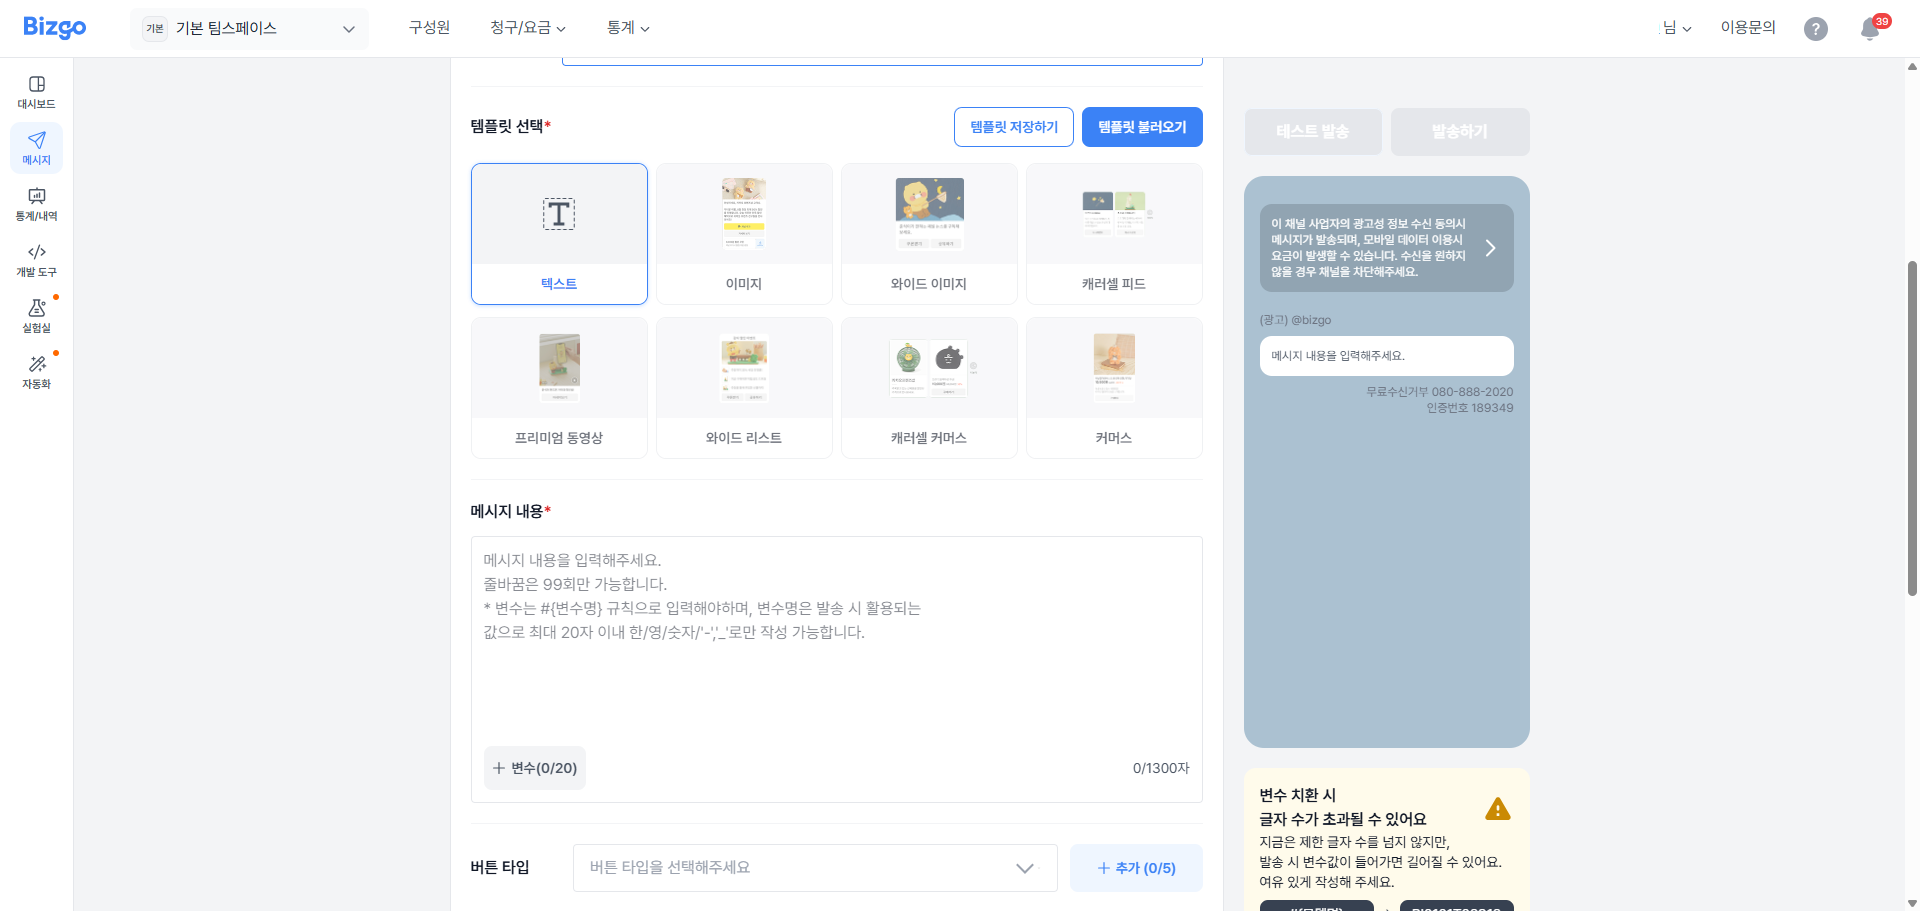
2. Insert buttons
To add a button to the template, turn on the toggle in the Insert buttons (버튼 삽입) section and register it.
| Button type | Description |
|---|---|
| 웹 링크 (Web link) | Opens a web page (PC/mobile). Of the PC and mobile web URLs, the mobile web URL is required. The link must include http:// or https:// |
| 앱 링크 (App link) | On mobile, tapping the button opens an app (Android/iOS). Two of scheme_ios, scheme_android, and the mobile web URL are required. Each scheme must be registered in the format required by iOS and Android |
| 봇키워드 (Bot keyword) | The button name is sent to the bot or agent; use it to pass the user's action to a bot or agent. 1:1 chat must be turned ON in the Kakao Talk Channel Admin Center |
| 메시지전달 (Forward message) | The button name plus the message body is sent to the bot or agent. 1:1 chat must be turned ON in the Kakao Talk Channel Admin Center |
| 채널추가 (Add channel) | Opens the add-channel pop-up page on the Kakao Talk channel home. The button name is fixed to 채널추가. The button is hidden for recipients who have already added the channel |
| 비즈니스폼 (Business form) | Links to a form in Kakao Talk that can collect information and responses for reservations, surveys, entries, and so on. You need to create a business form in the Kakao Talk Channel Admin Center and have its business form ID |
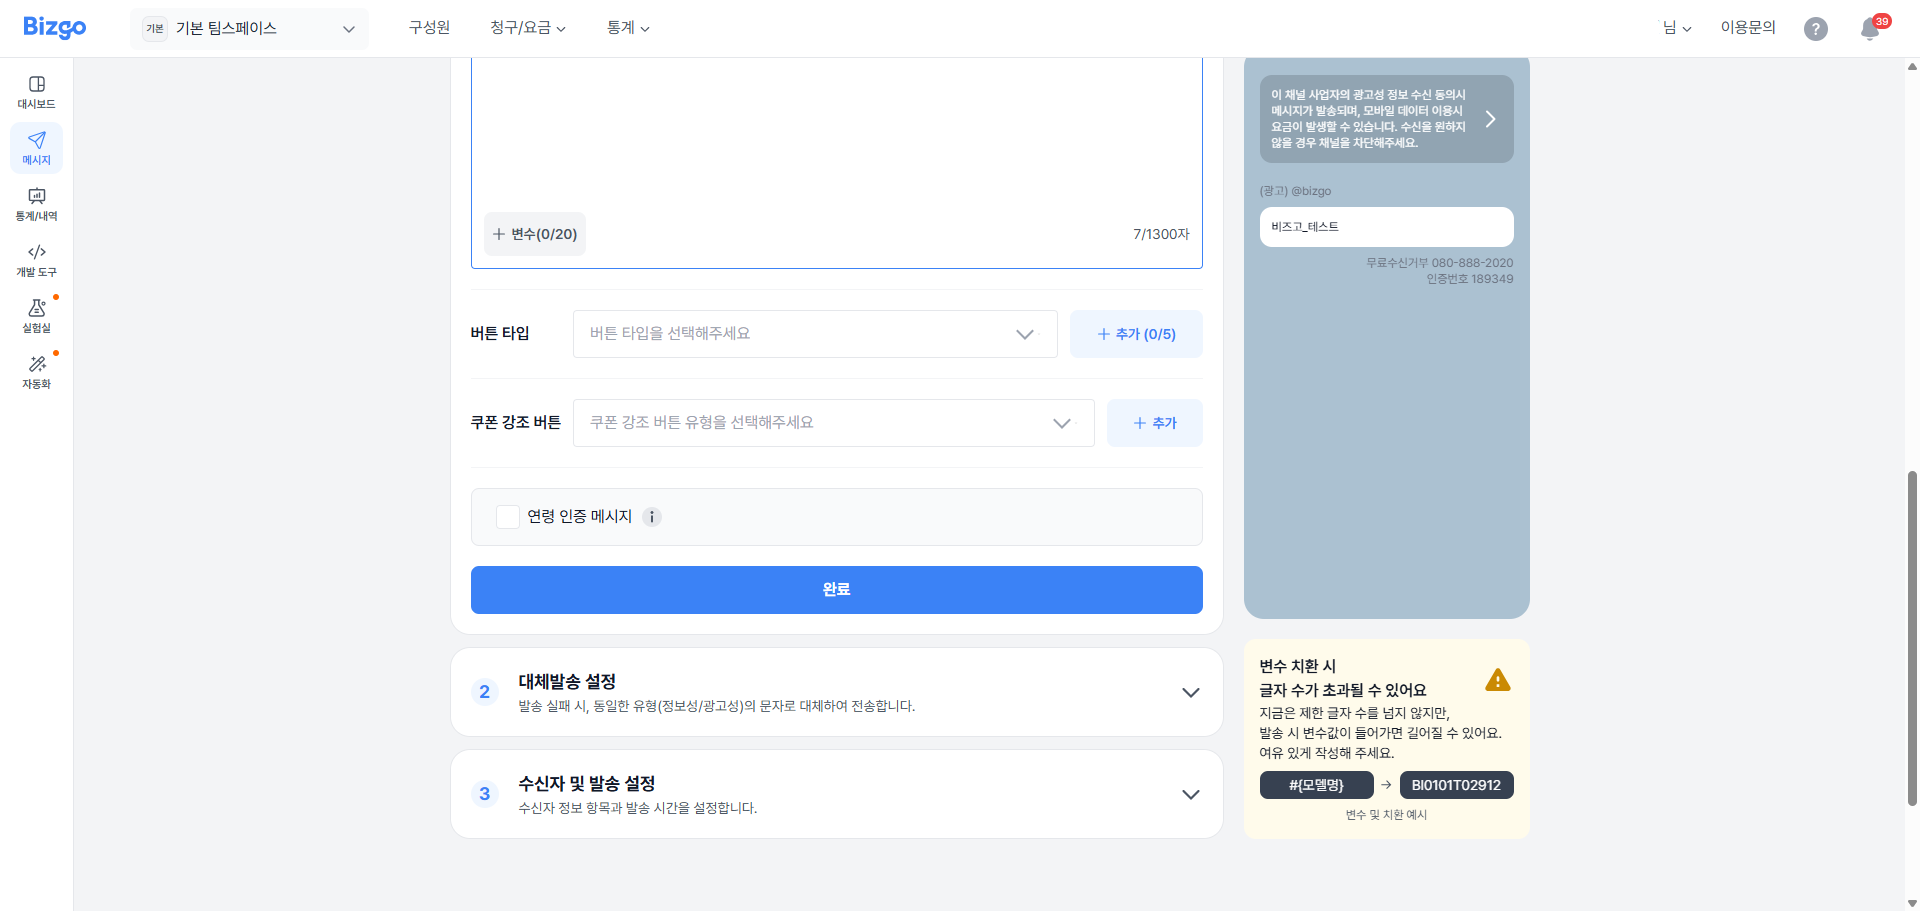
3. Insert a coupon highlight button
To add a coupon highlight button, turn on the toggle and register it. The coupon name can use variable substitution or a directly entered value, and you can optionally add supplementary information about the coupon. For the coupon link, you have to enter at least one of Mobile, Android, or iOS.
| Coupon highlight type | Coupon name input format |
|---|---|
| 금액할인 (Amount discount) | #{할인금액} or a number (1 to 99,999,999) |
| 할인율 (Discount rate) | #{할인율} or a number (1 to 100) |
| 배송비 (Shipping fee) | — |
| 상품무료 (Free product) | #{상품명} or text (up to 7 characters) |
| 상품 UP (Product UP) | #{상품명} or text (up to 7 characters) |
4. Configure age verification
If you check 연령 인증 메시지 (Age verification message) before sending, a cover is placed over the message in the chat room so that only adults aged 20 or over can view the content.
Industries that must apply age verification
The 'age verification message' feature is optional in general, but it is mandatory for messages from industries and content that are inappropriate for minors.
Mandatory industries and content — Games rated as not for minors, films and videos rated as not for minors, albums and music files with age restrictions for minors, and content such as webtoons, publications, and books, plus any other industries and related content judged to be harmful to minors.
5. Content to write per message type
The content you need to write differs by message type.
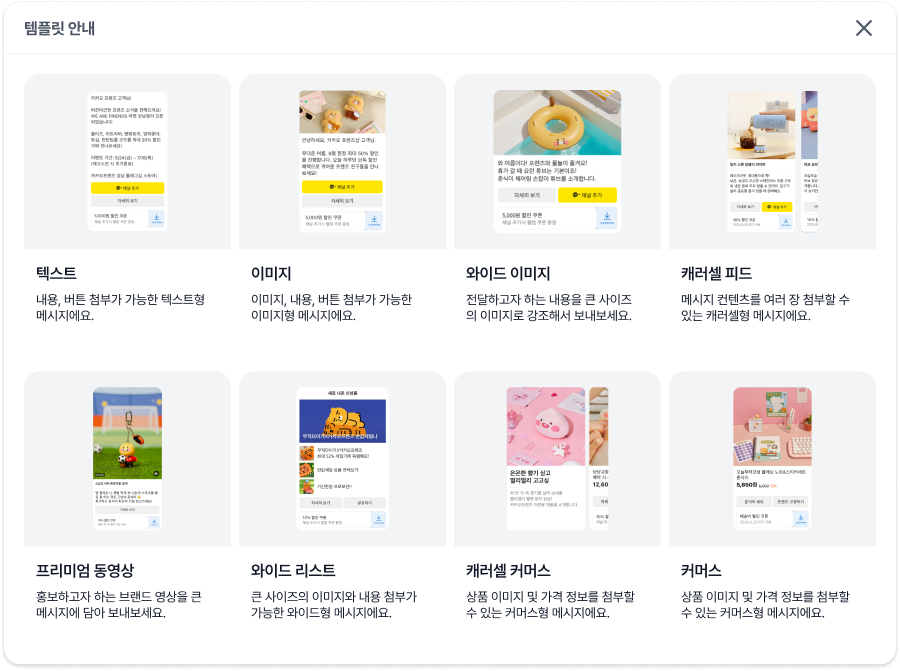
6. Configure recipients and delivery
If you use variables in the message, you have to set the recipient numbers and the variables in the recipient setup. Click the Set recipient fields (수신자 항목 설정하기) button to configure recipients.
The recipient setup screen and features are the same as those described in 기본형(템플릿) 발송.
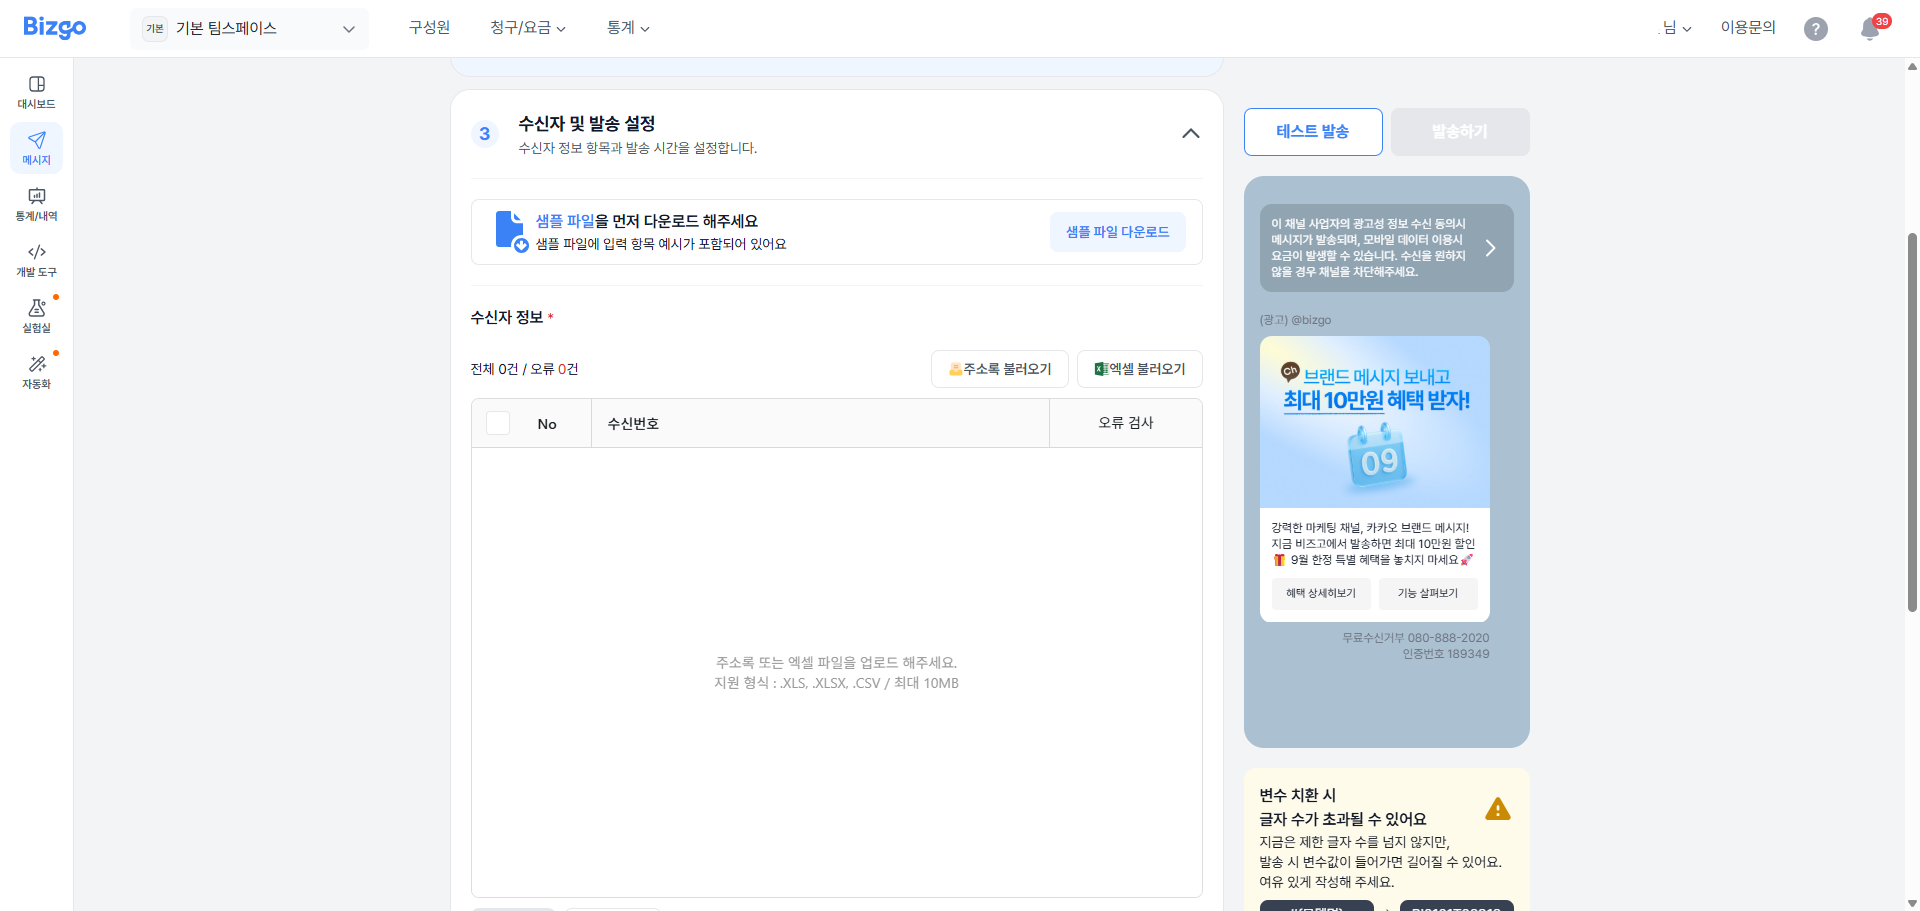
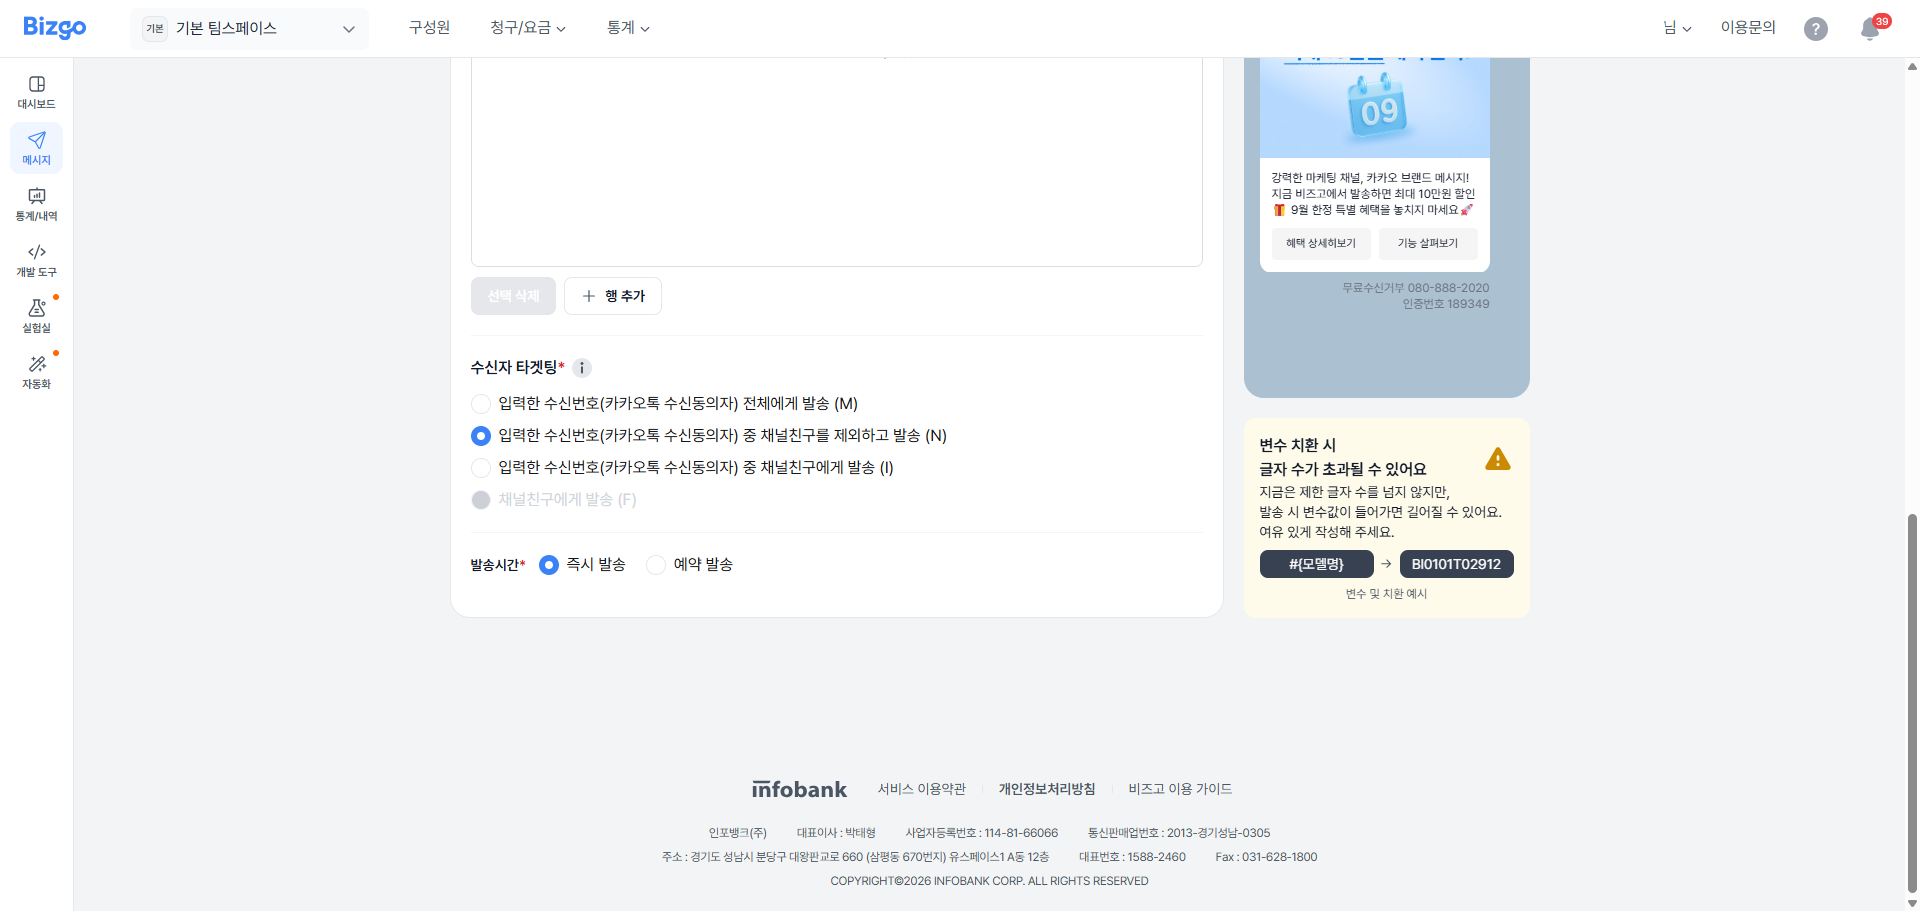
Once you have completed every step, click the Send now button to send.
Send an RCS message
Load a registered template or compose a new message yourself to send an RCS message. You can configure the brand, the sender number, and the send method, and specify the recipient information and the delivery time.
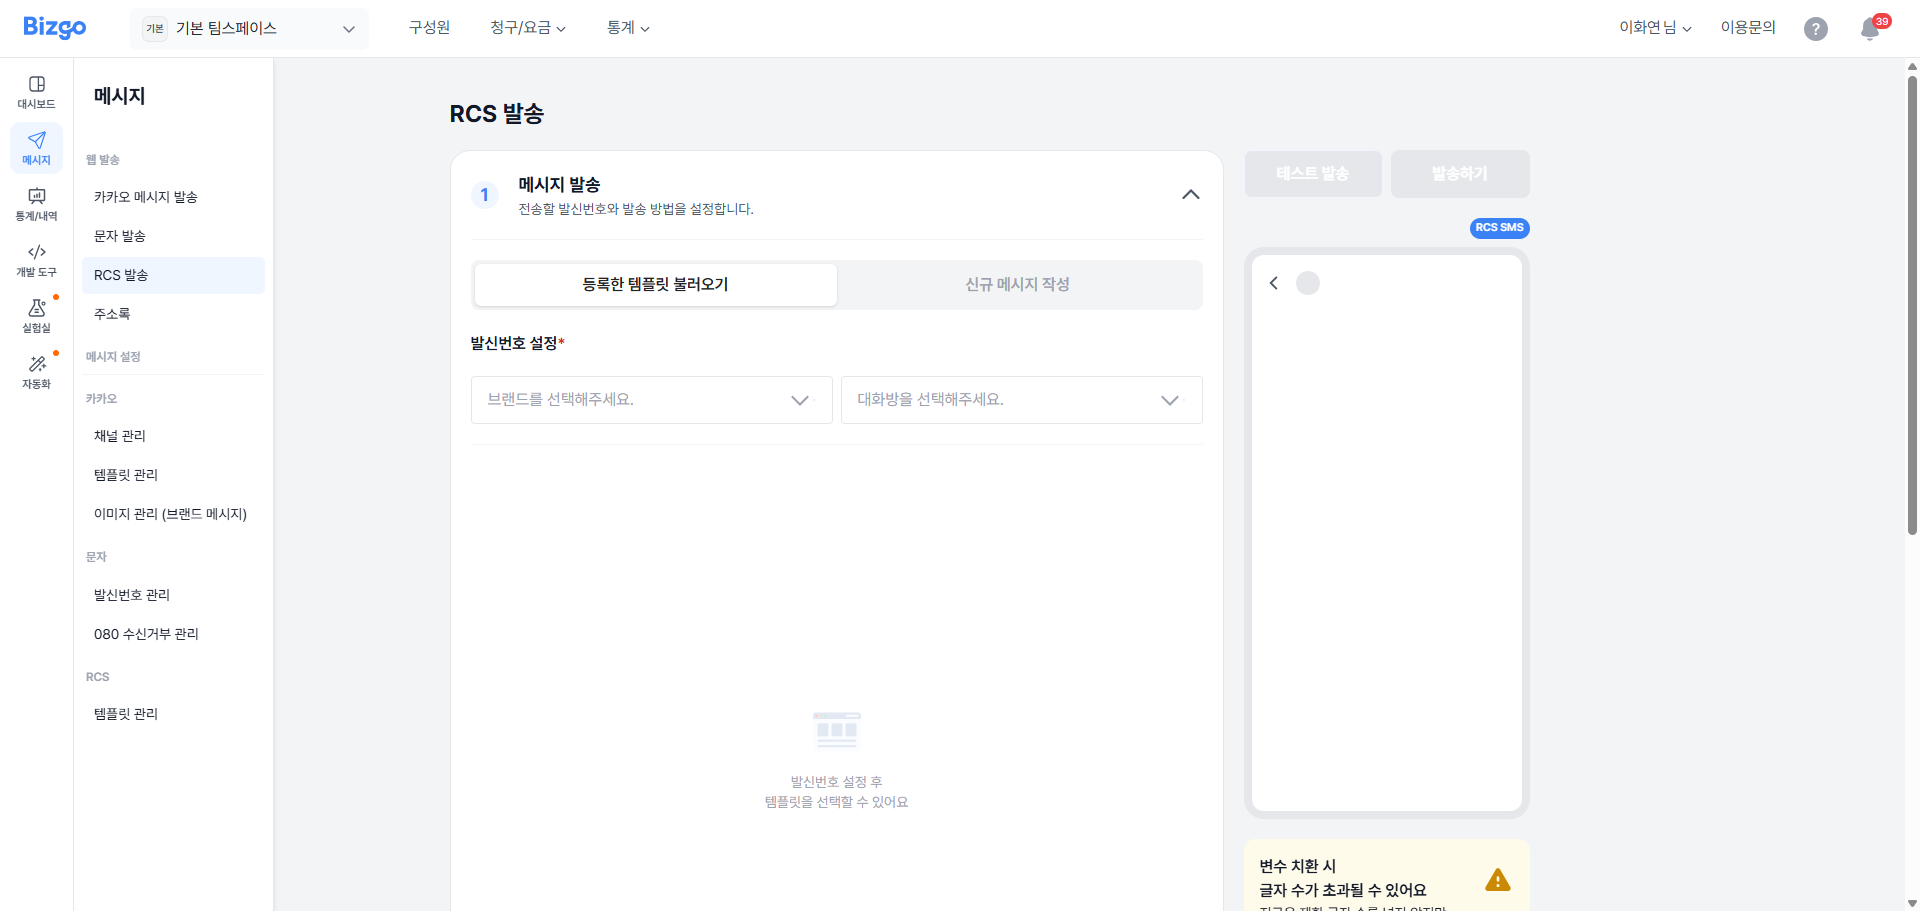
1. Compose the message
Configure the sender number to send from and the send method. You can choose between loading a registered template and composing a new message.
Load a registered template
Select and load an RCS template that is already registered. You can select a template after you configure the sender number.
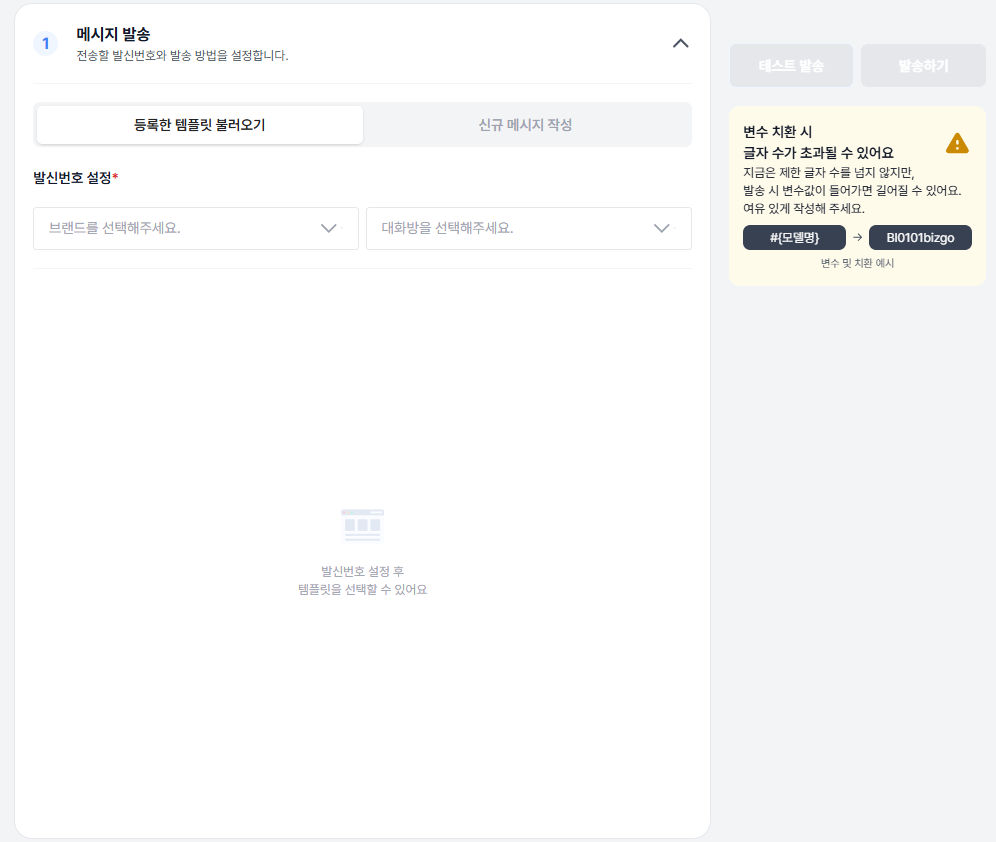
Select brand (브랜드 선택) — Select the brand to send from in the dropdown.
Select chat room (대화방 선택) — Select the chat room to send from, and the sender number appears.
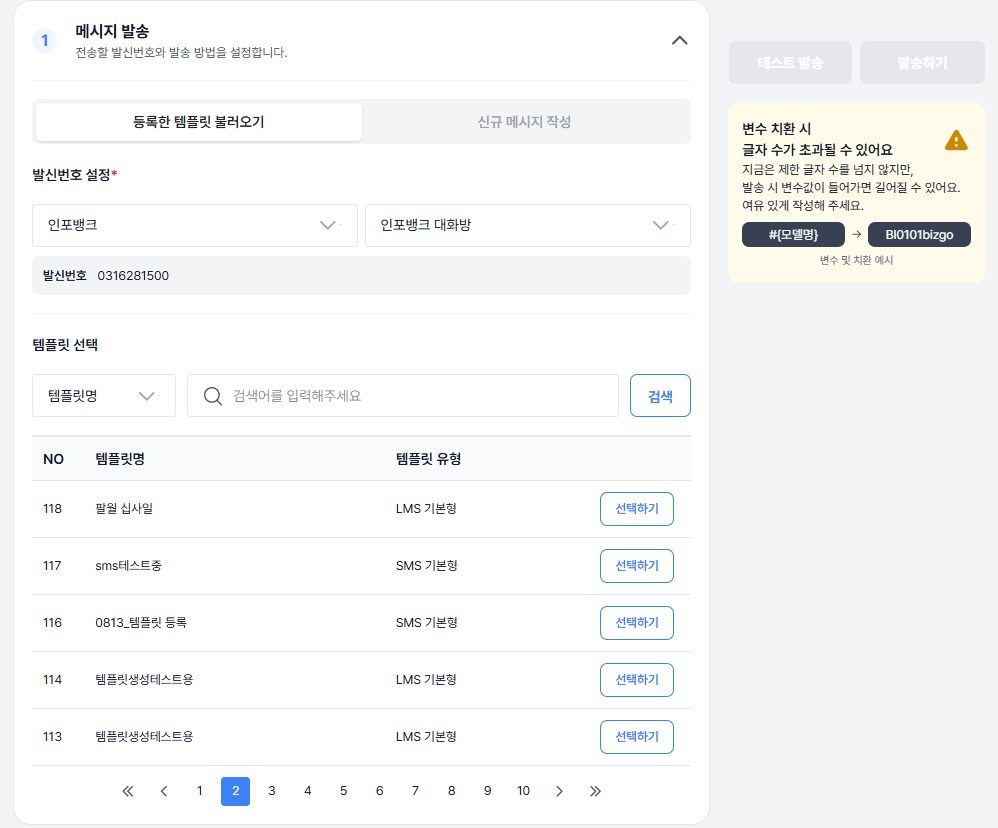
Find the template you want using the template name, the template type, and the search feature. Clicking the Select button applies that template. Hovering over a template row shows a preview mockup.
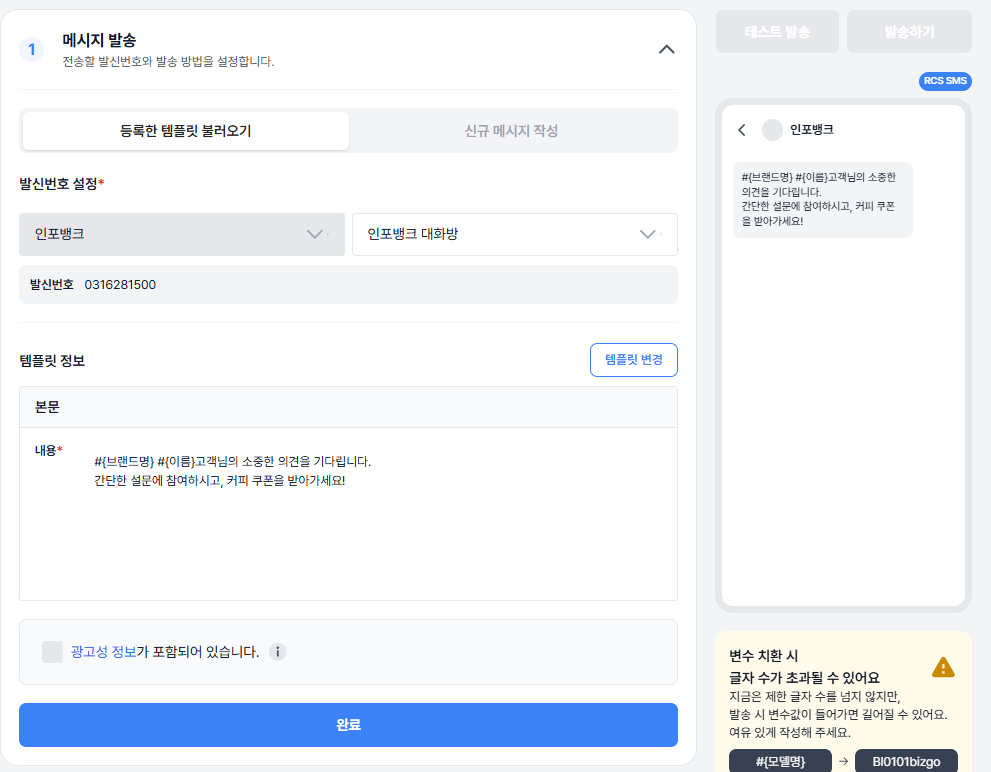
When you select a template, the registered template details load automatically. Once everything is ready, click the Done button to move to the next step.
Compose a new message
You can compose and send a one-off new message without registering a template.
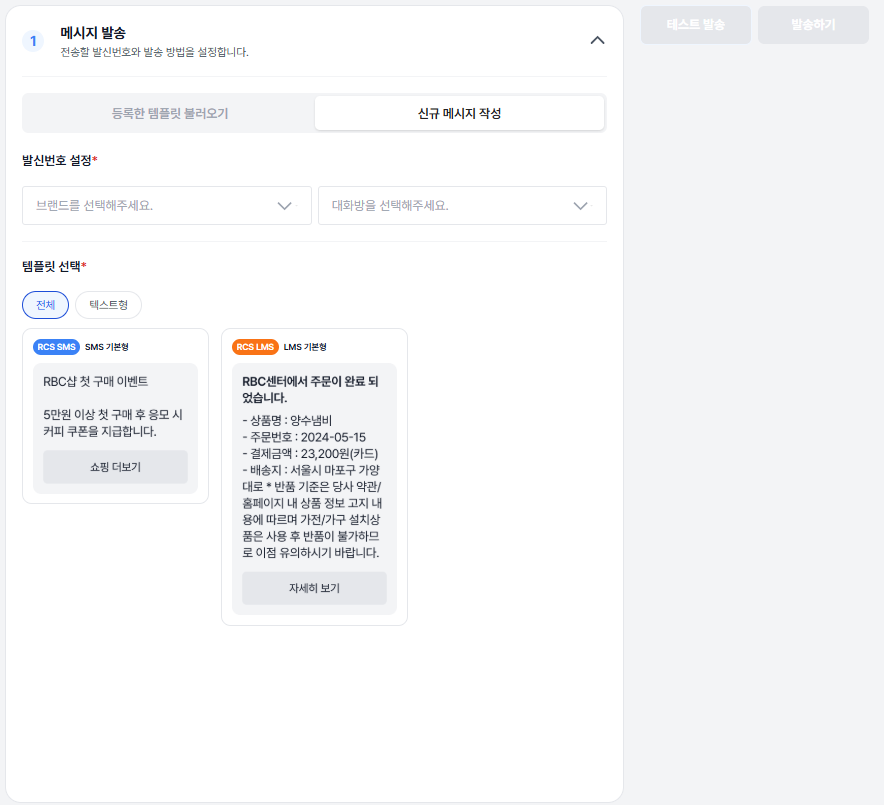
- Configure the sender number the same way as when loading a template.
- Select either the SMS or the LMS format.
- Write the body content for the message type you selected.
- If the message contains promotional information, click the Promotional information (광고성 정보) checkbox.
2. Configure failover delivery
Register in advance the content to be sent as SMS/LMS in case the RCS message delivery fails or is not supported.
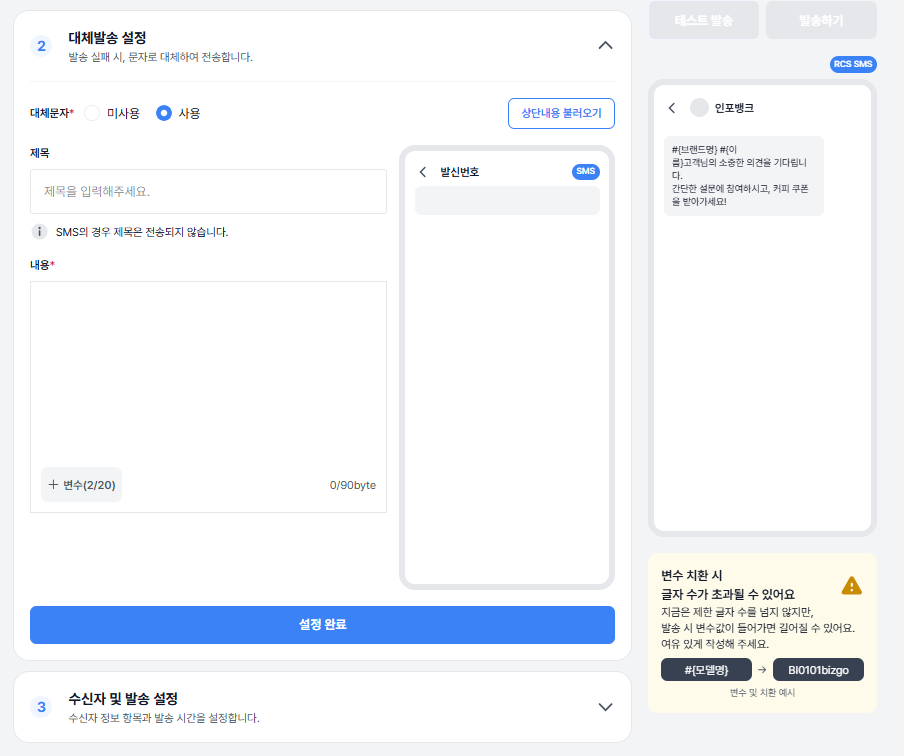
Choose whether to use failover delivery
Choose whether to fall back to SMS or LMS when delivery fails. If you select 미사용 (Do not use), you move straight to the recipient setup step.
Write the failover content
- If you select 사용 (Use), you can pull in the same content as the RCS message with Load content at the top.
- You can freely edit the content you pulled in.
- Anything over 90 bytes is automatically converted to LMS.
Message composition
- Enter a title (optional) and a body (required)
- You can add variables just as in RCS (for example,
#{브랜드명},#{이름}) - The parenthetical indicator (for example,
2/20) means the number of variables currently in use / the maximum number - Variable substitution can increase the actual byte count, so leave yourself some headroom
- Whether the message is promotional or informational follows the type you set for the RCS message
Final check
Before saving, always use the preview to check the final content along with any byte or variable warnings. Clicking Finish setup moves you to the recipient setup step and then the delivery setup step.
3. Configure recipients and delivery
Here you upload and edit recipient information, set the delivery time, and preview the message with variable substitution. Delivery only works correctly if you follow the exact number format and the file upload rules.
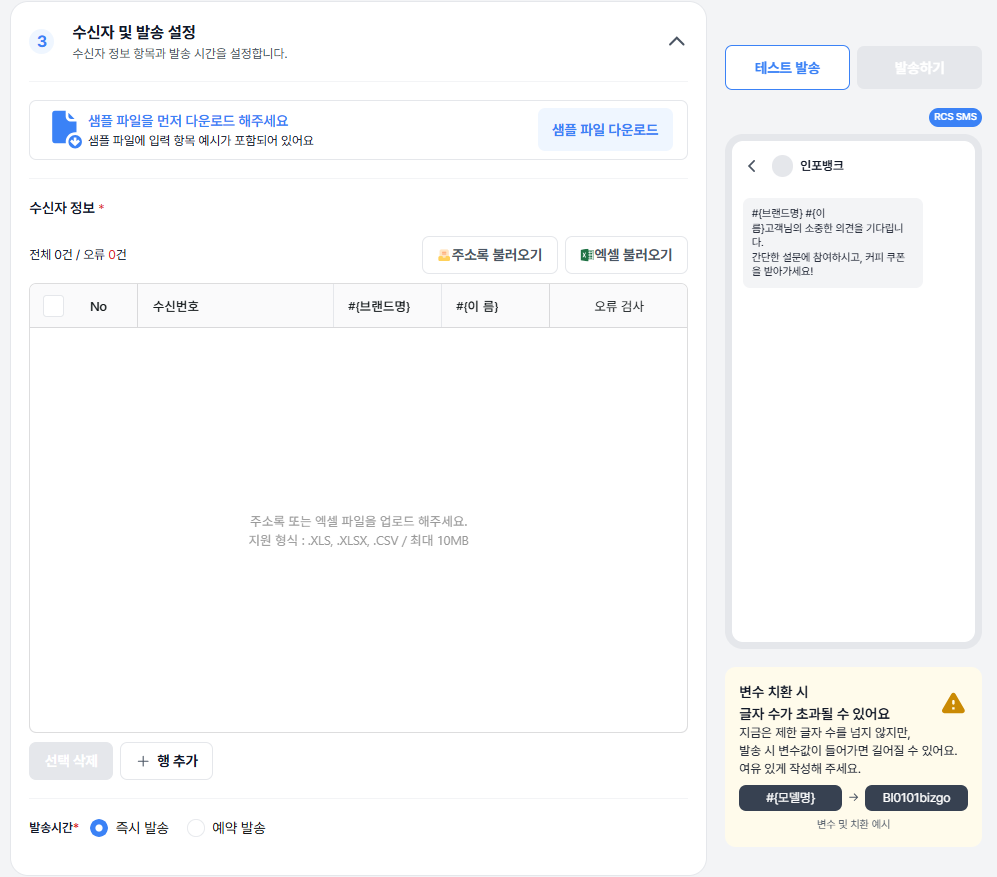
Ways to register recipients
| Method | Description |
|---|---|
| Load from address book | Loads an address book registered in Bizgo to set the recipients. |
Load Excel (.xls, .xlsx, .csv / max 10MB / up to 200,000 records) | Download the sample file, enter the recipient numbers and variables, then upload the file. |
| Add row | Click the Add row button to register recipient numbers directly in the grid. |
Recipient error check
If recipient number or variable validation fails, the problems are listed.
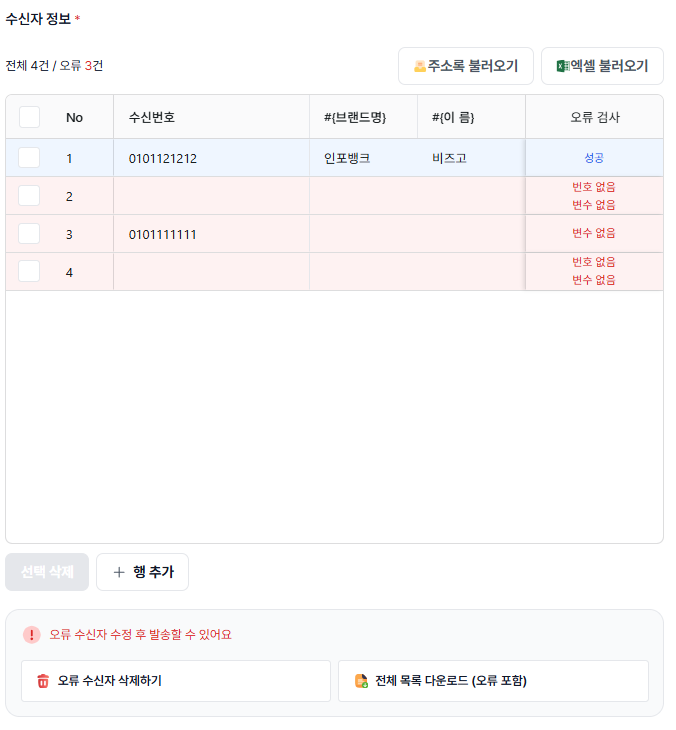
| Error status | How to handle it |
|---|---|
| Cell error | Edit the cell directly to fill in the missing value and clear the error. |
| Bulk errors | Download the list with Download full list (including errors), correct them in bulk in Excel, and re-upload. |
| Delete error rows | Remove unneeded error rows all at once with Delete error recipients. |
Requirements for sending
Every error must be resolved before you can send. Check that the "오류 수신자 수정 후 발송할 수 있어요" ("You can send once you fix the recipients with errors") notice at the bottom of the screen disappears.
4. Run a test send
Click Test send at the top right to send to a small group (up to 5 people) and verify variable substitution, line breaks, links, character counts, and more on a real device.
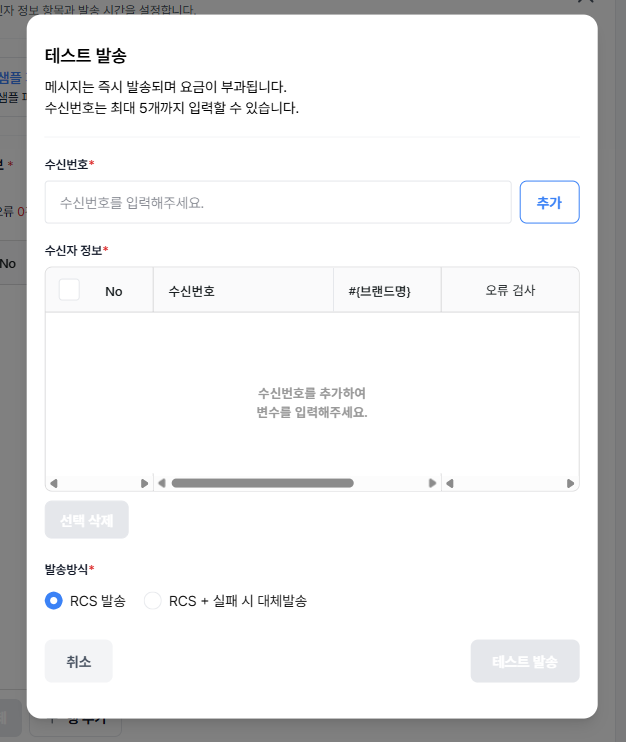
In the test send pop-up, enter a recipient number, click Add, then choose the send method.
- RCS 발송 (RCS send)
- RCS + 실패 시 대체발송 (RCS + failover on failure)
About test sends
Clicking Test send sends immediately and is charged.
After you finish the recipient information error check, choose the send method and run the test send, then verify that the delivered message displays correctly.
5. Set the delivery time
Under delivery time at the bottom, choose one of the following.
- Send immediately — Sends right away at the current time
- Reservation send — Choose a date and time, then save (you can schedule from 10 minutes after the current time onward)
6. Send the message
After confirming everything, click Send now. A final confirmation pop-up appears before the send.
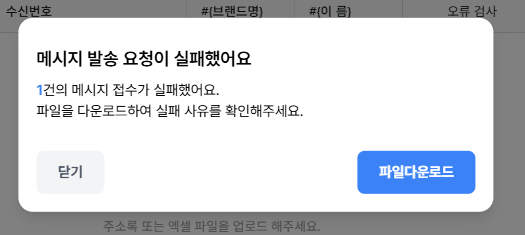
Send request failed — If the message send request fails, you can review the failed records and the reasons. Download the Excel file, check the cause of failure, and then retry the send.
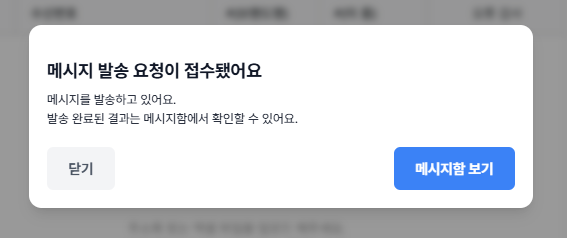
Send request succeeded — When the message send goes through successfully, an acceptance pop-up appears. You can check the delivery result in the message box.
Message box
The message box (메시지함) is where you review the history of messages sent from the web. Sent messages shows the history of sends that have already been attempted, and reservation messages lets you look up sends that are still upcoming.
Sent messages
1. Sent messages list
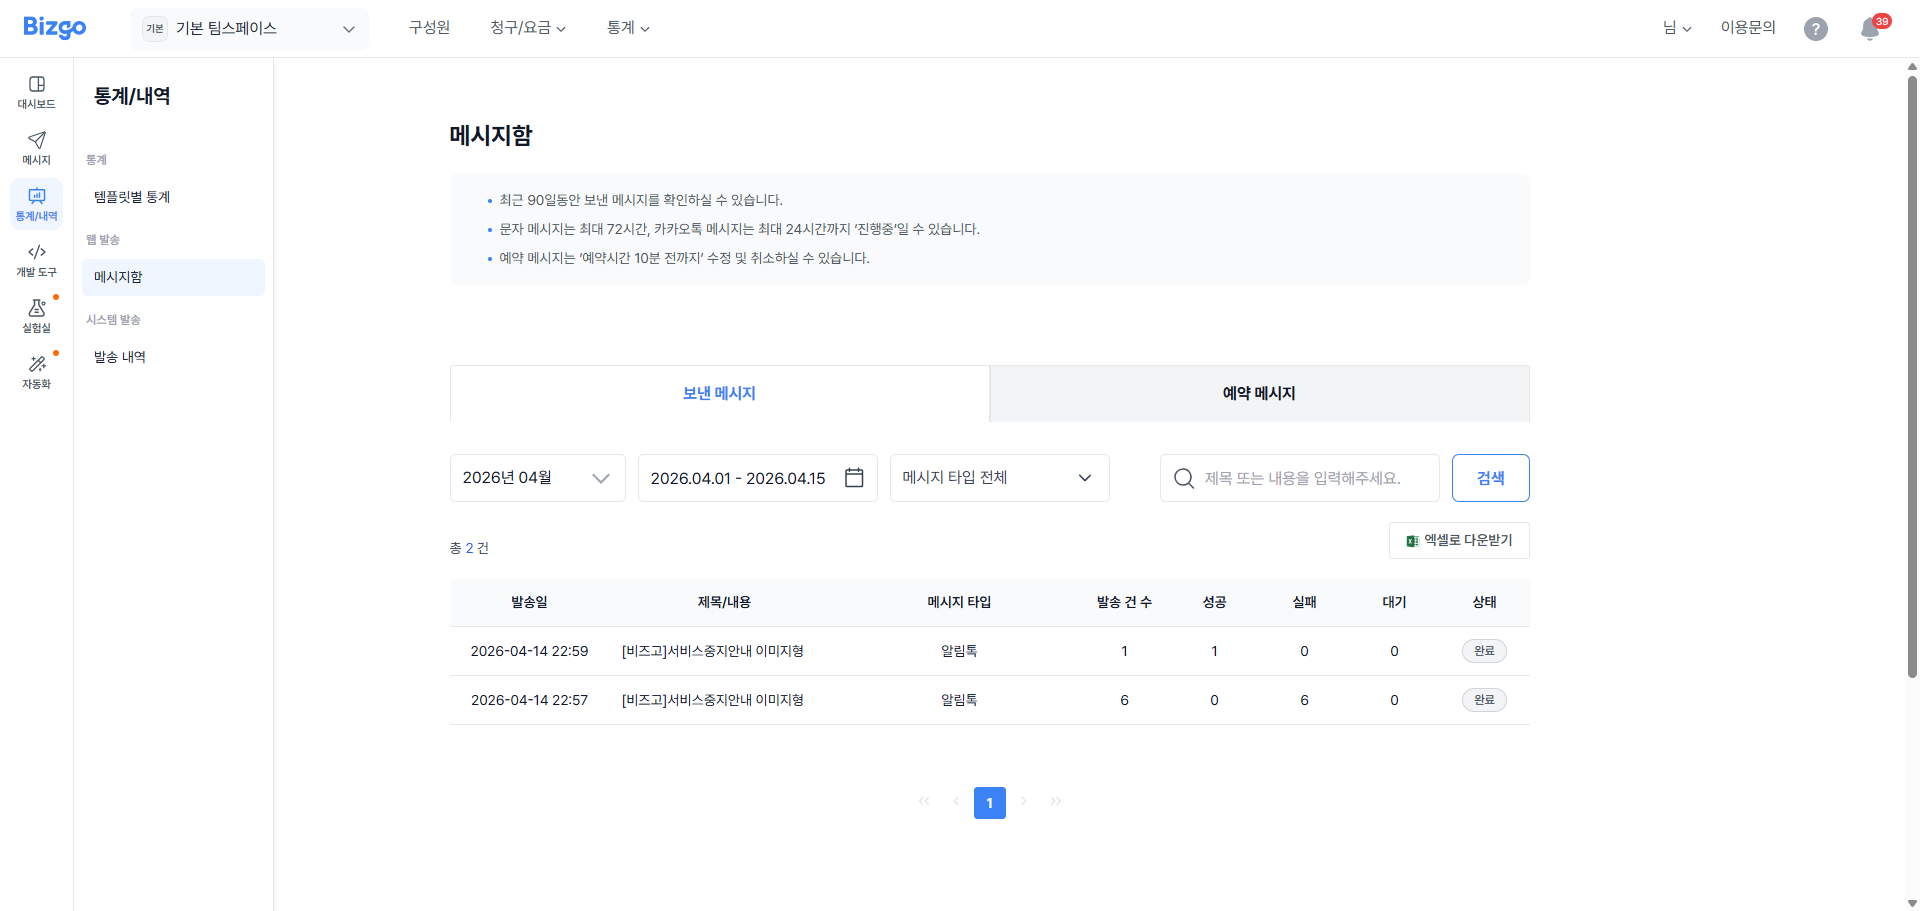
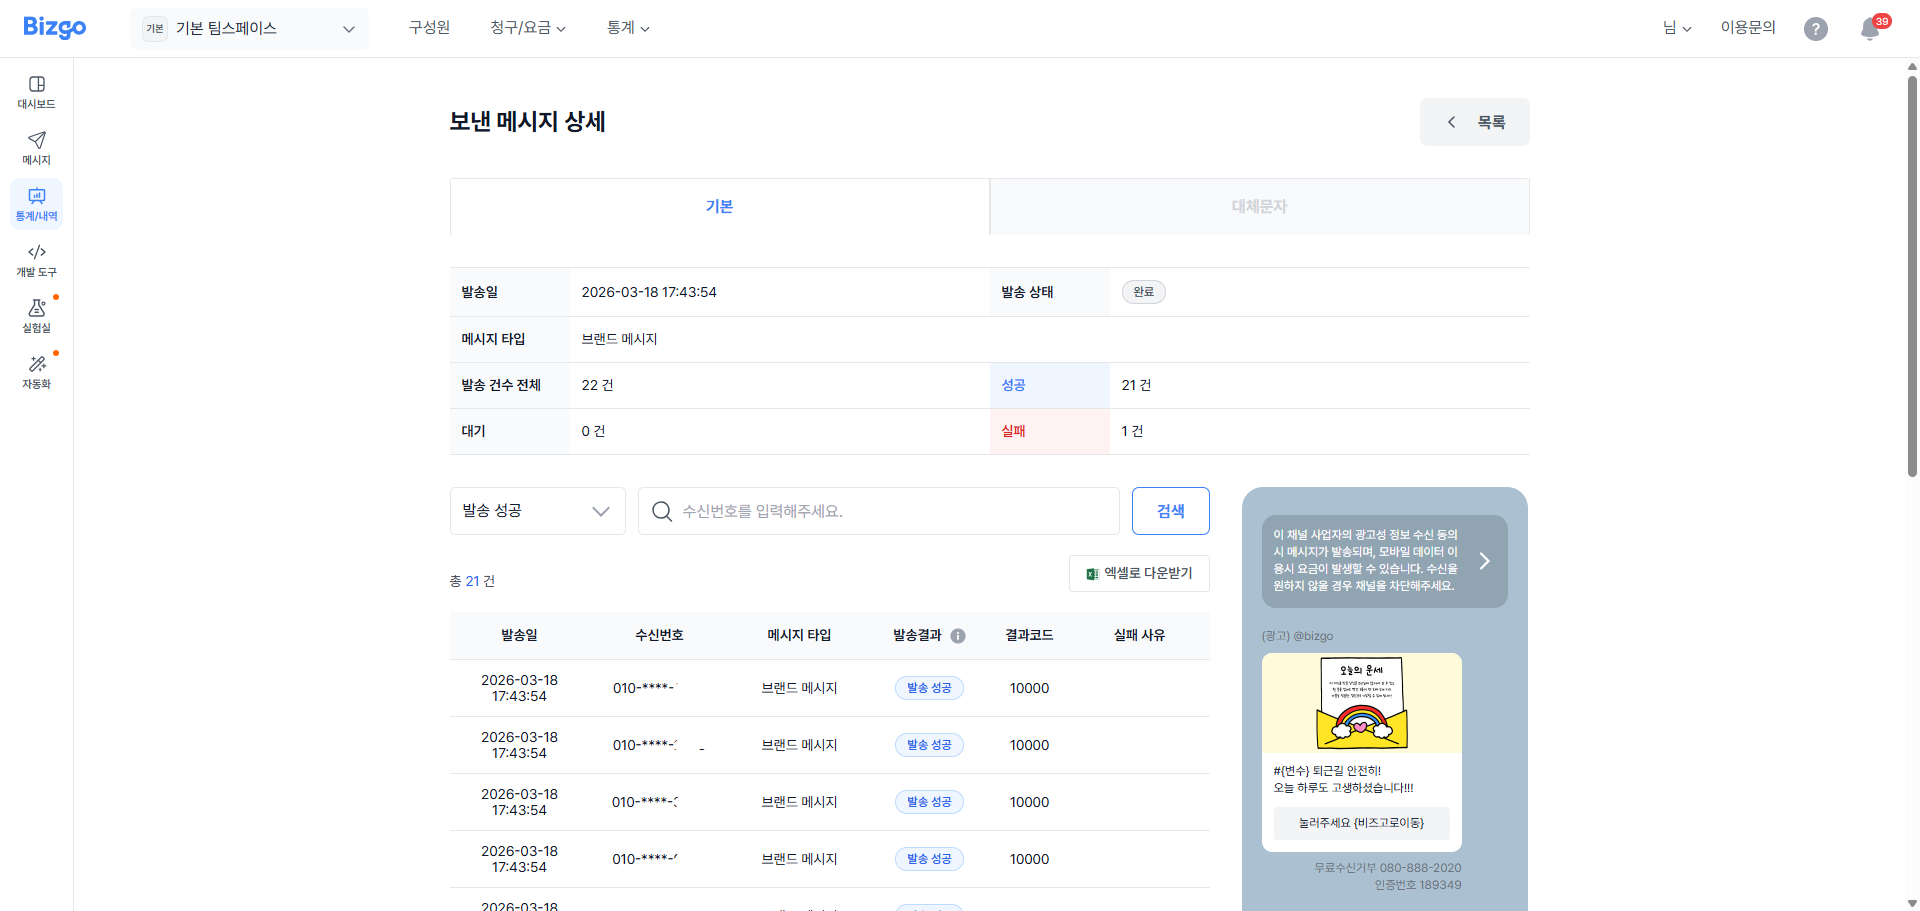
You can review messages sent in the last 90 days.
Text messages can stay in '진행중' (in progress) for up to 72 hours, and Kakao Talk messages for up to 24 hours.
Messages with failover text configured are labeled 대체문자 (Failover text) in the list.
The send count is the total number of recipients in the send request; success is the number of those requests whose delivery result is success, failure is the number whose delivery result is failure, and pending is the number whose delivery result is pending.
2. Sent message details
You can review the details of a sent message.
You can see both the original message you intended to send and the failover SMS/LMS/MMS content.
Reservation messages
1. Reservation message list
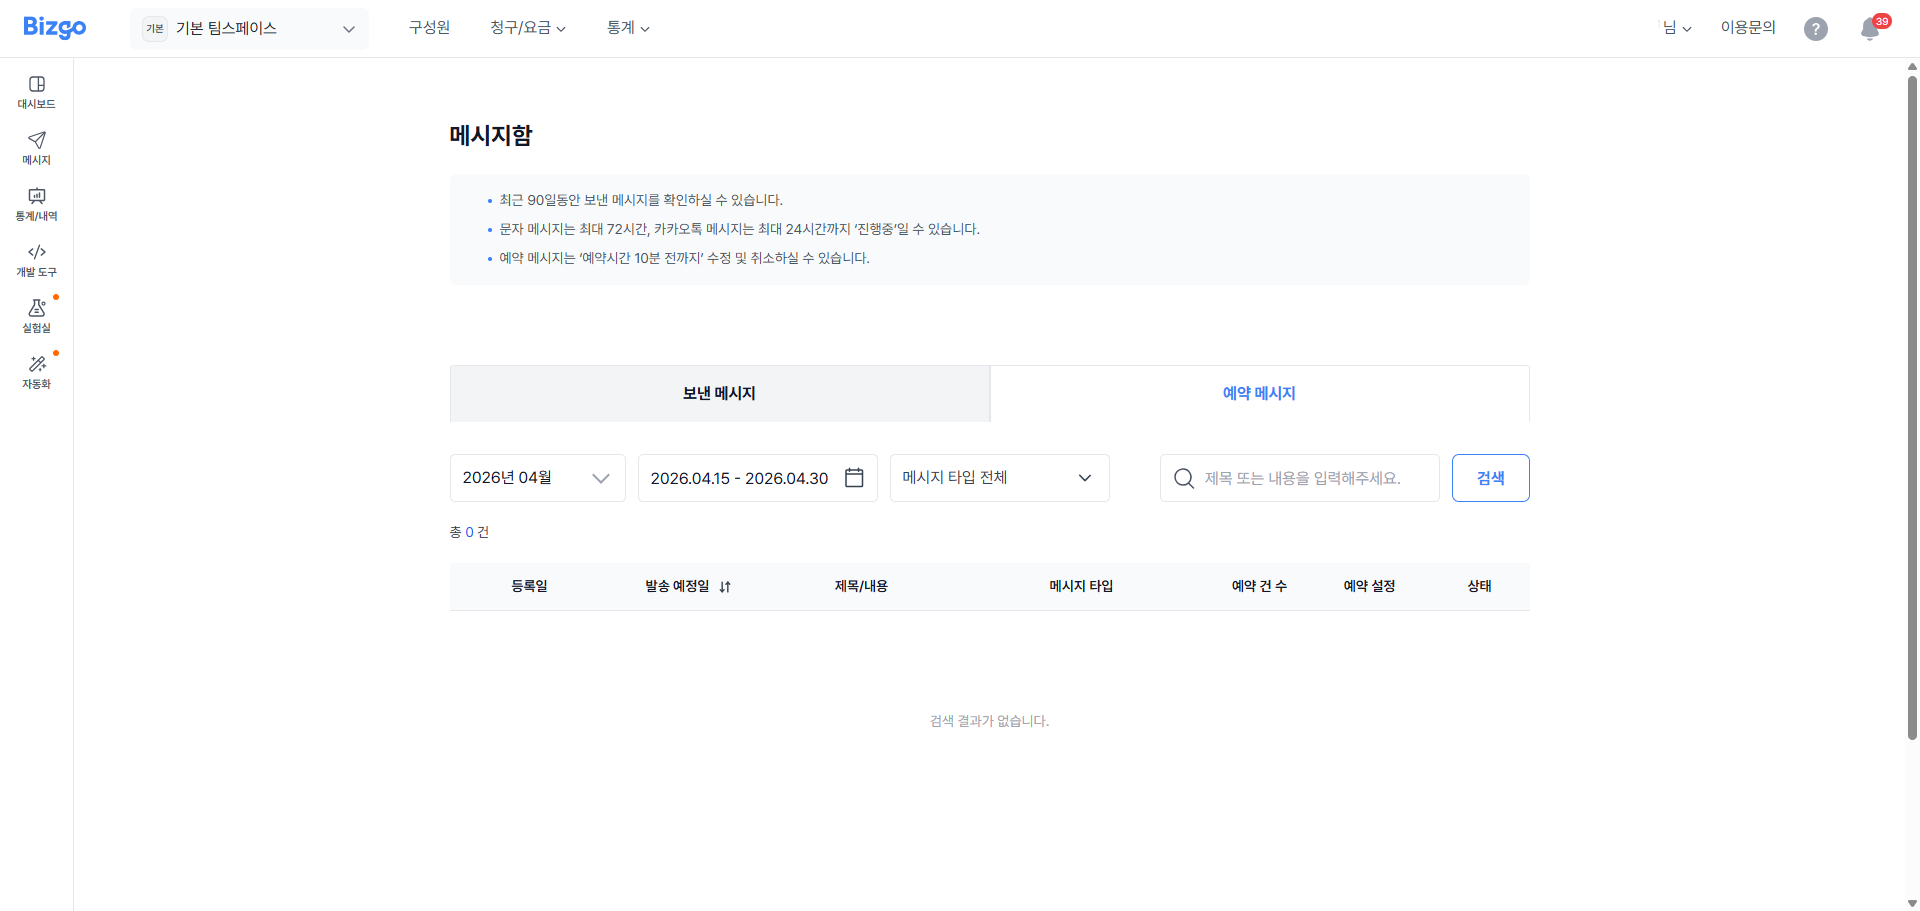
You can review reservations from the last 90 days.
You can edit or cancel a reservation message up to 10 minutes before its reservation time.
2. Reservation message details
You can review the details of a reservation message.
You can see both the original message you intend to send and the failover SMS/LMS/MMS content.