
No-code automation
Connect Bizgo to a workflow automation tool and send messages automatically, with no code.
You can call the Bizgo API using events from external services such as Google Sheets, Typeform, a CRM, or a commerce platform as your trigger.
Make and Zapier integrations released
Bizgo has released official integrations for Make and Zapier.
Previously you had to configure an HTTP module yourself; now you can build message send automation just by choosing a Bizgo-specific action.
- Make — search for the Bizgo app in the marketplace and add it straight to your scenario
- Zapier — connect a Bizgo action to your Zap and integrate instantly with thousands of apps
- No separate HTTP setup: enter your unified API key (통합키) and the integration is done
Try the demo below to see the integration key management flow for yourself.
Overview
Message send automation means setting things up so that a message is sent automatically, with no human involvement, when a particular event occurs.
Automating repetitive send work raises your operational efficiency and reduces mistakes.
Common use cases
- Send an informational SMS/LMS/MMS to a customer automatically when a row is added to Google Sheets
- Send a notification message when an order or shipping status changes
- Send announcement messages repeatedly from a prepared recipient list
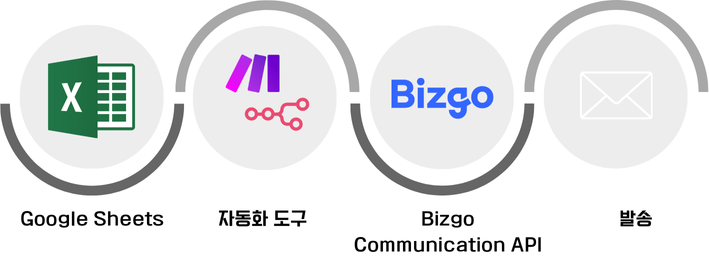
When an event occurs in your data source, the automation tool detects it, calls the Bizgo API, and sends the message over the channel you specified.
Choose a tool

Build automation scenarios by clicking, no code required. Connecting external services such as Google Sheets is straightforward.
Open source. Handles complex conditional branching and can be self-hosted.

SaaS based. Connect to thousands of apps instantly with nothing to install.
Shared prerequisites
Whichever tool you use, prepare the following before you integrate.
- Create a Bizgo account and a team space.
- Register the sender number and sender information for the message channel you will use.
- Issue a Bizgo V2 API key and register the IP of your automation tool's server in the IP ACL.
- Organize the trigger data you will use for sending. For example: recipient number, name, order number, shipping status.
API key security
Store your API key using each tool's credentials, secret, or environment variable feature.
Never expose it directly in a scenario body or in a shared document.
The send flow
- An event occurs — a trigger fires in an external service (Google Sheets, Typeform, Shopify, and so on)
- Data is collected — the automation tool collects trigger data such as the recipient number and variable values
- The API is called — the HTTP request step calls the Bizgo send API
- The result is handled — you check the Bizgo response code and follow up according to success or failure
Make
Build a flow yourself in which entering data in a Google Form makes Make detect the new row in Google Sheets and send a message automatically through the Bizgo API.
Google Form submitted → Row added to Google Sheets → Make detects it → Bizgo API call → Message sent
Prerequisites
| Item | Notes |
|---|---|
| Make account | Sign up at make.com |
| Google account | For Google Form and Sheets |
| Bizgo unified API key | Issue it in Integration management (연동관리) |
| Sender number | You must complete sender number registration |
Step 1: Set up a Google Form
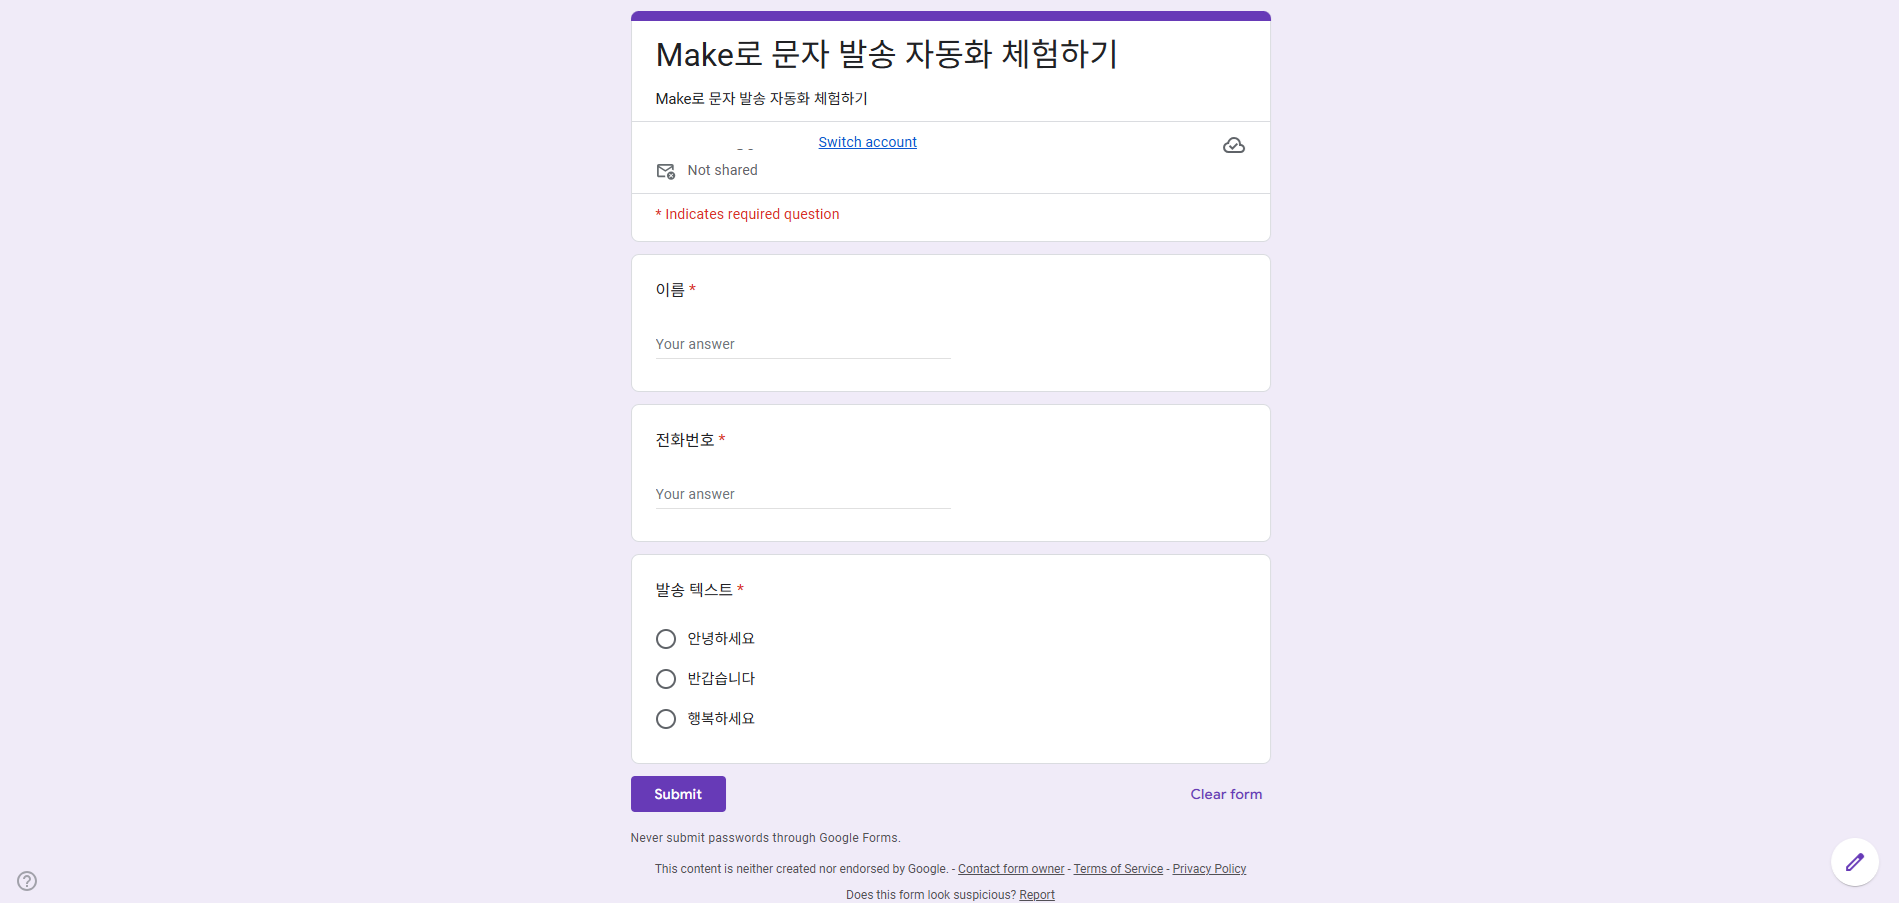
Create a Google Form to collect recipient information, and connect the responses to Google Sheets automatically.
- Sign in with your Google account.
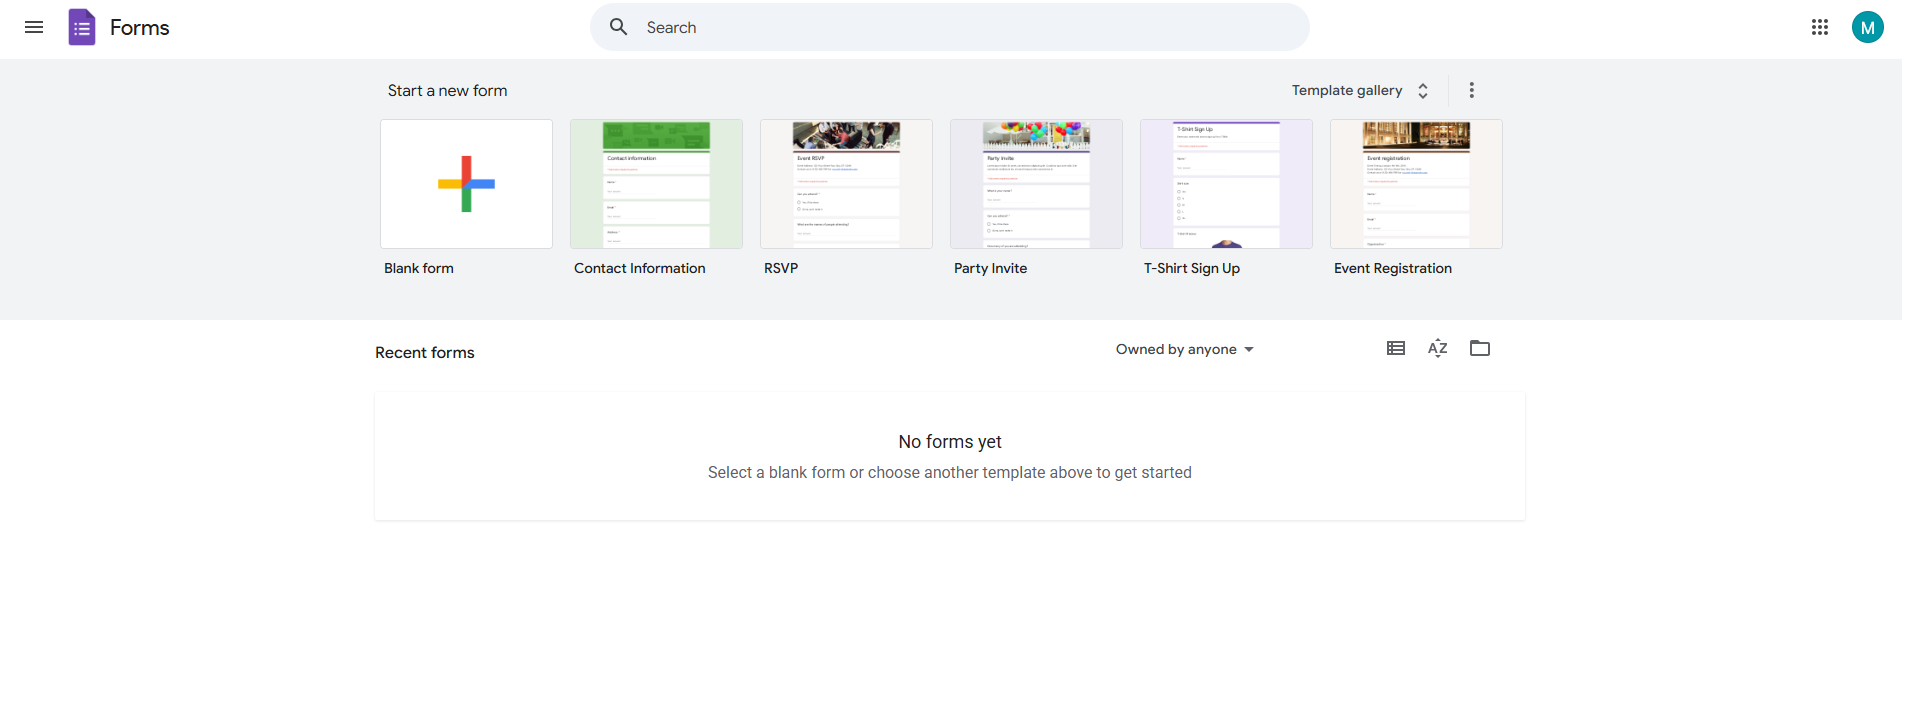
- Go to the Google Form creation page.
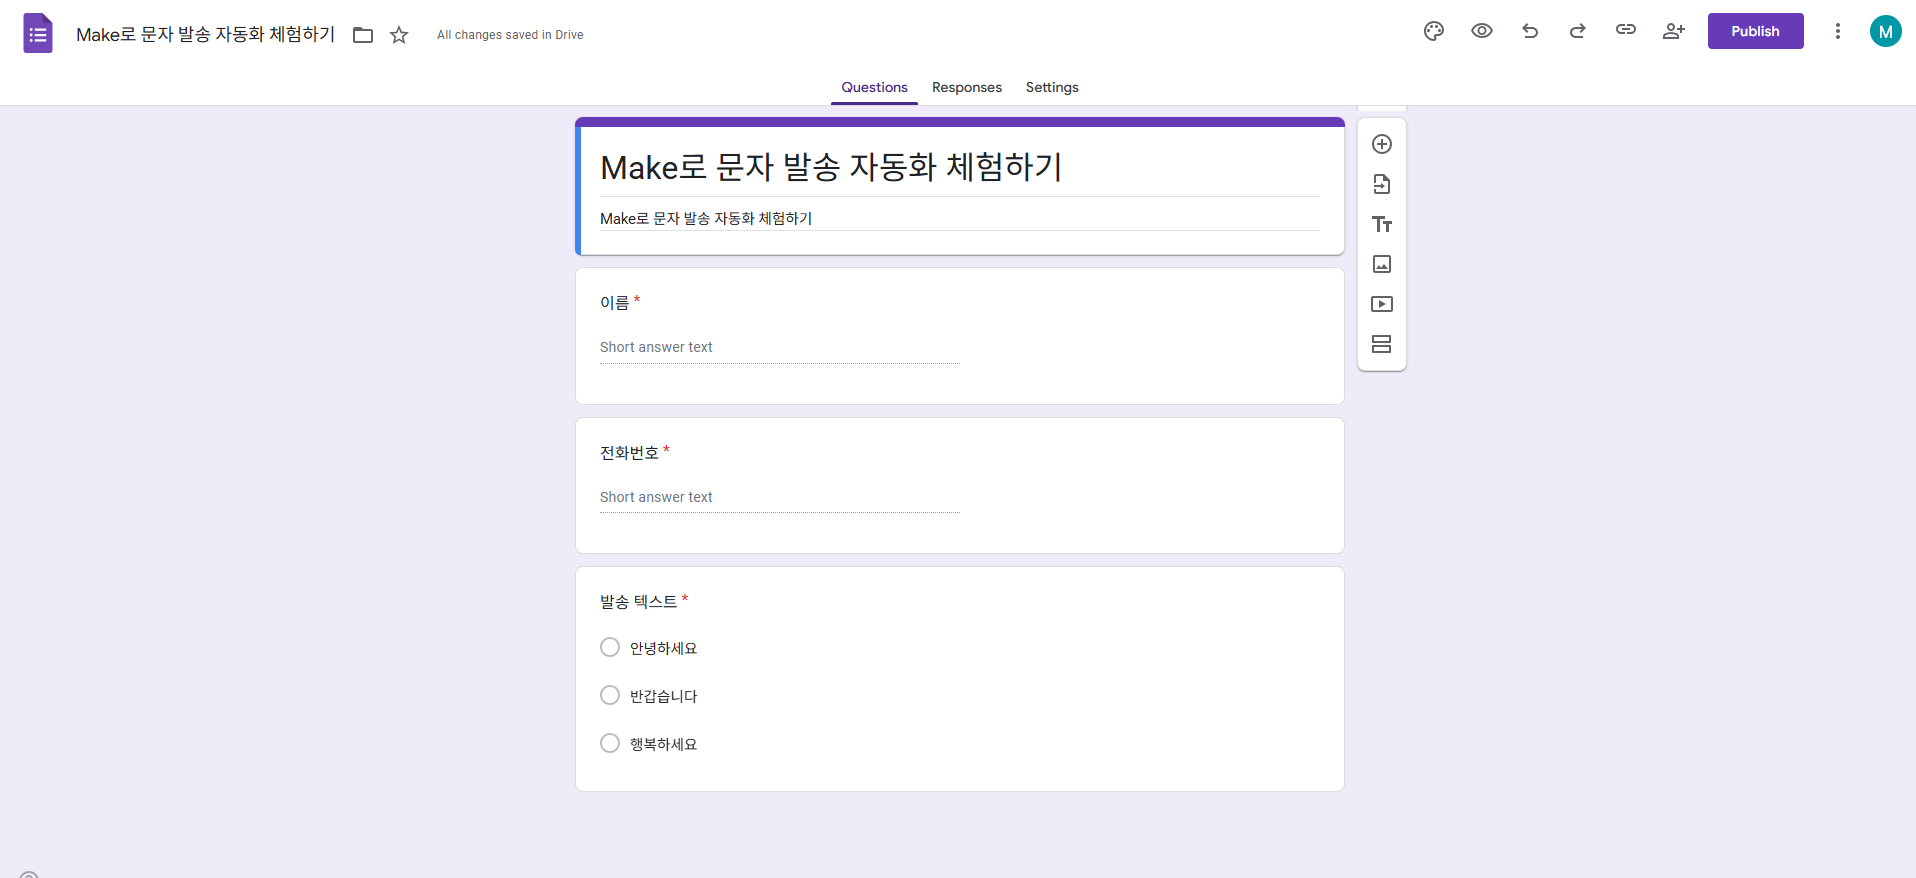
- Add the items you need — phone number, message text, and so on — then create and publish the Google Form.
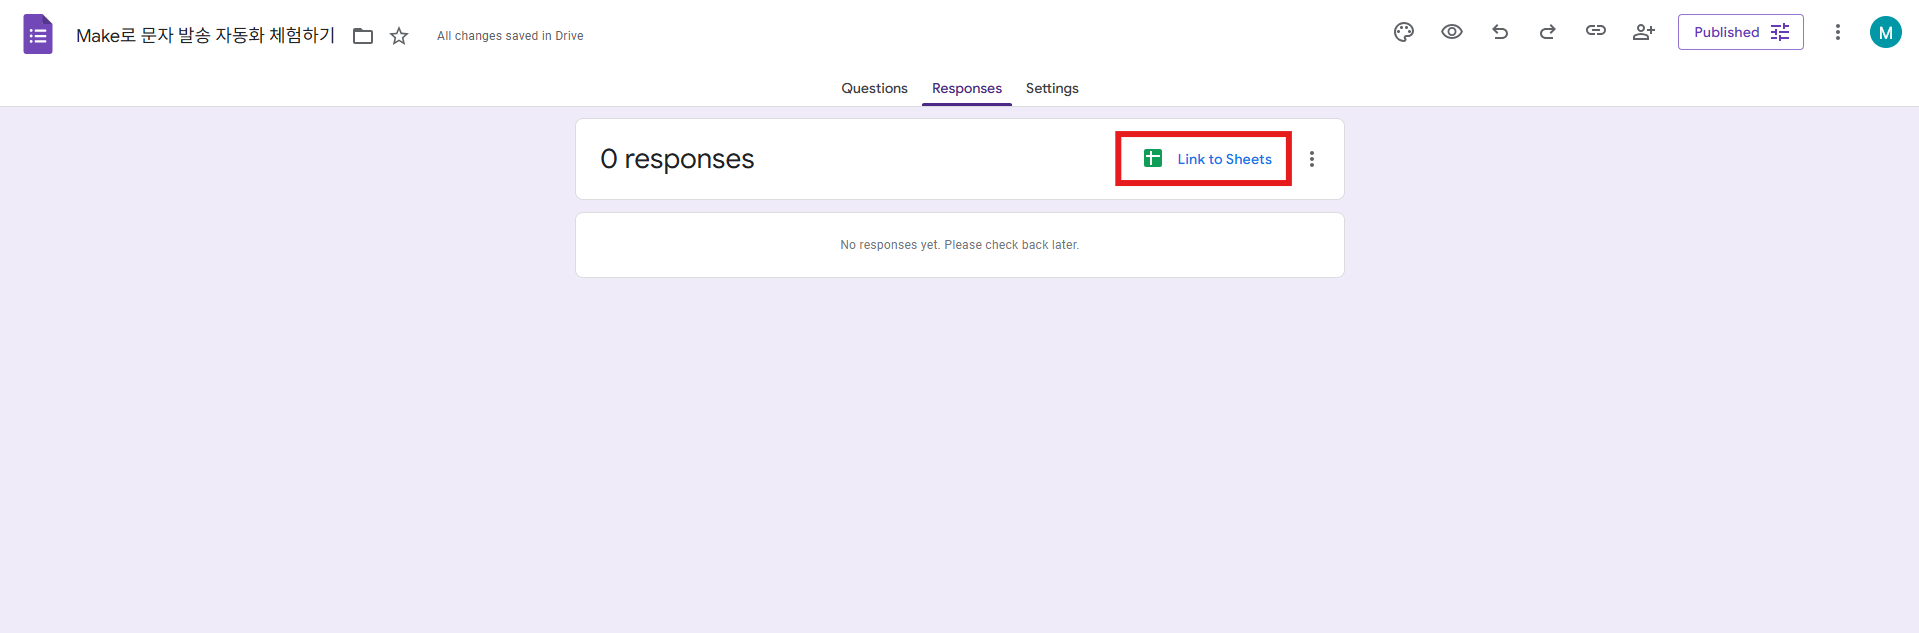
- On the Responses tab, choose Link to Sheets.
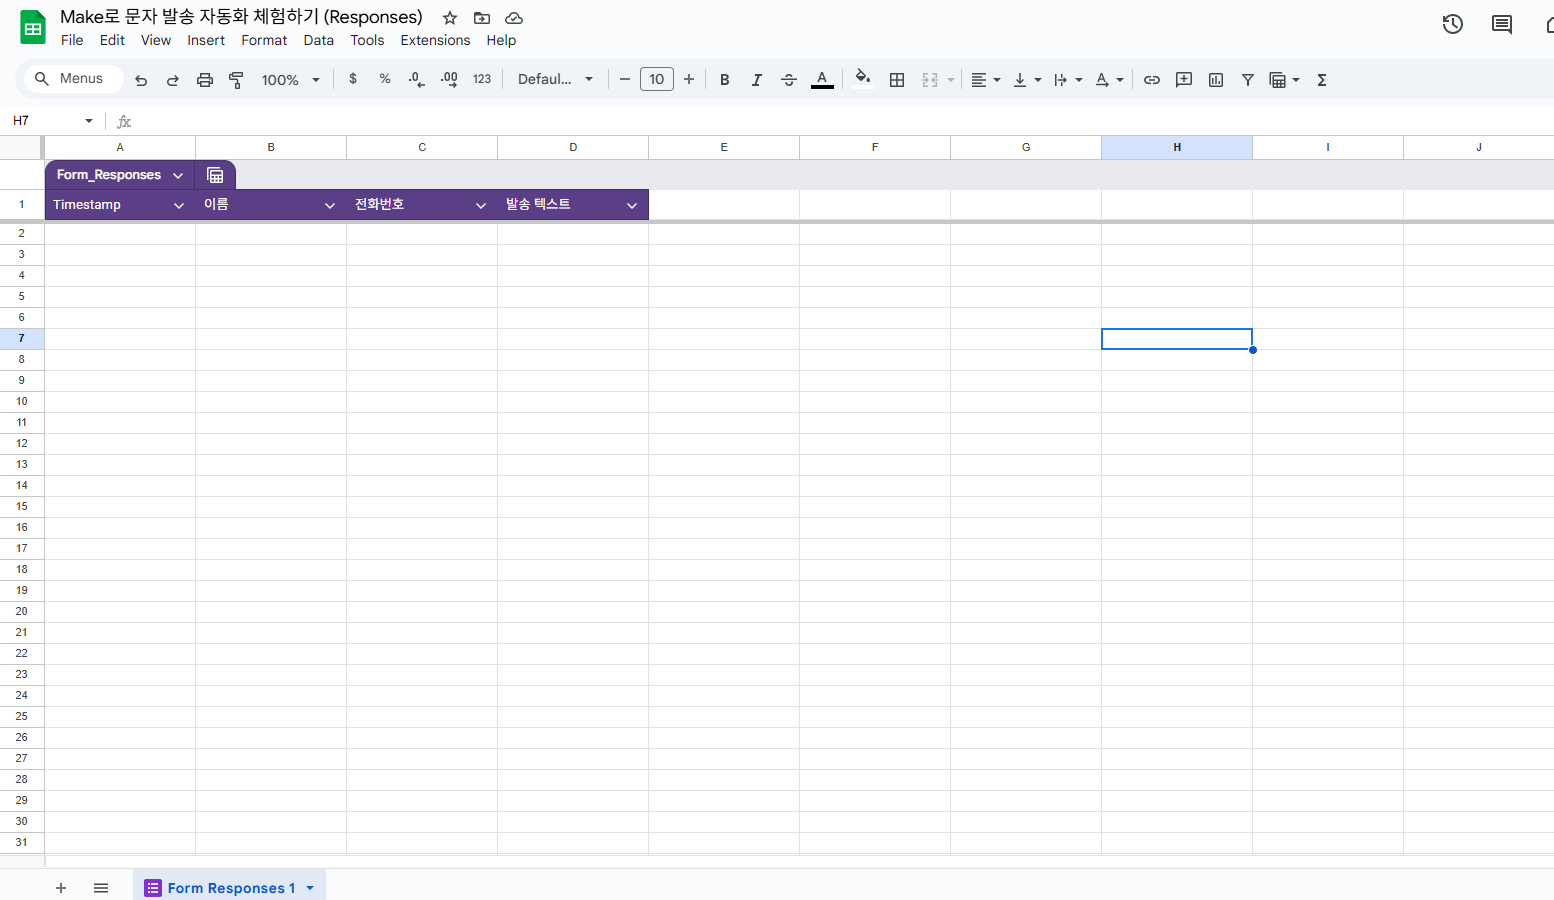
- Confirm that the response data is recorded in Google Sheets automatically.
Step 2: Create a Make scenario
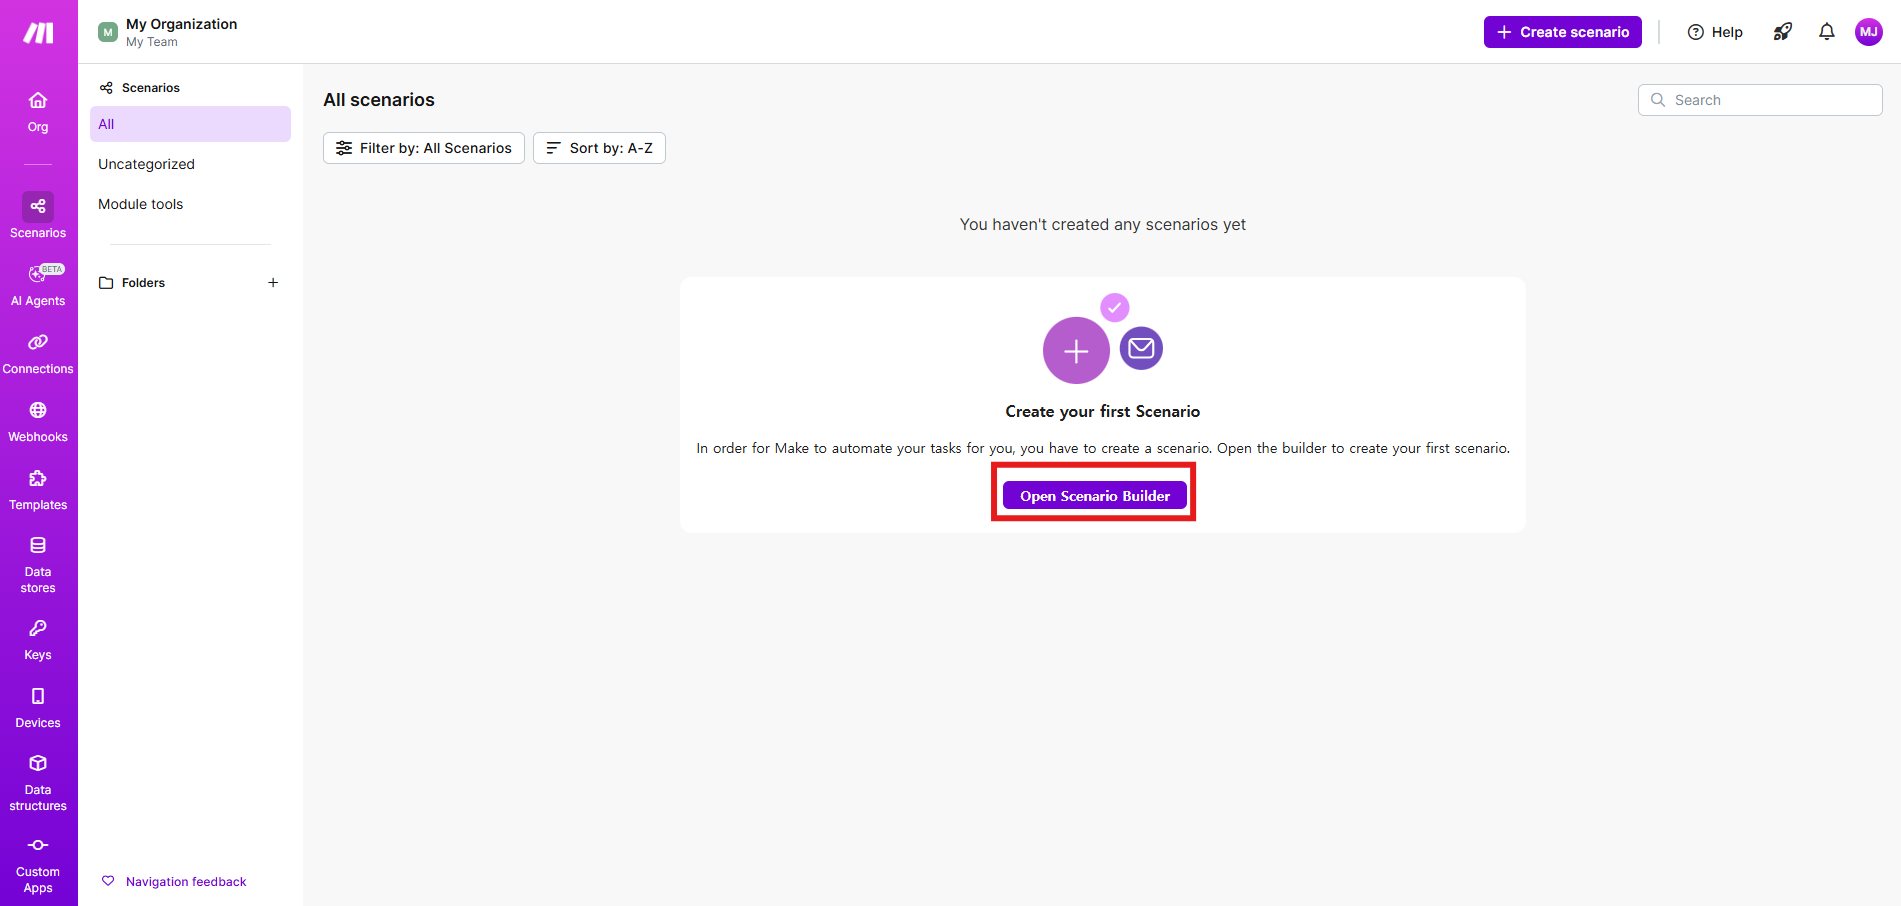
In Make, set Google Sheets as the trigger so that it detects each new row.
- Sign in to Make and create a new scenario.
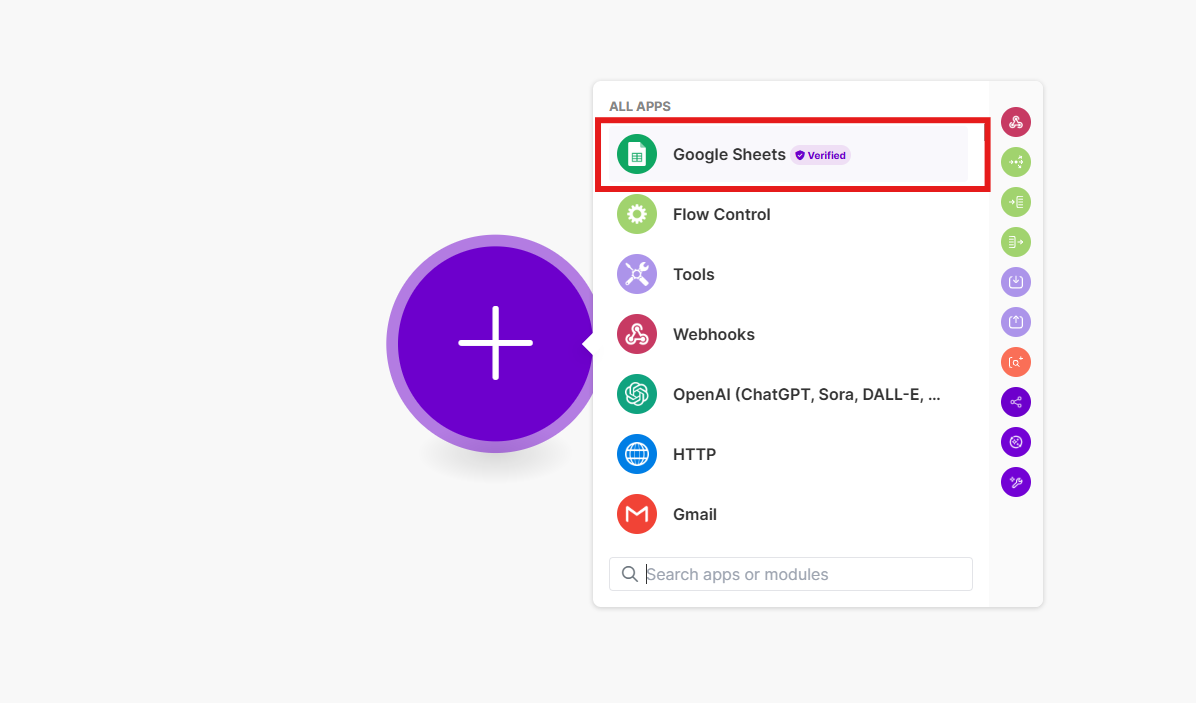
- From the trigger module list, choose Google Sheets.
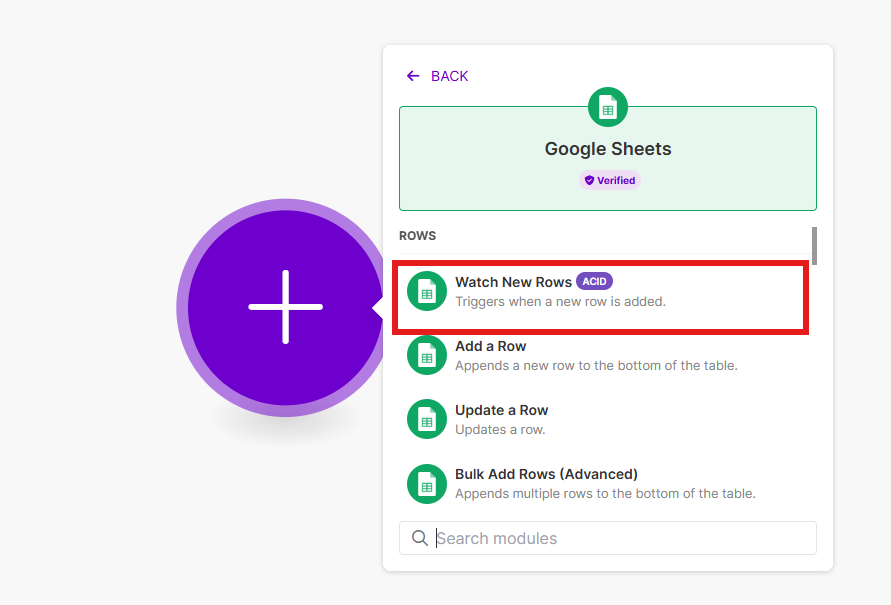
- Choose Watch New Rows as the action.
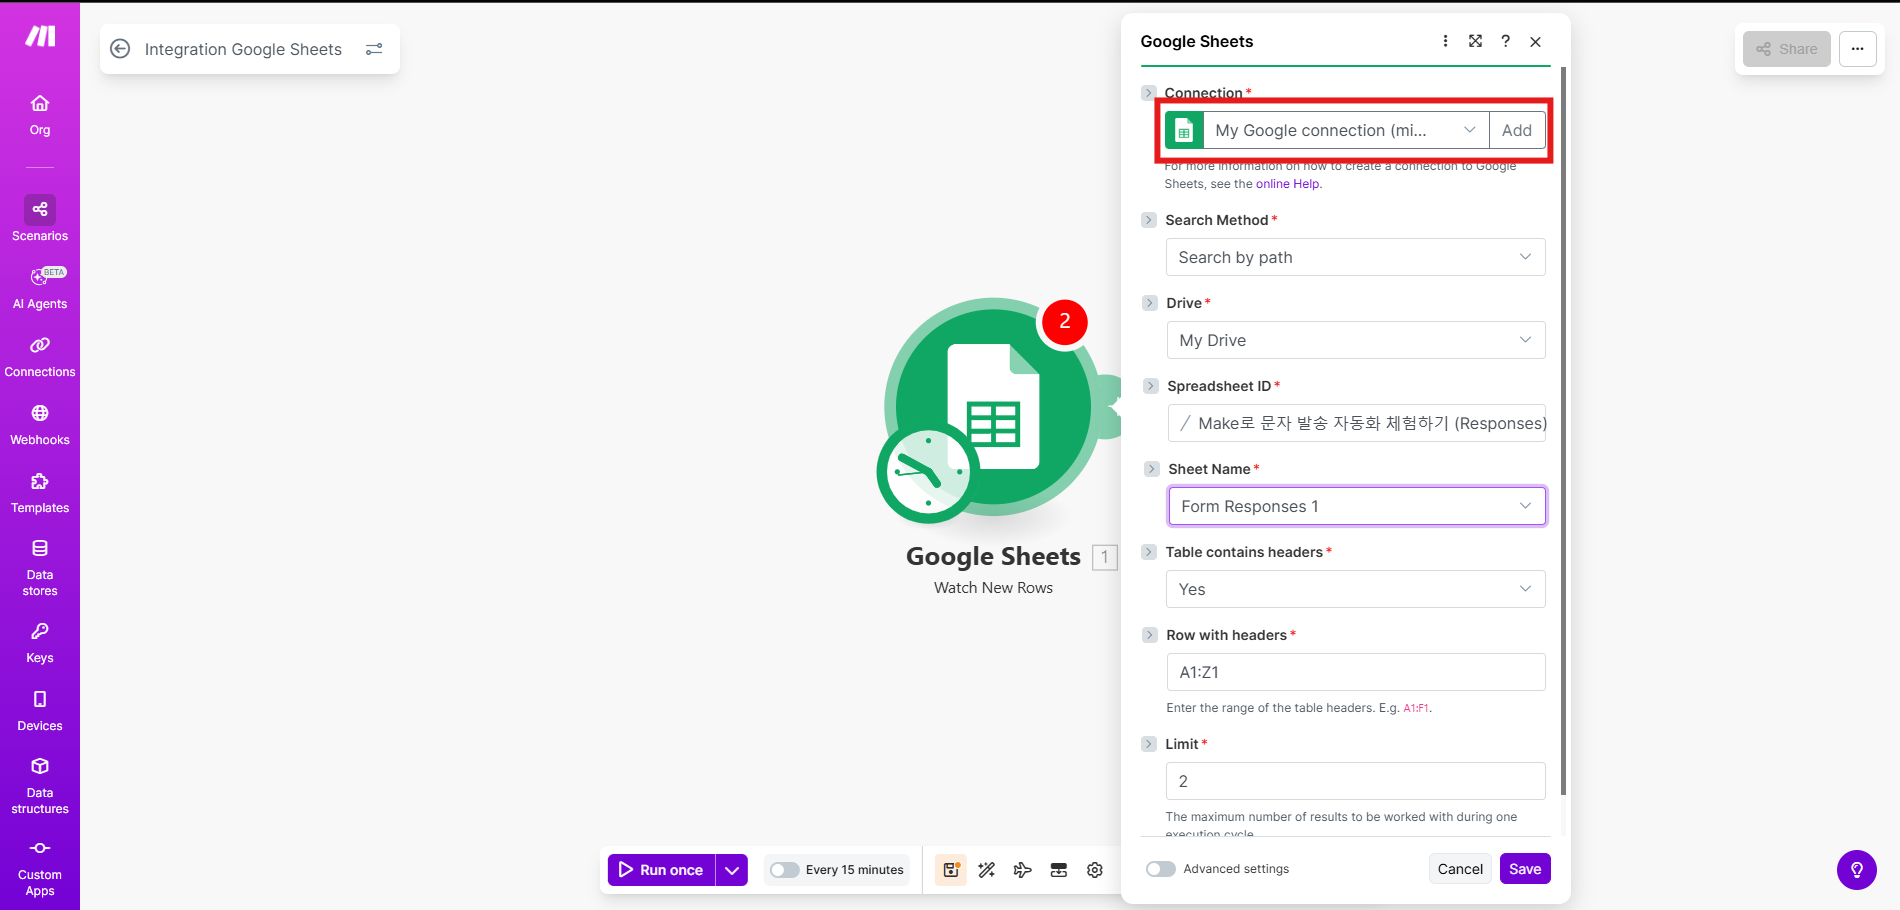
- Under Connection, sign in with your Google account and grant the permissions.
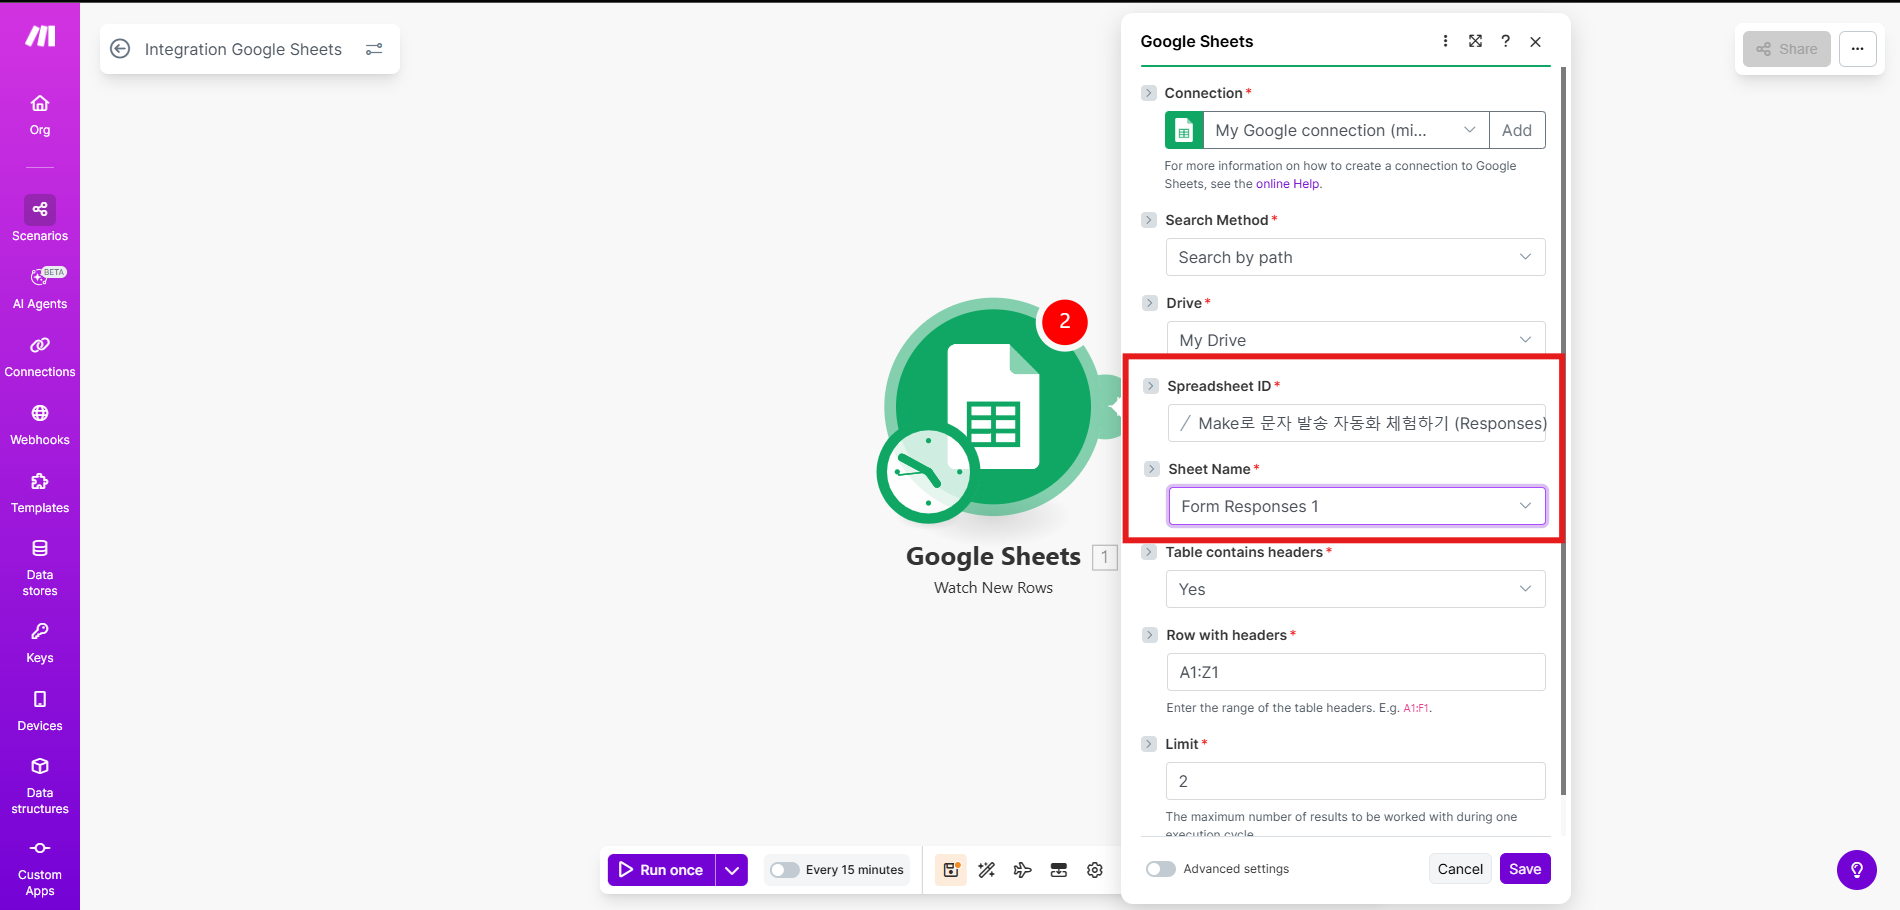
- Choose the spreadsheet ID and sheet name you connected in step 1.
- Click Save and choose All as the point to start watching from.
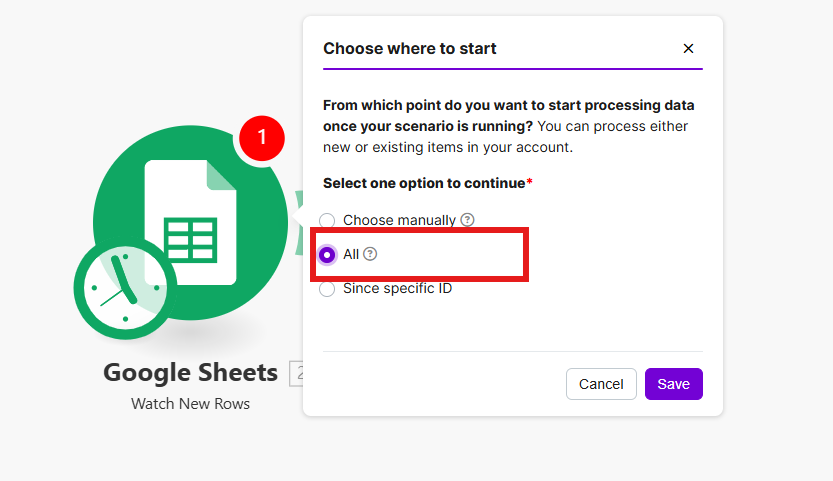
Step 3: Connect the Bizgo API
Add an HTTP module to the right of the Google Sheets module to call the Bizgo send API.
- Add an HTTP module to the right of the Google Sheets module.
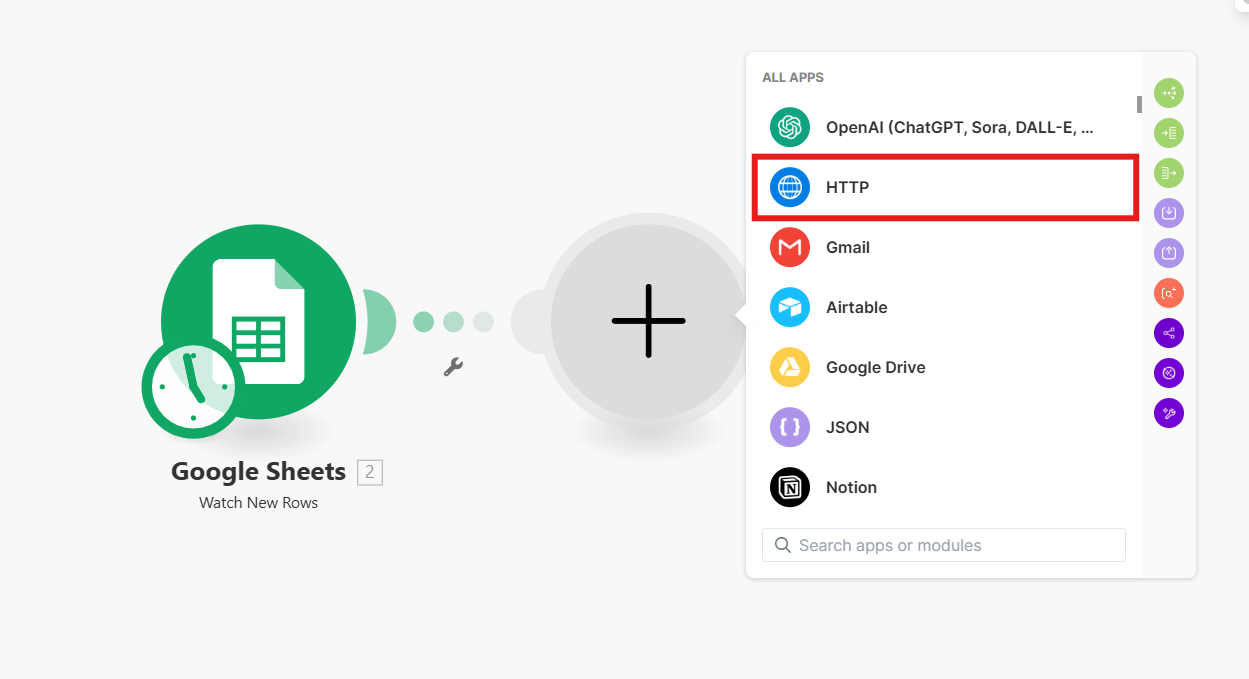
- Choose Make a request as the action.
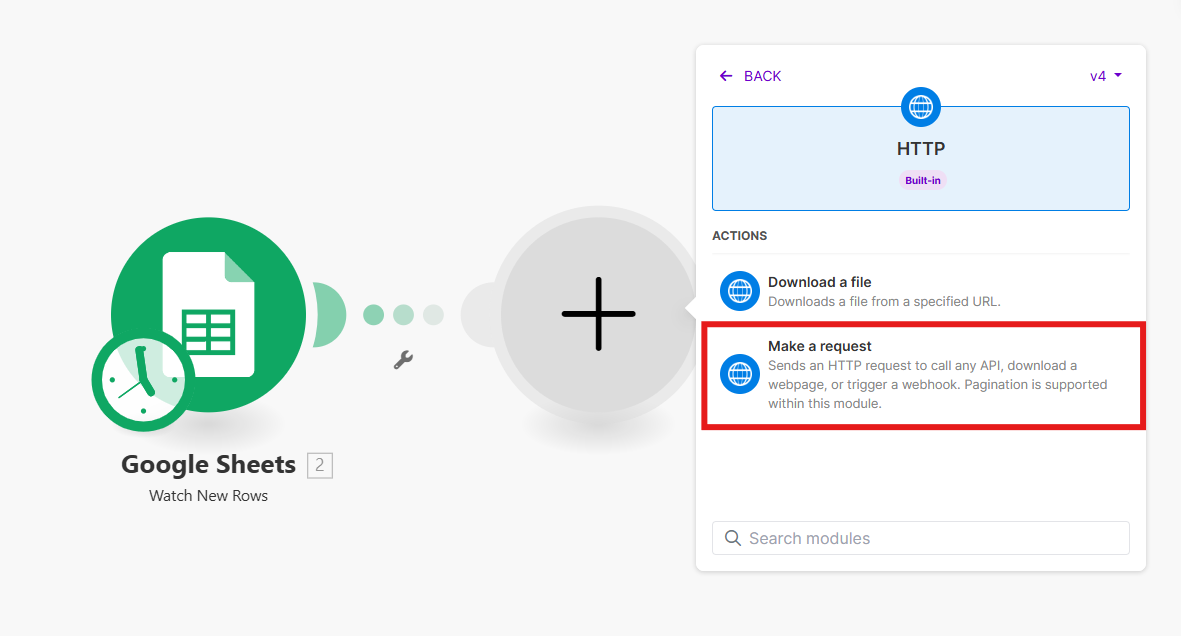
- Set Authentication type to API Key.
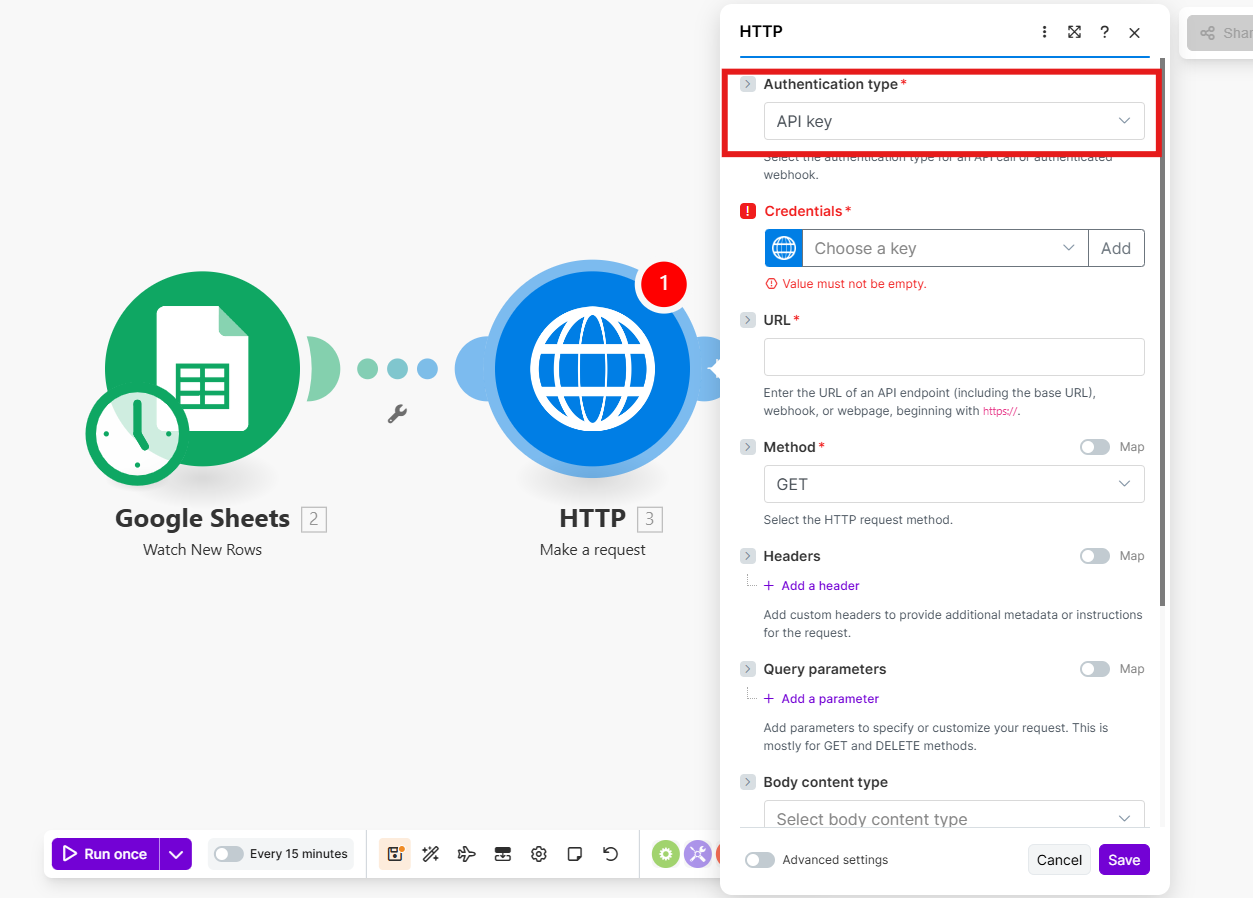
- Click Add under Credentials and enter your Bizgo unified API key.
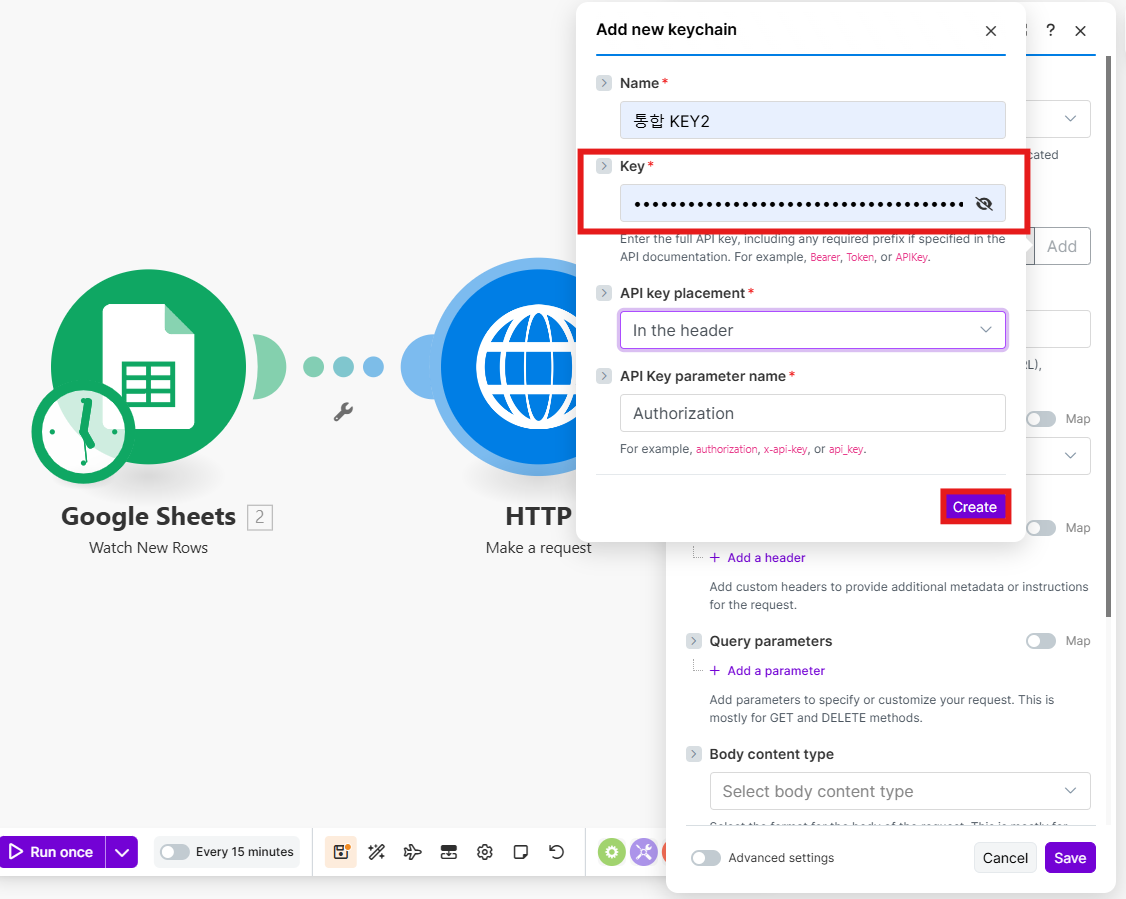
- Set the URL and Method.
| Item | Value |
|---|---|
| Method | POST |
| URL | https://mars.ibapi.kr/api/comm/v1/send/omni |
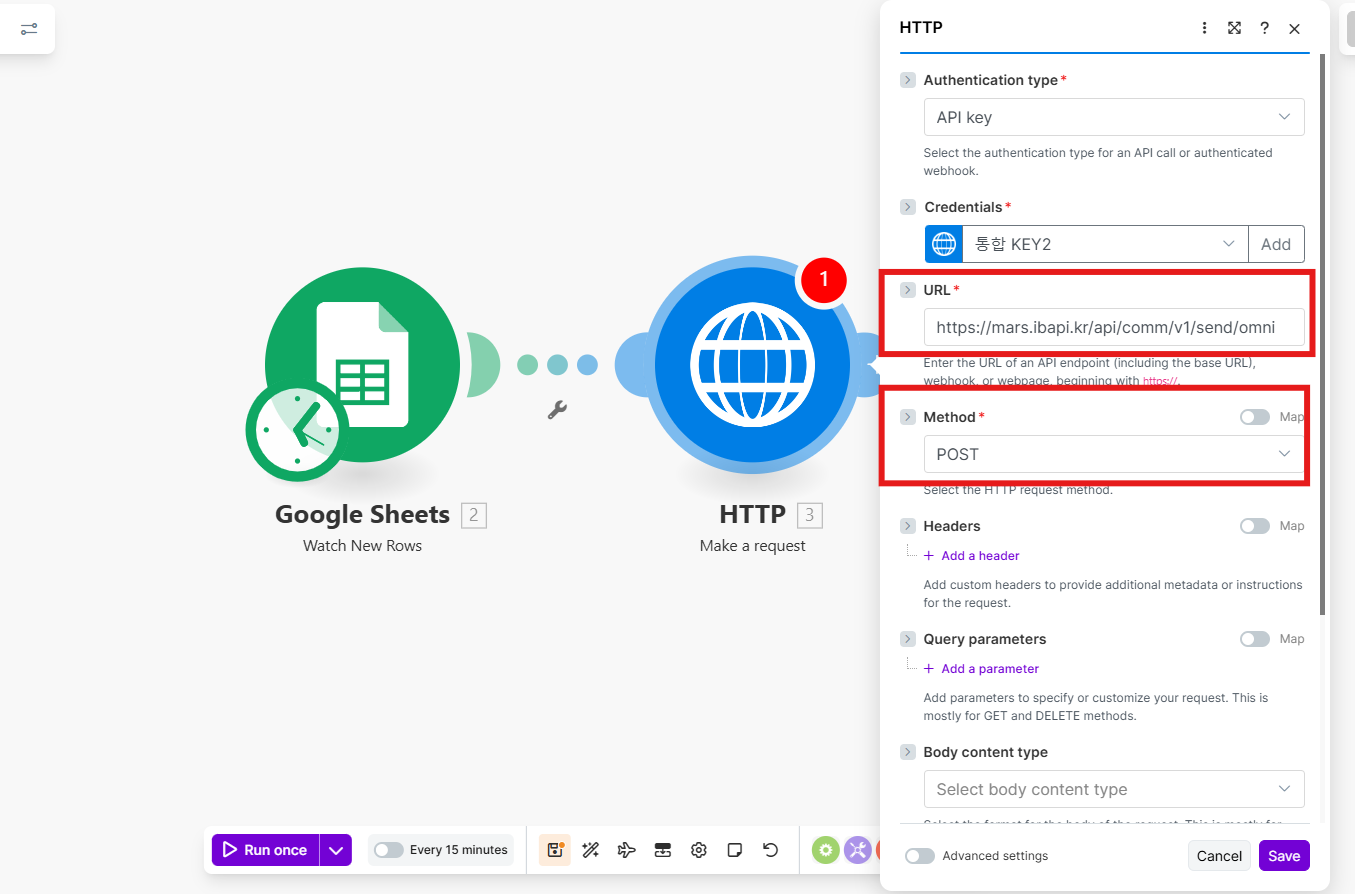
- Set Body Content type to
application/json.
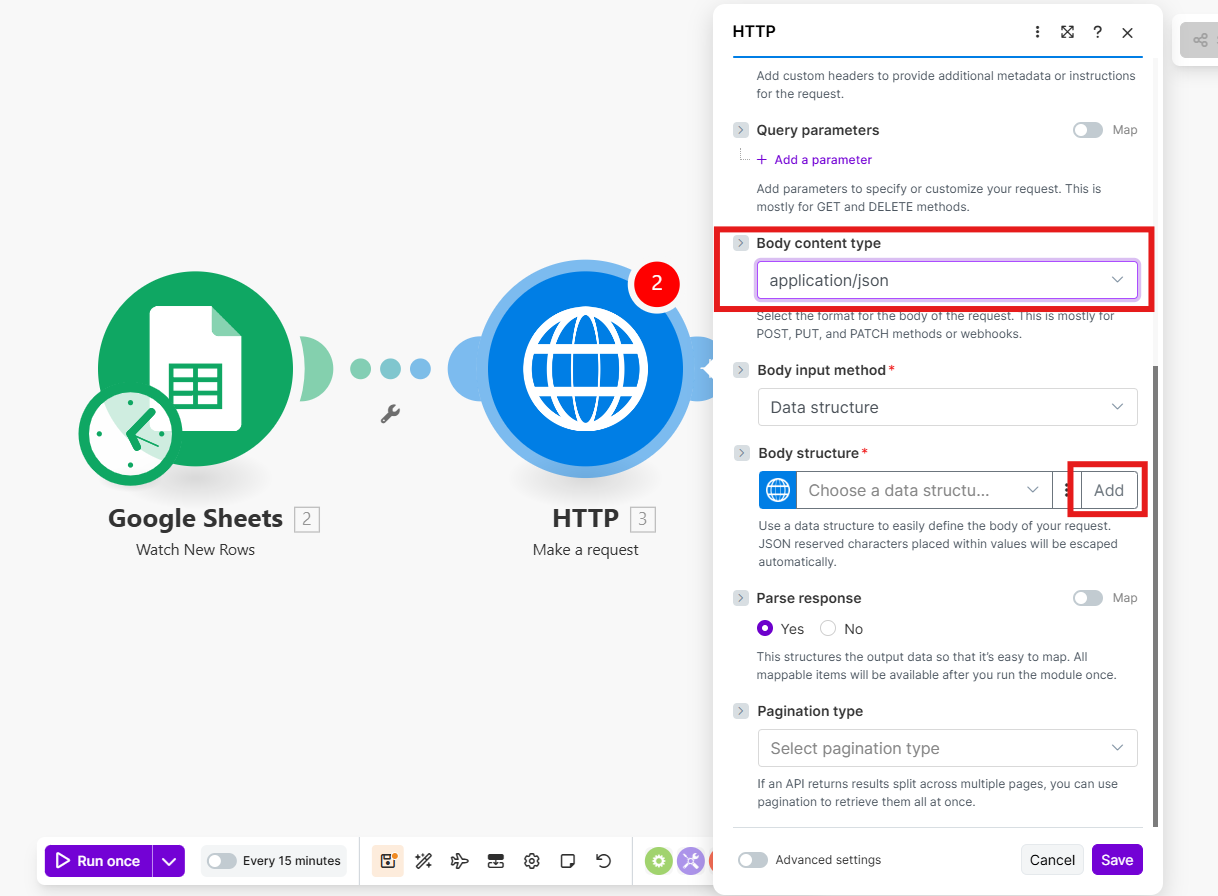
- Choose Specification → Generate.
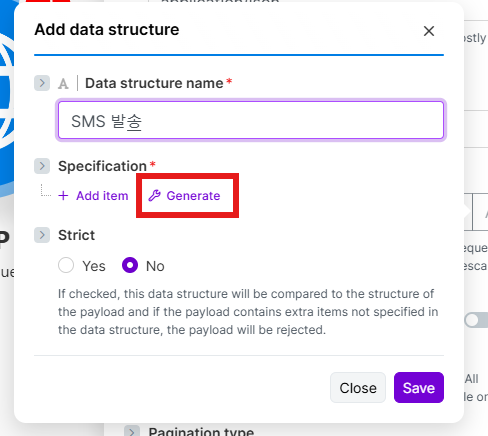
- Enter the JSON below in the Sample data field.
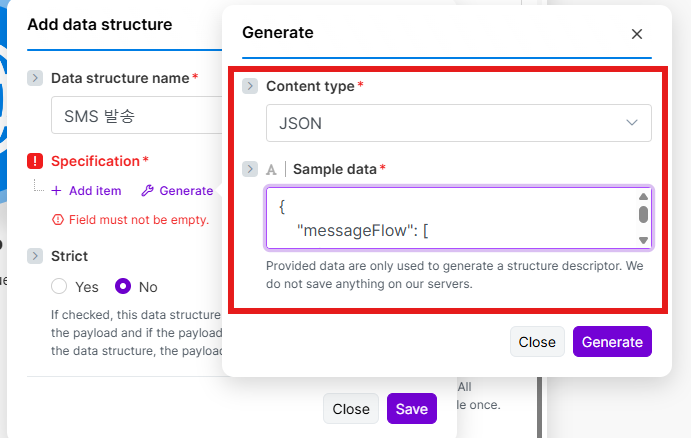
{
  "messageFlow": [
    {
      "sms": {
        "from": "{{CALLER_NUMBER}}",
        "text": "Test message"
      }
    }
  ],
  "destinations": [
    {
      "to": "{{PHONE_NUMBER}}"
    }
  ]
}
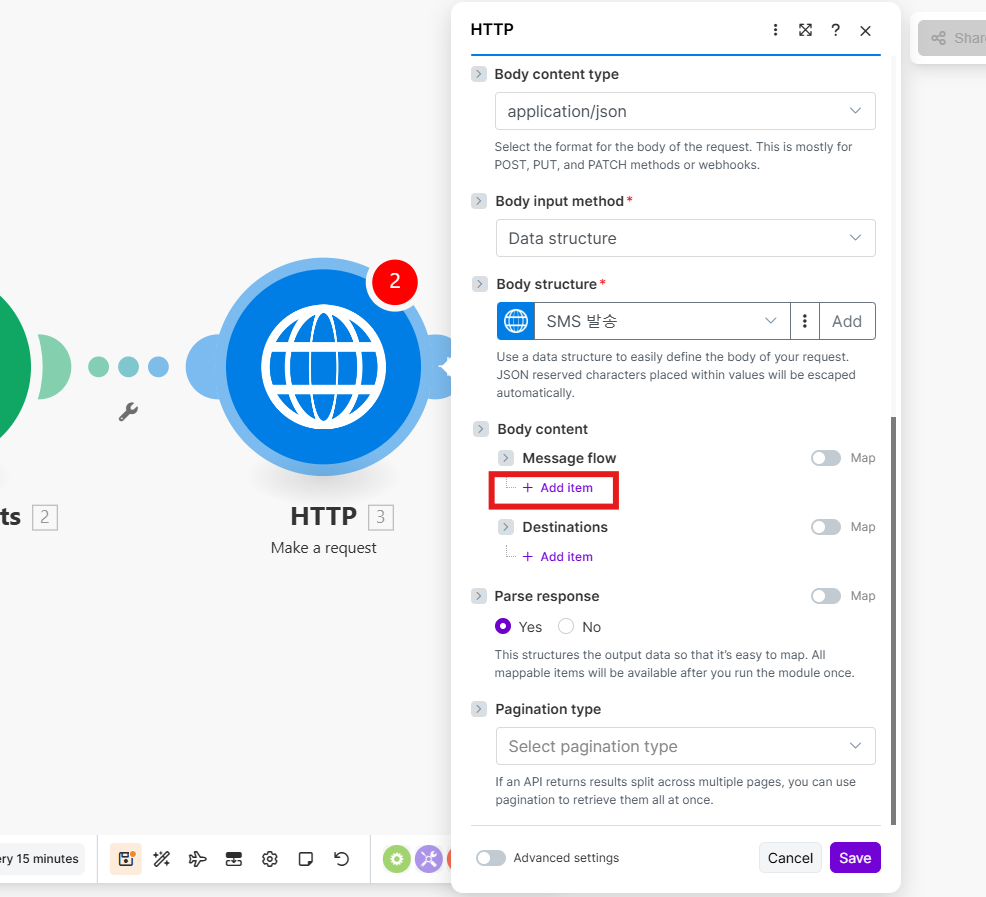
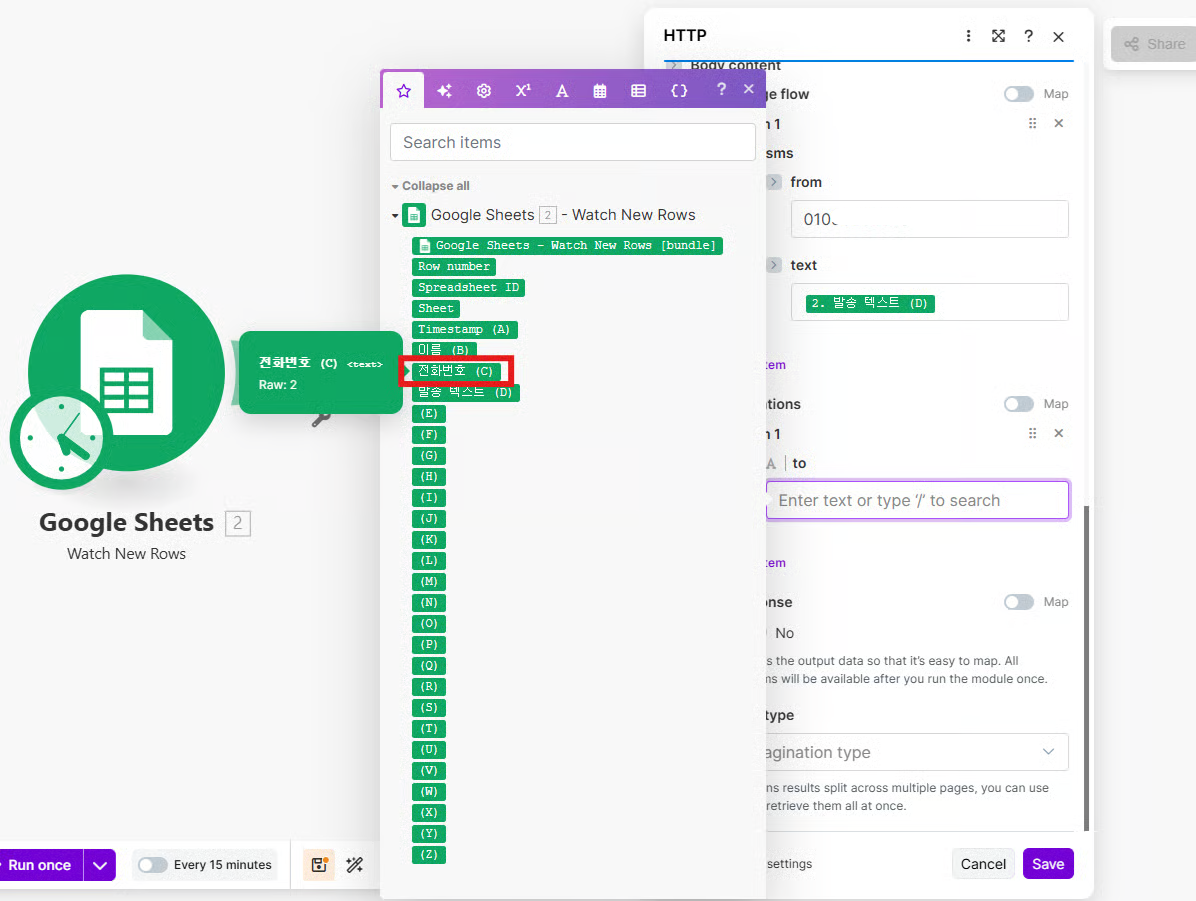
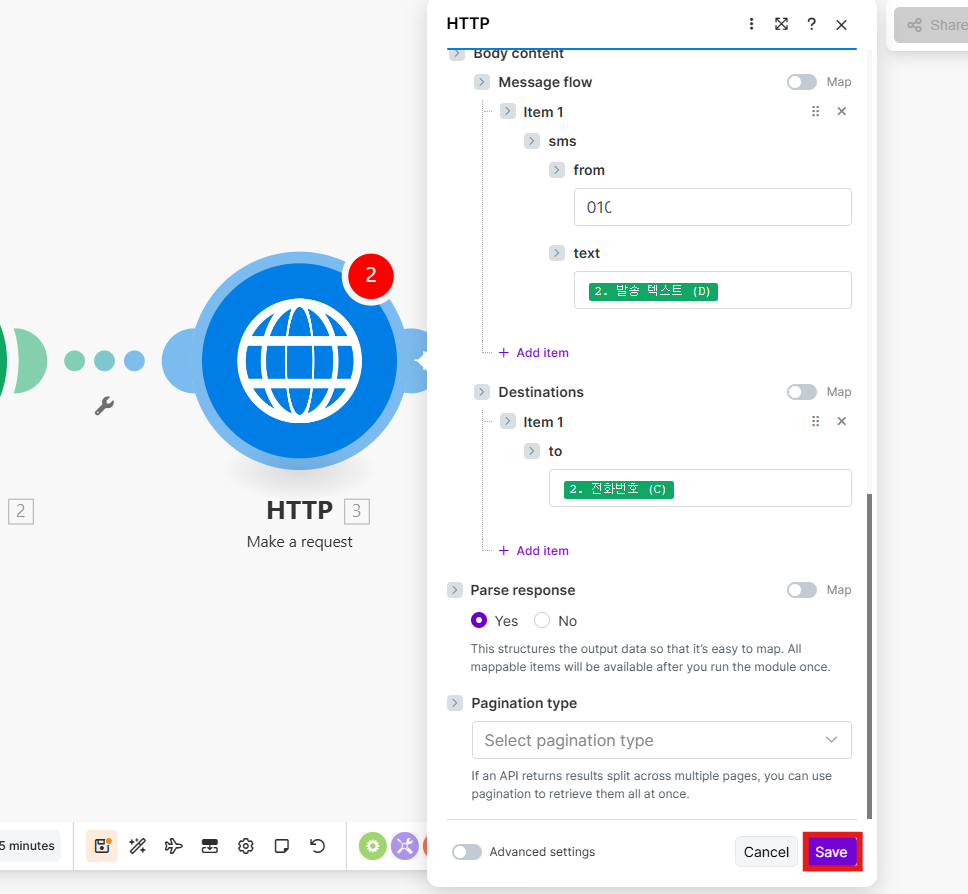
- Click Add item at the bottom of Message flow.
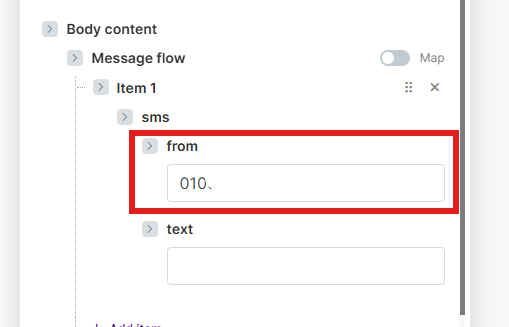
- Enter your registered sender number in the
fromfield.
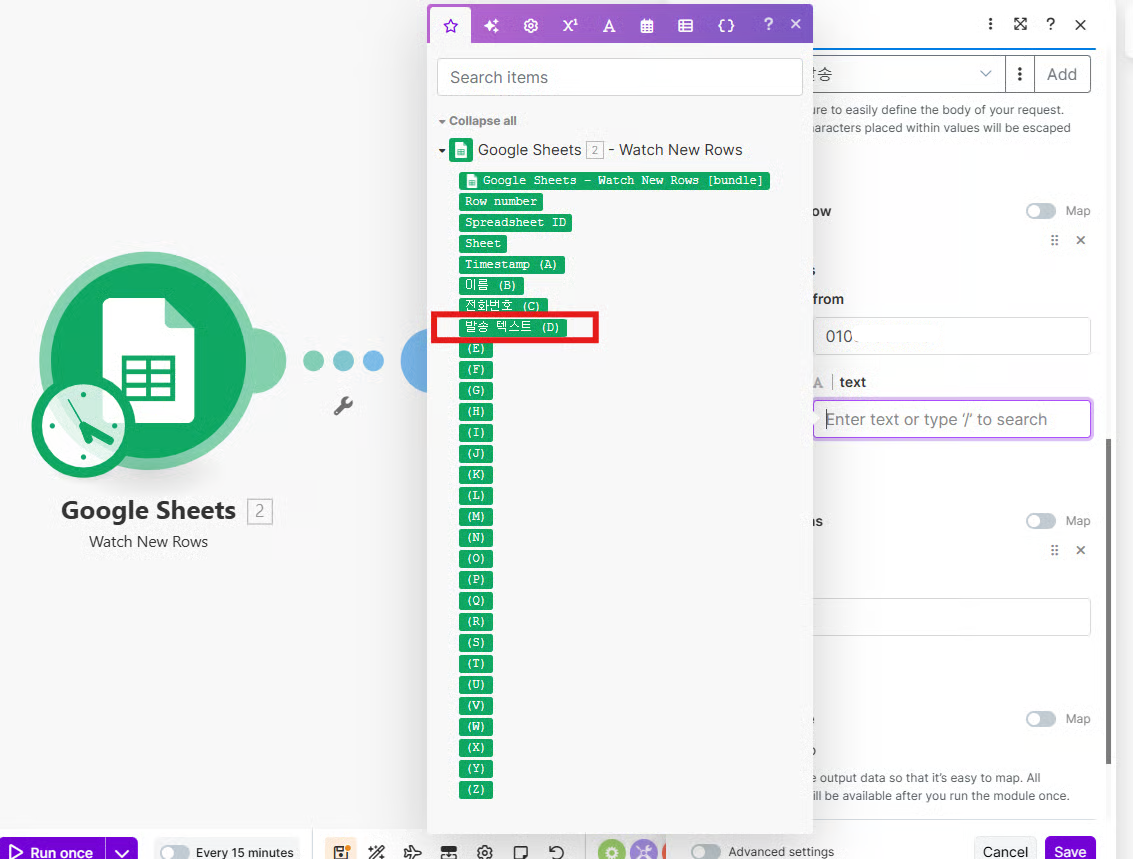
- For the
textfield, choose the message text column from Google Sheets.
- For the
tofield, choose the phone number column from Google Sheets.
- Click Save to save it.
Step 4: Test the send
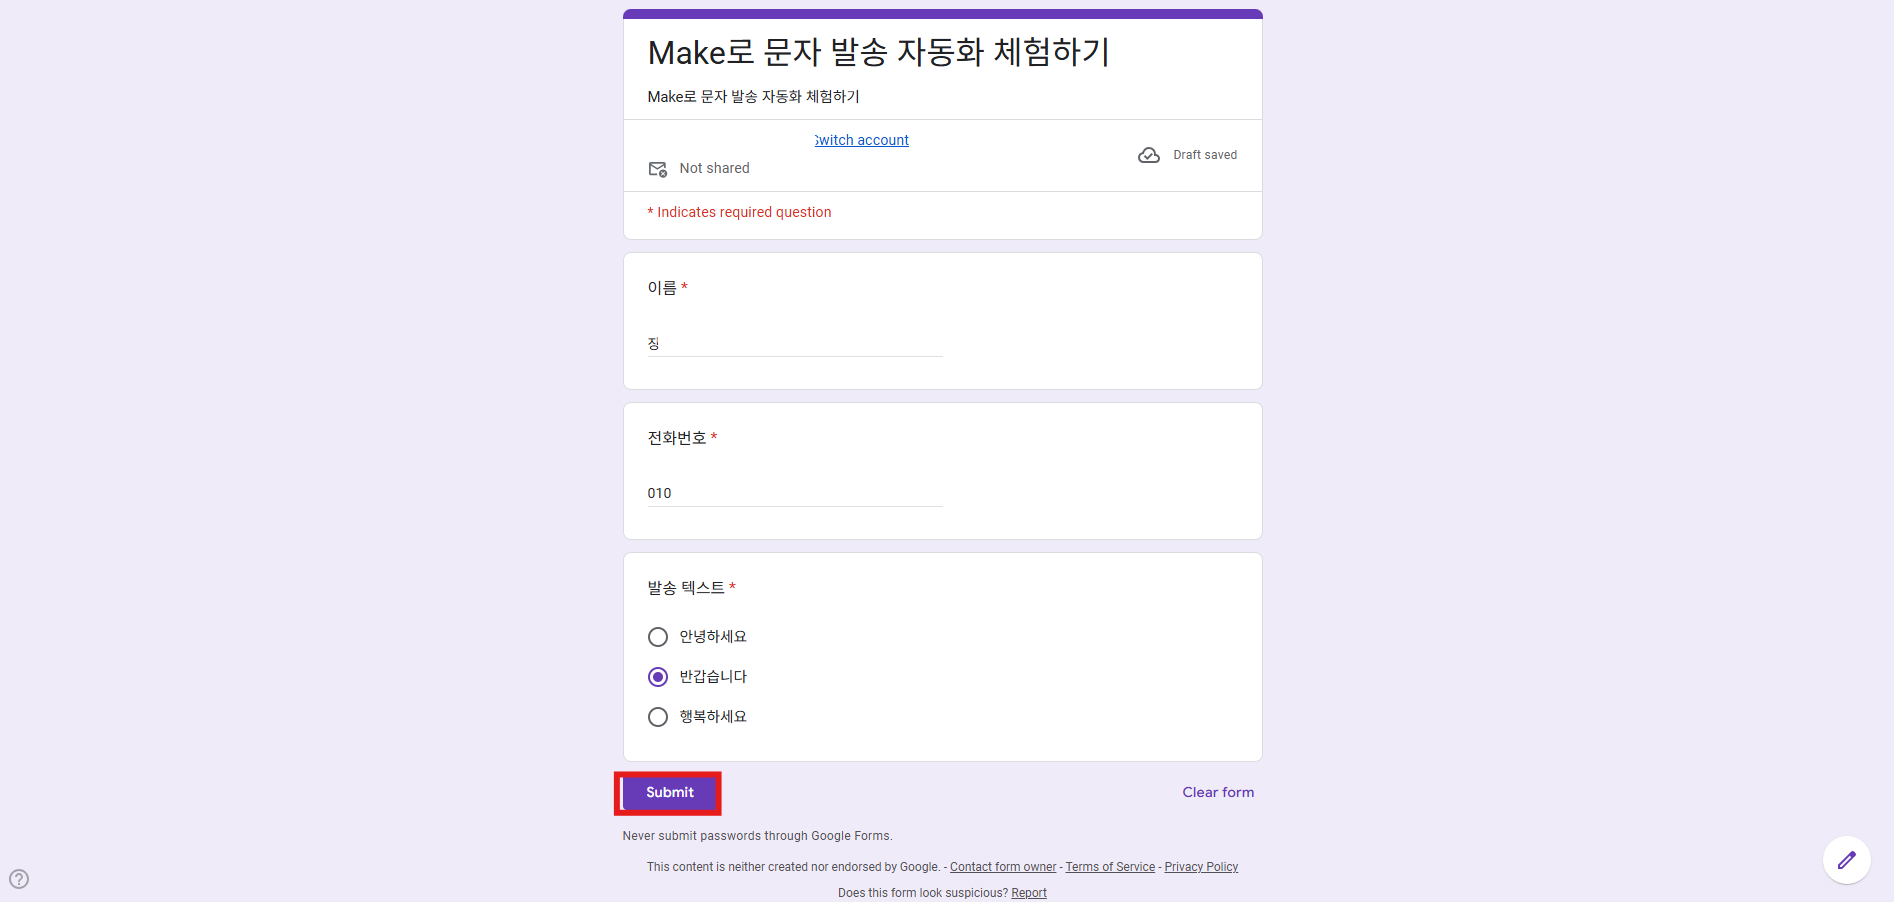
- Enter test data in the Google Form and submit it.
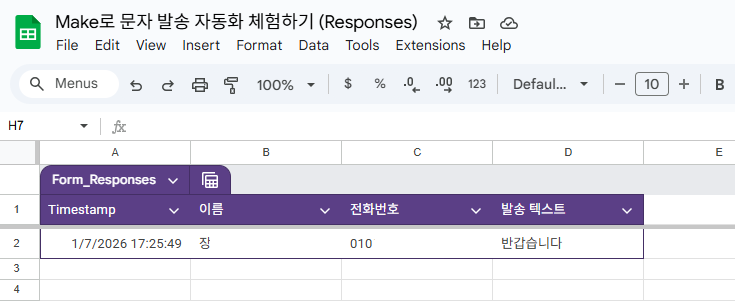
- Confirm that a row was added to Google Sheets.
- Run the Make scenario.
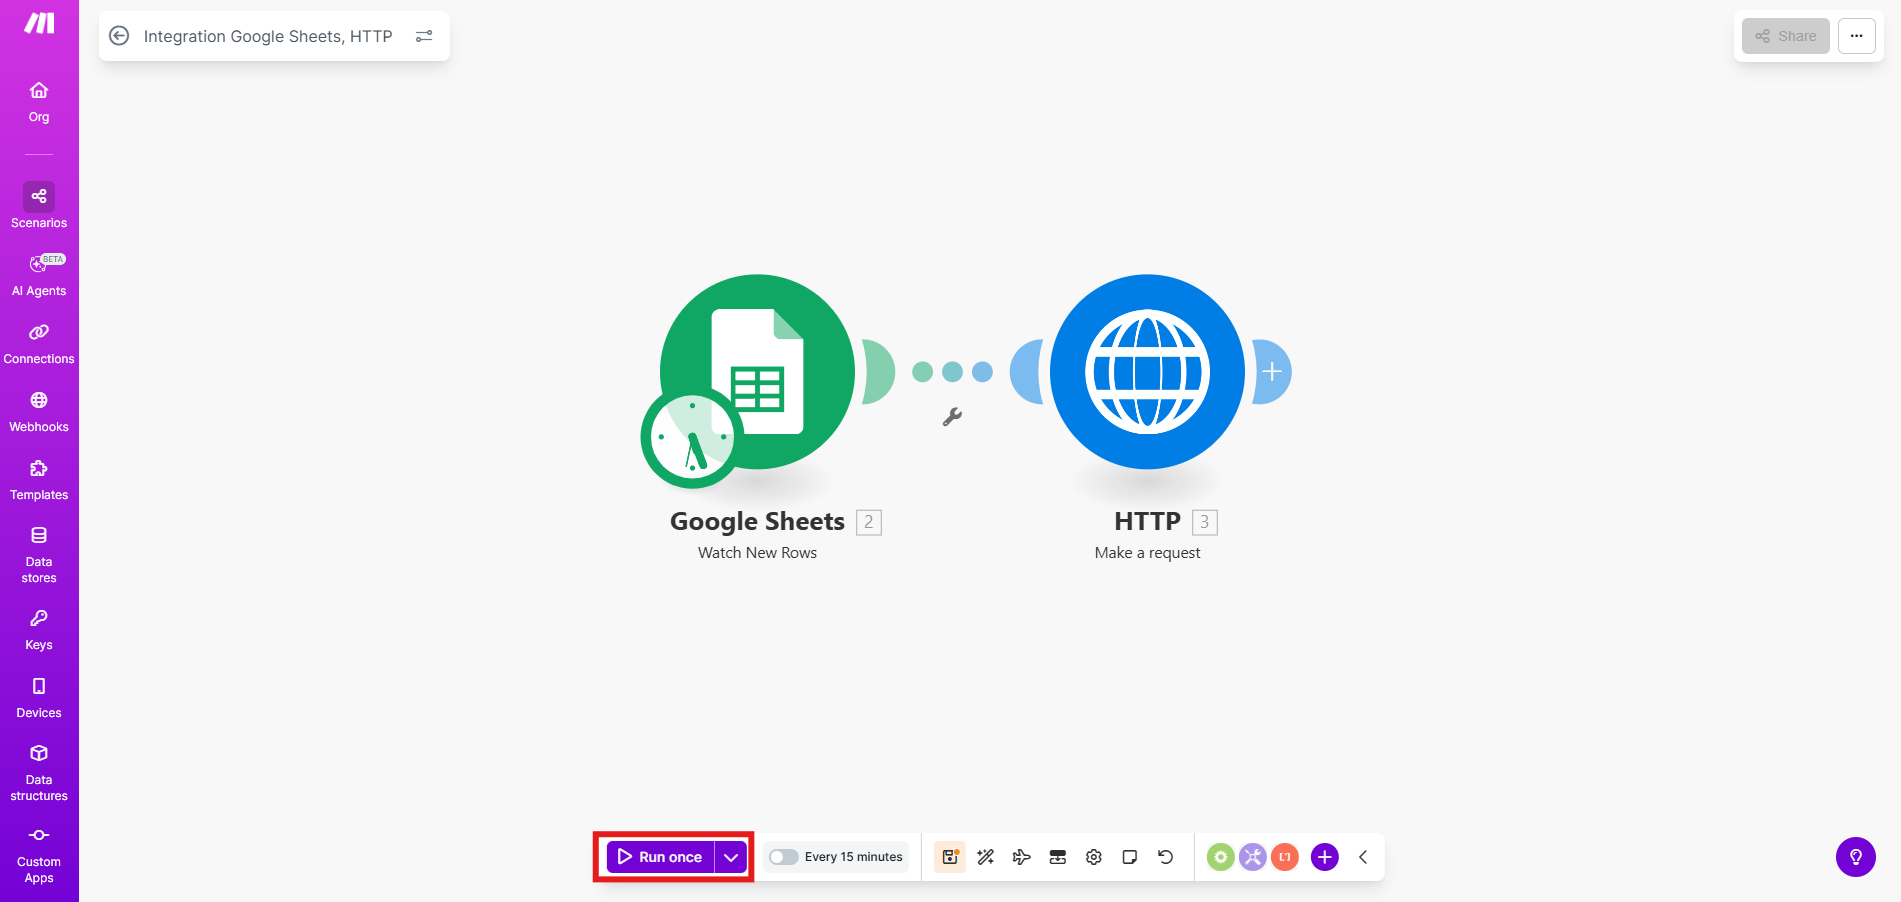
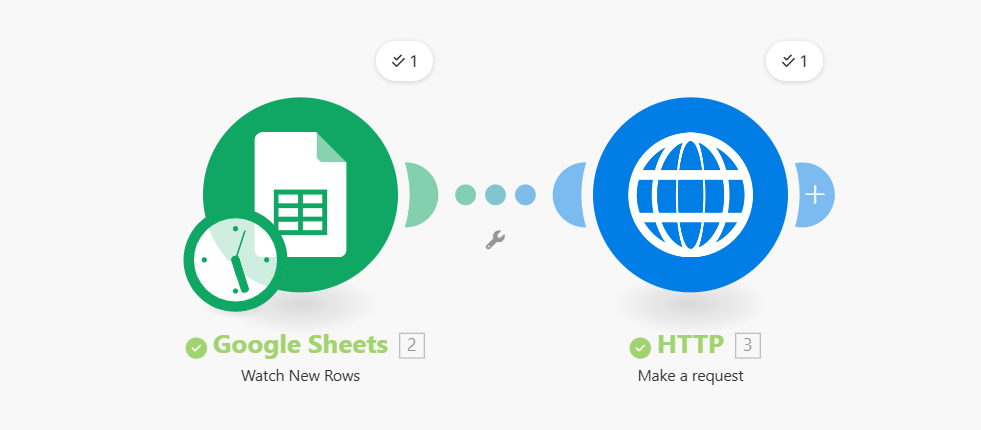
- Check whether the send succeeded.
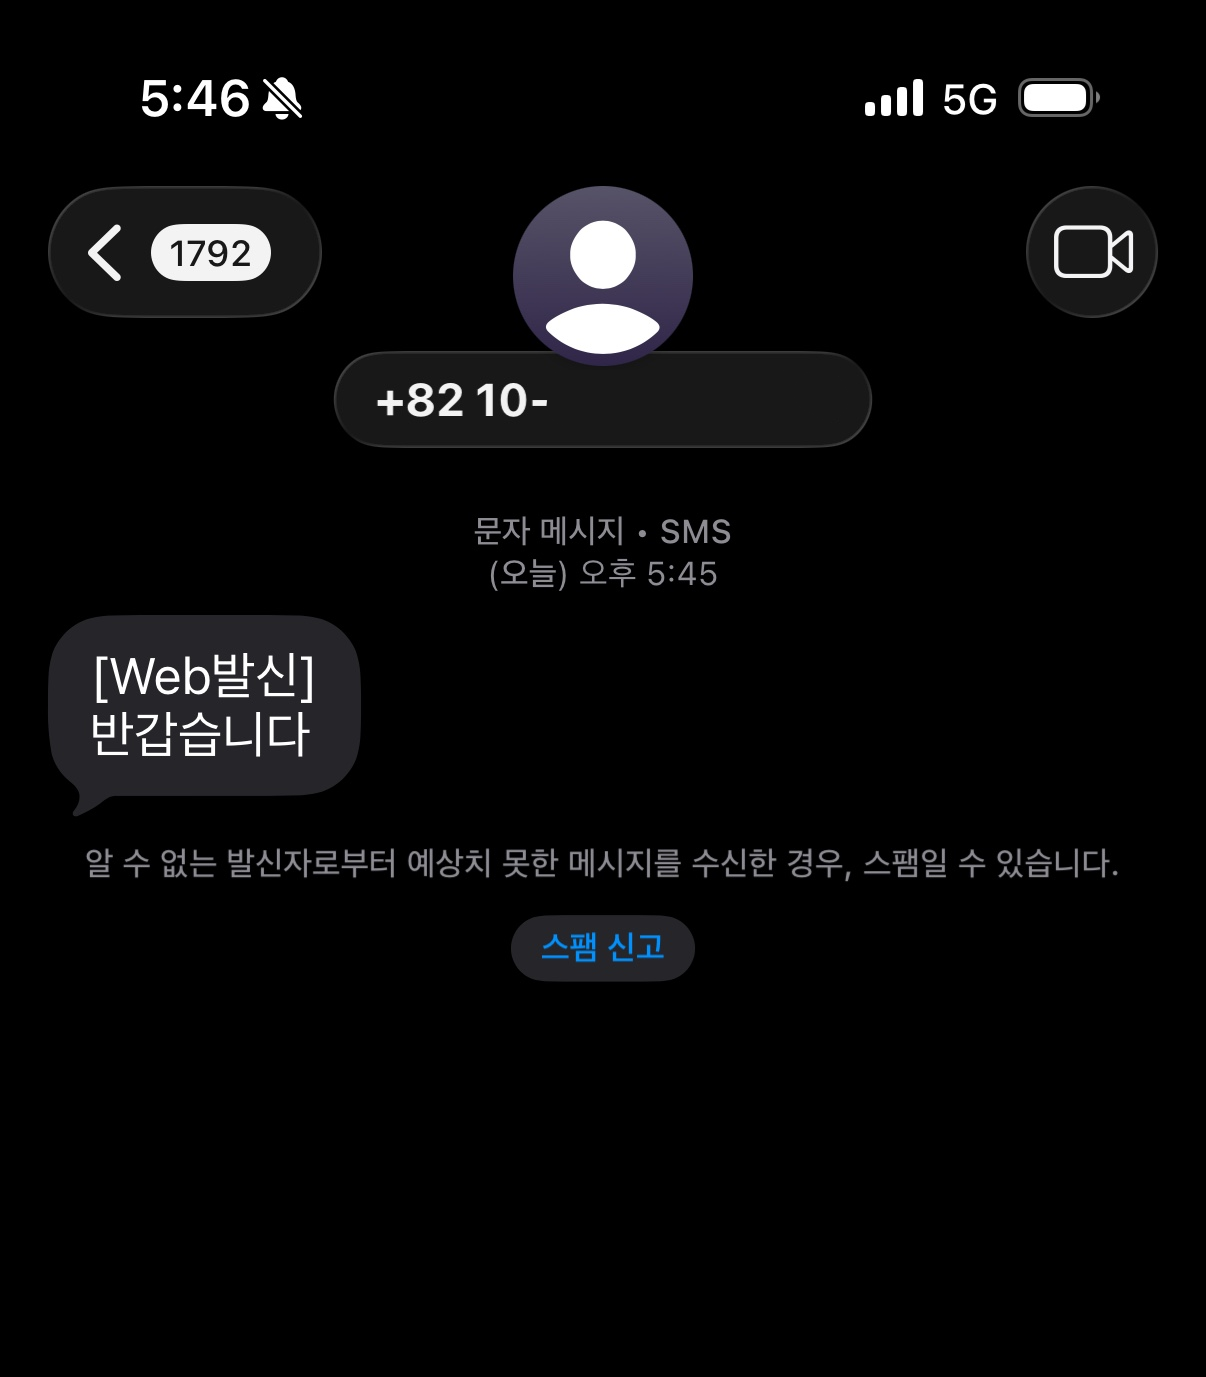
- Confirm that the message arrives on a real device.
Troubleshooting
ACL error (A403)
A Bizgo unified API key only allows requests from registered IPs. If you see an error like the one below, copy the IP address from the response and register it in the ACL in Integration management.
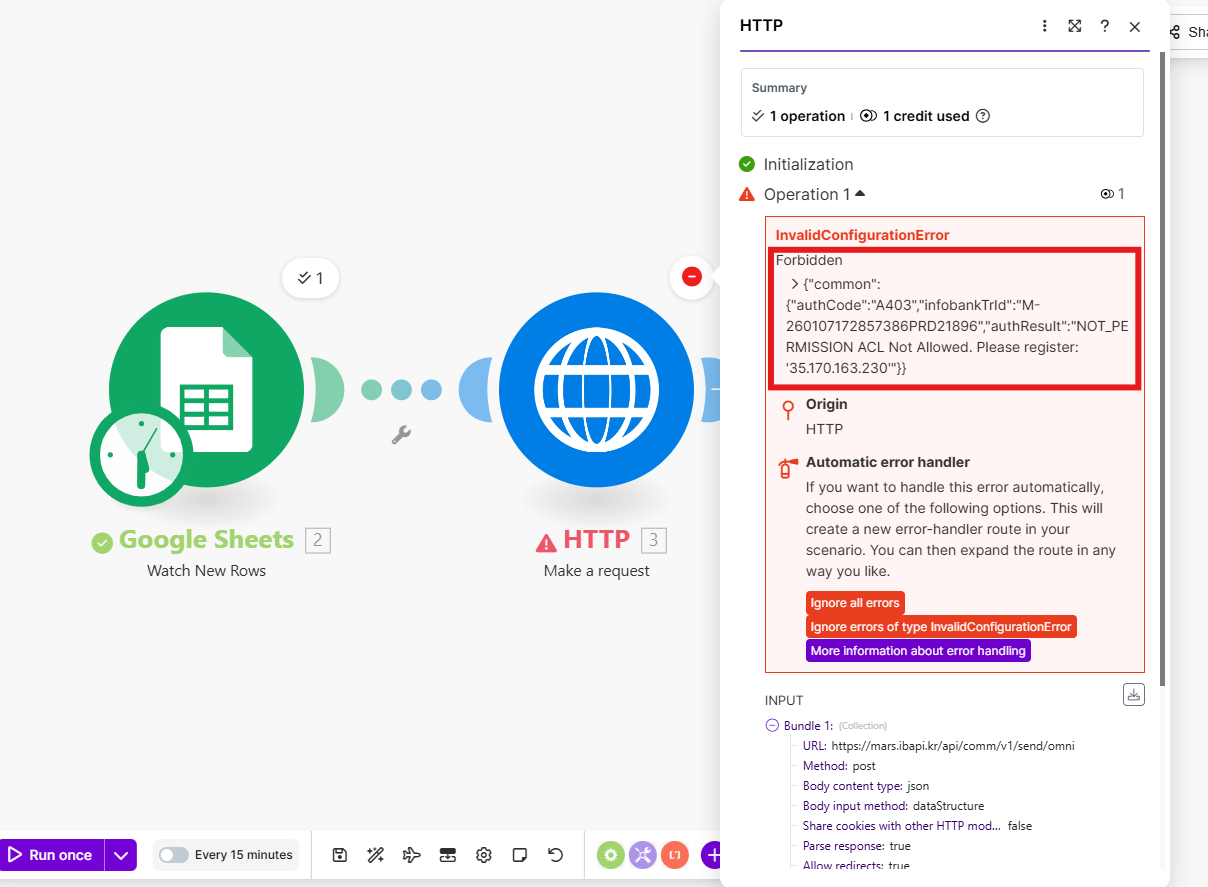
{
  "common": {
    "authCode": "A403",
    "authResult": "NOT_PERMISSION ACL Not Allowed. Please register: '35.170.163.230'"
  }
}
n8n
Build a flow yourself in which entering data in a Google Form makes n8n detect the new row in Google Sheets and send a message automatically through the Bizgo API.
Google Form submitted → Row added to Google Sheets → n8n detects it → Bizgo API call → Message sent
Prerequisites
| Item | Notes |
|---|---|
| n8n account | Sign up at n8n.io |
| Google account | For Google Form and Sheets |
| Bizgo unified API key | Issue it in Integration management |
| Sender number | You must complete sender number registration |
Step 1: Set up a Google Form
Create a Google Form to collect recipient information, and connect the responses to Google Sheets automatically.
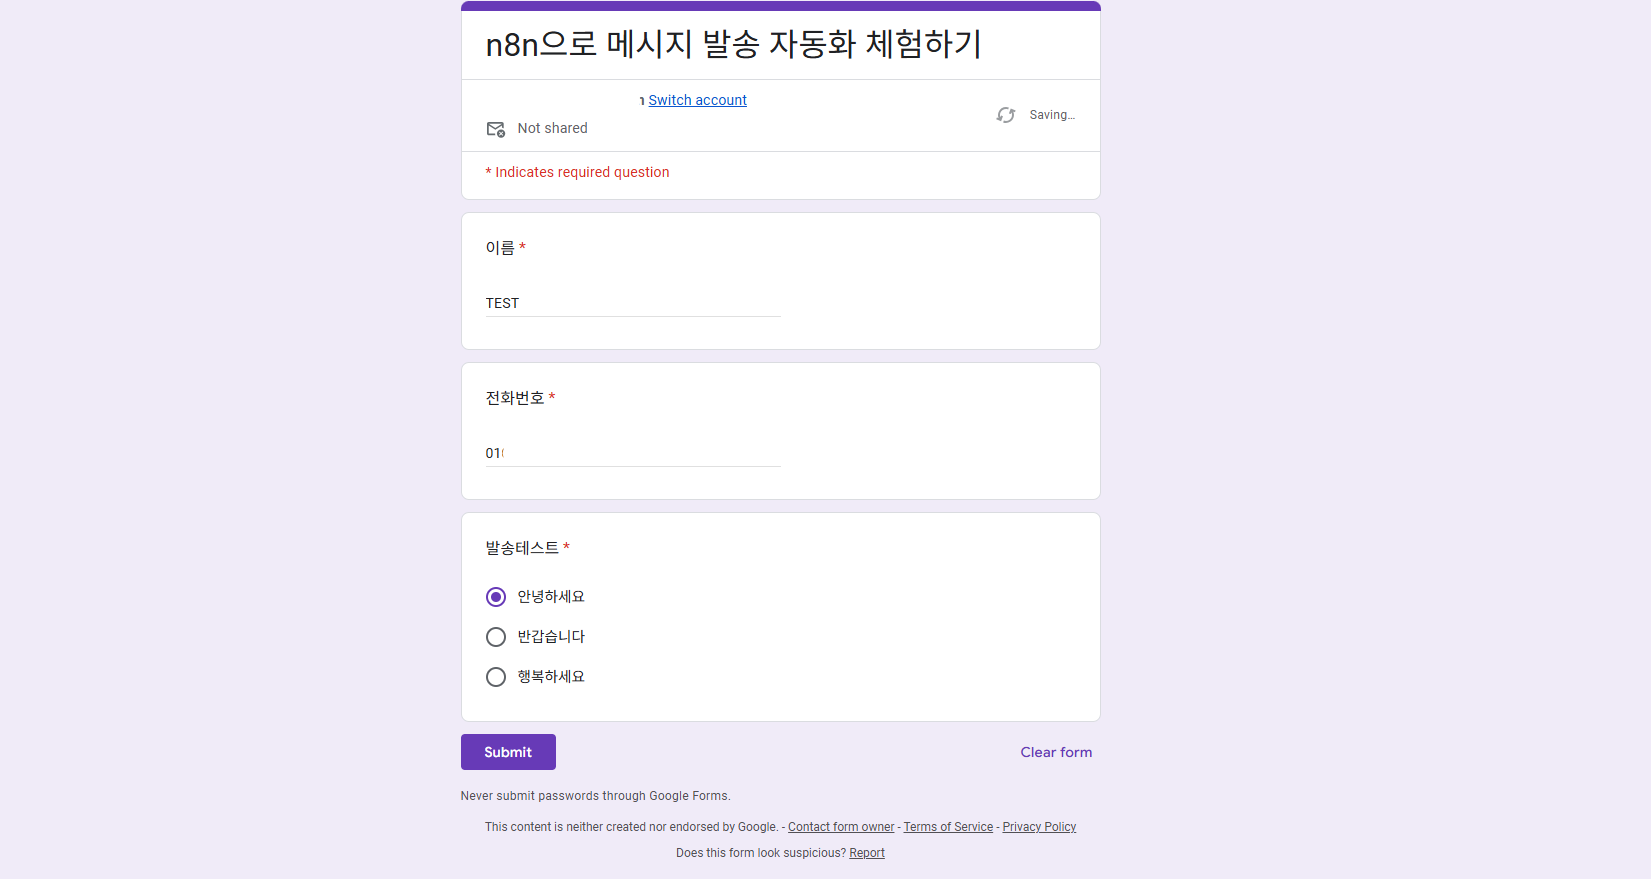
- Go to the Google Form creation page.
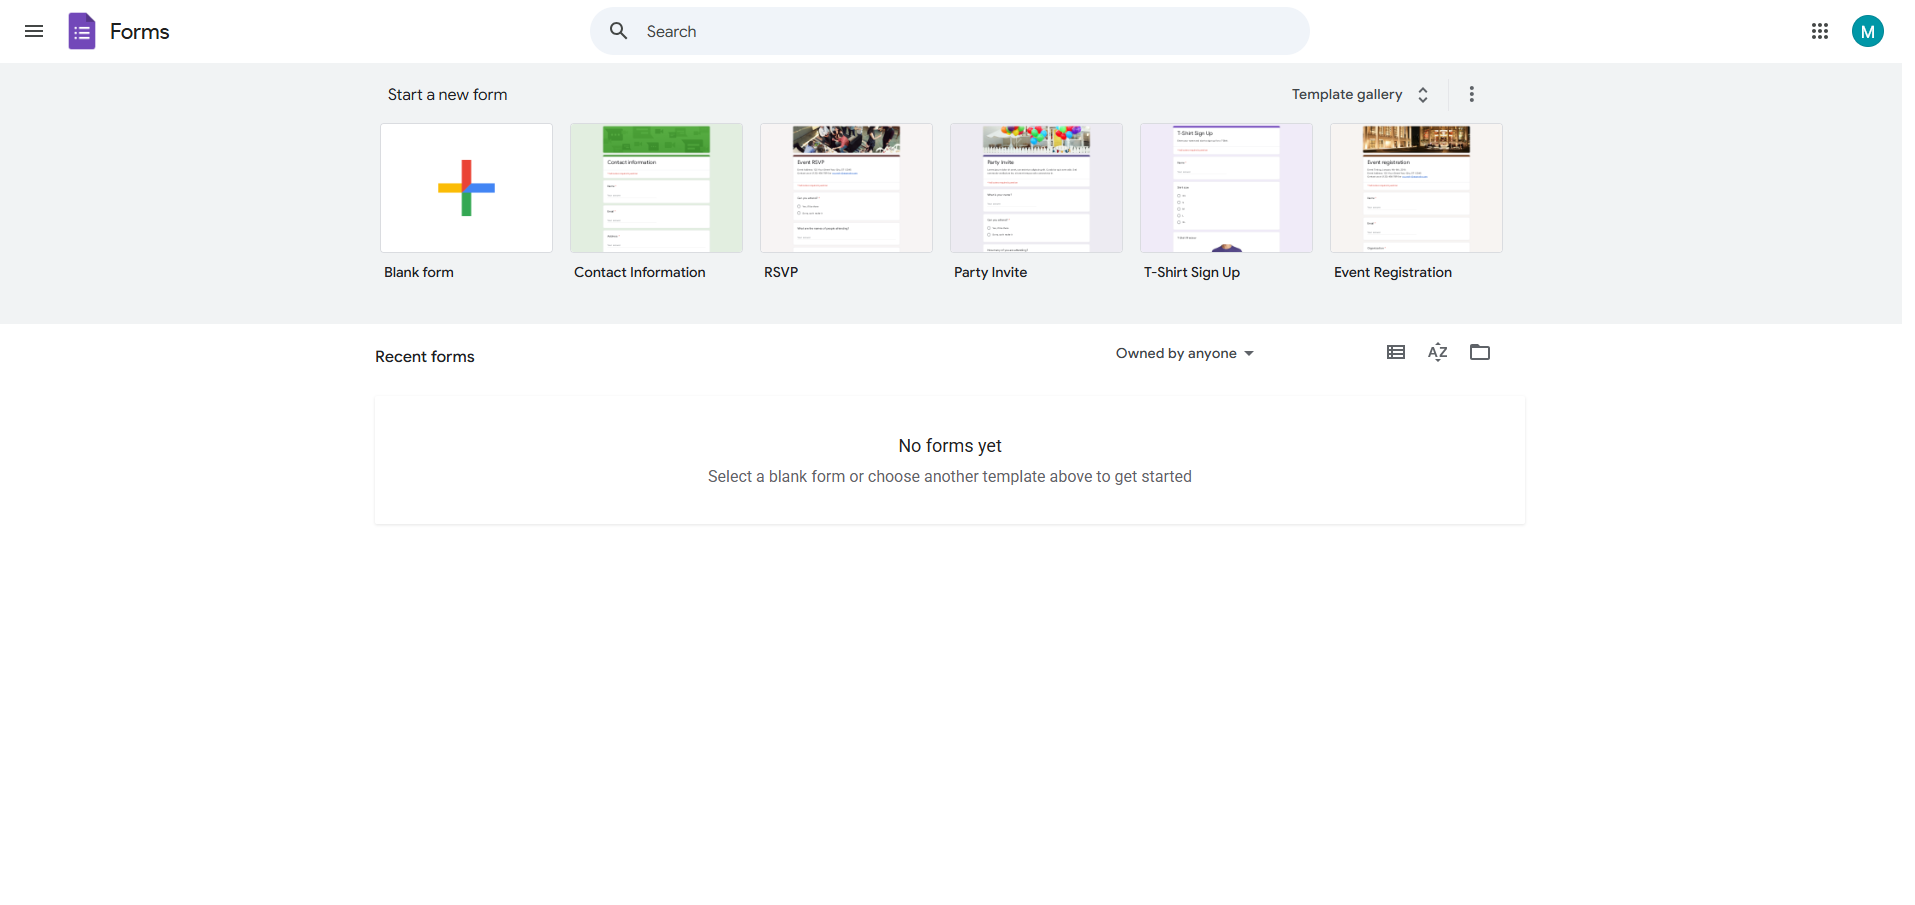
- Add the items you need — phone number, message text, and so on — and create the Google Form.
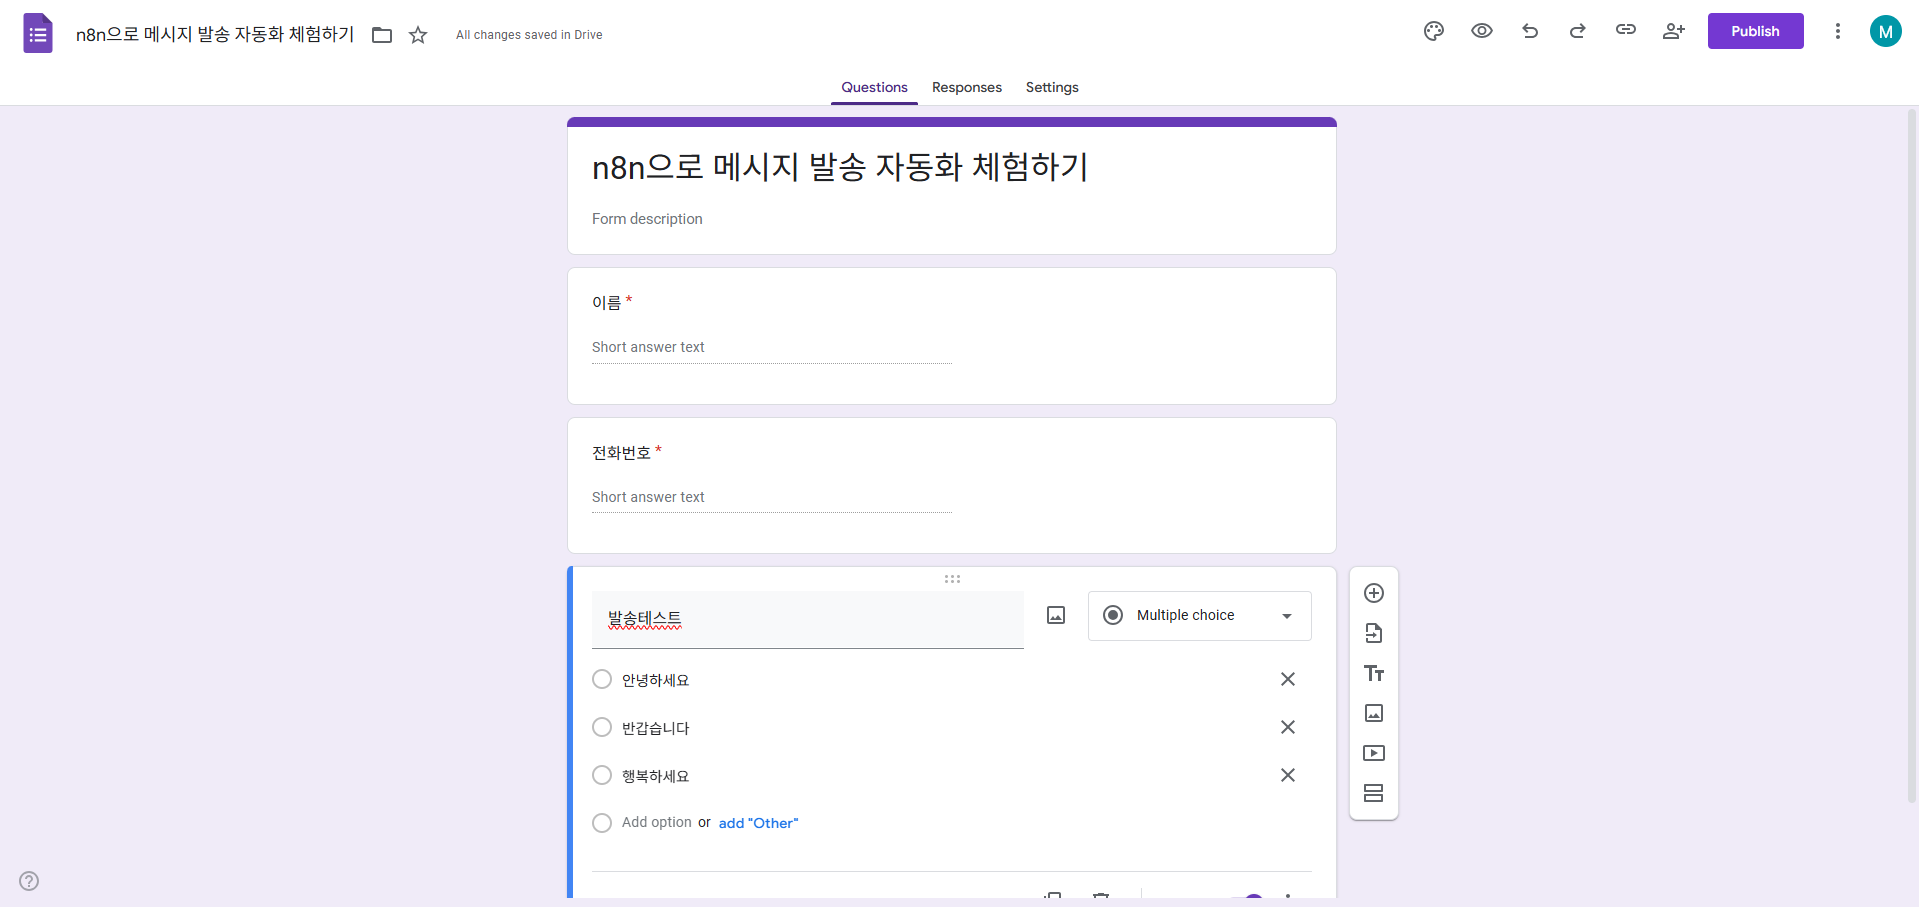
- Publish the form you created.
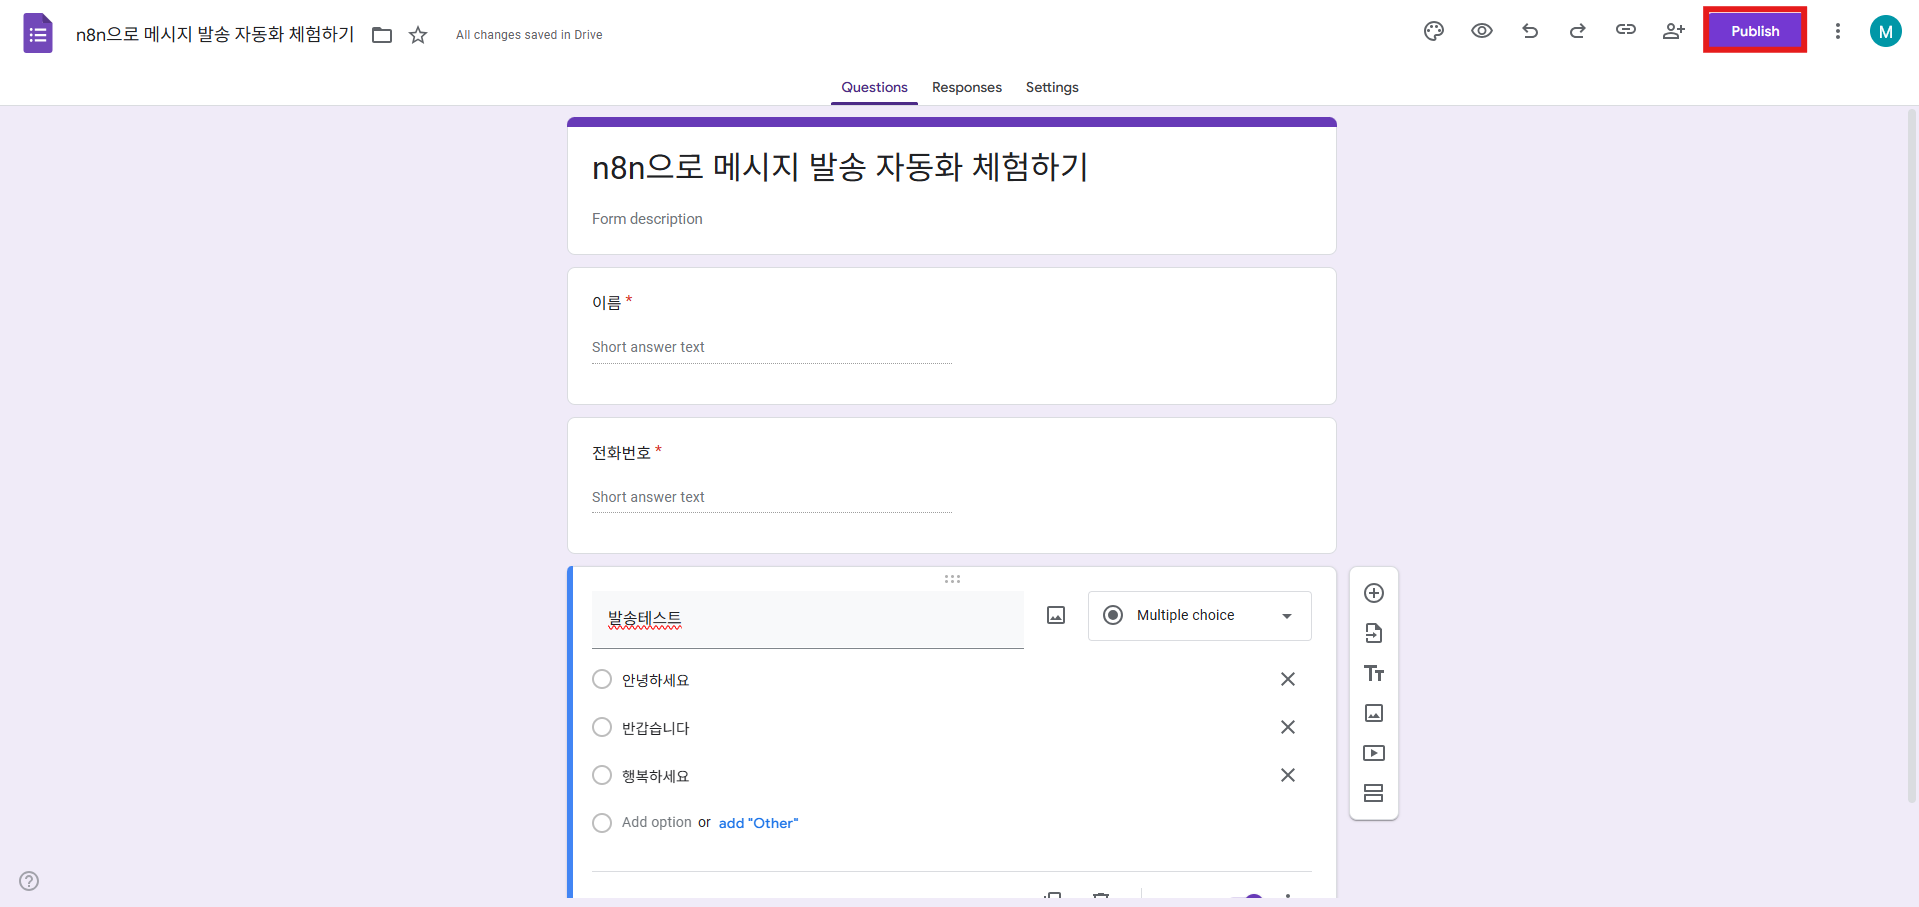
- Go to the Responses tab.
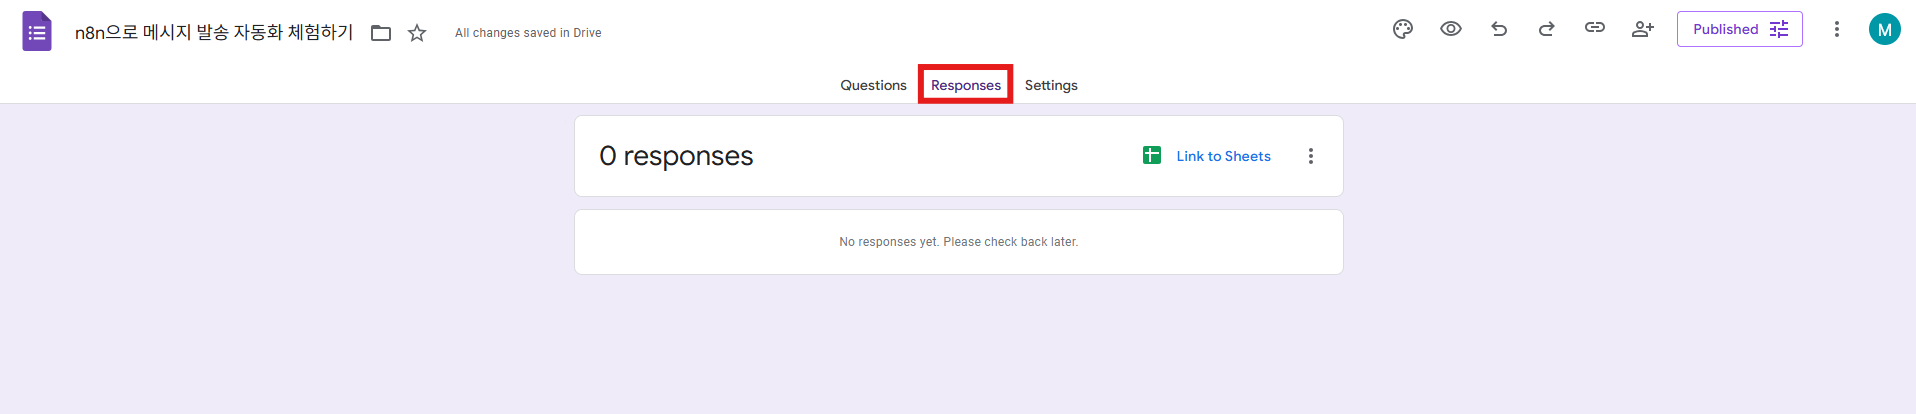
- Choose Link to Sheets.
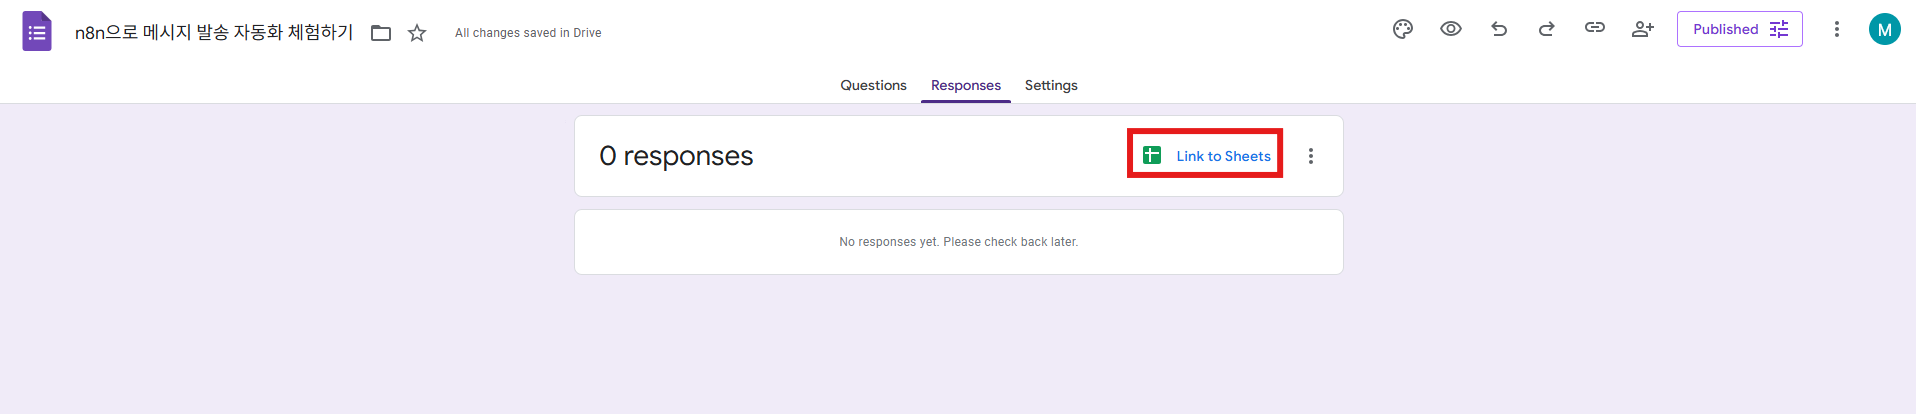
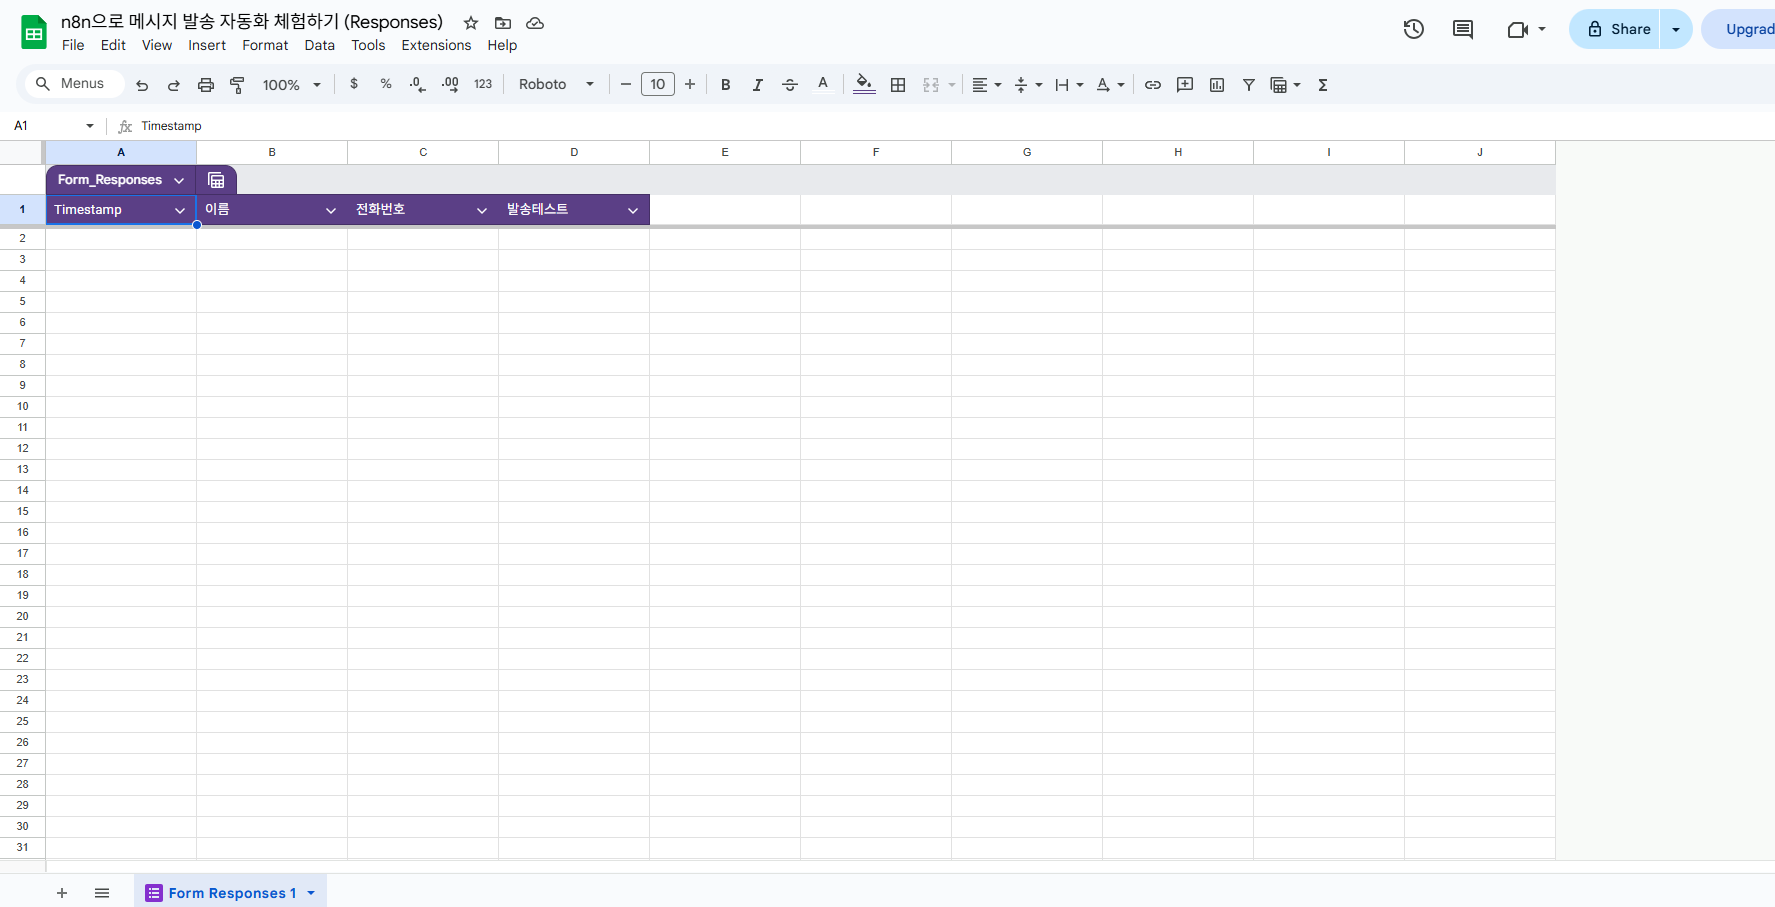
- Confirm that the response data is recorded in Google Sheets automatically. From now on, n8n detects each row added to this sheet.
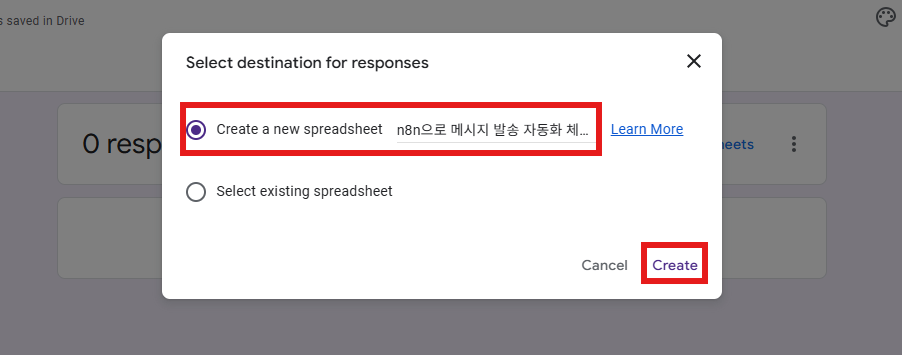
Step 2: Connect the Google Sheets trigger
In your n8n workflow, set Google Sheets as the trigger and connect your Google account.
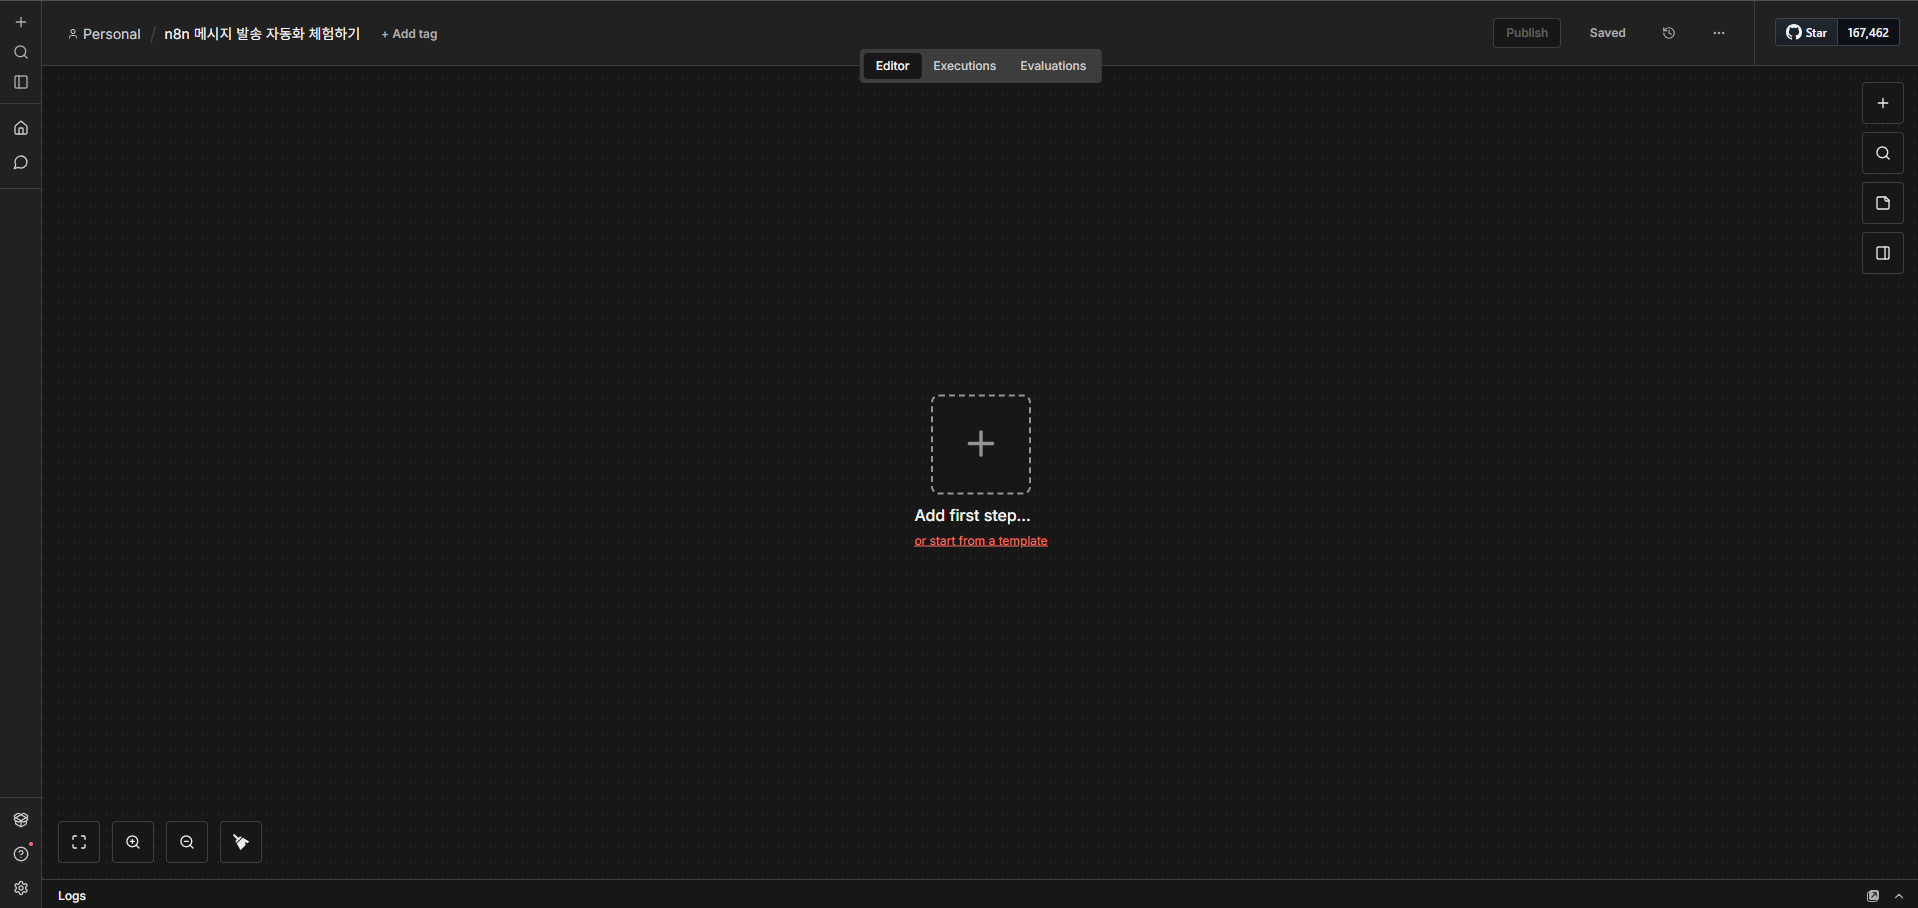
- Sign in to n8n and create a new workflow.
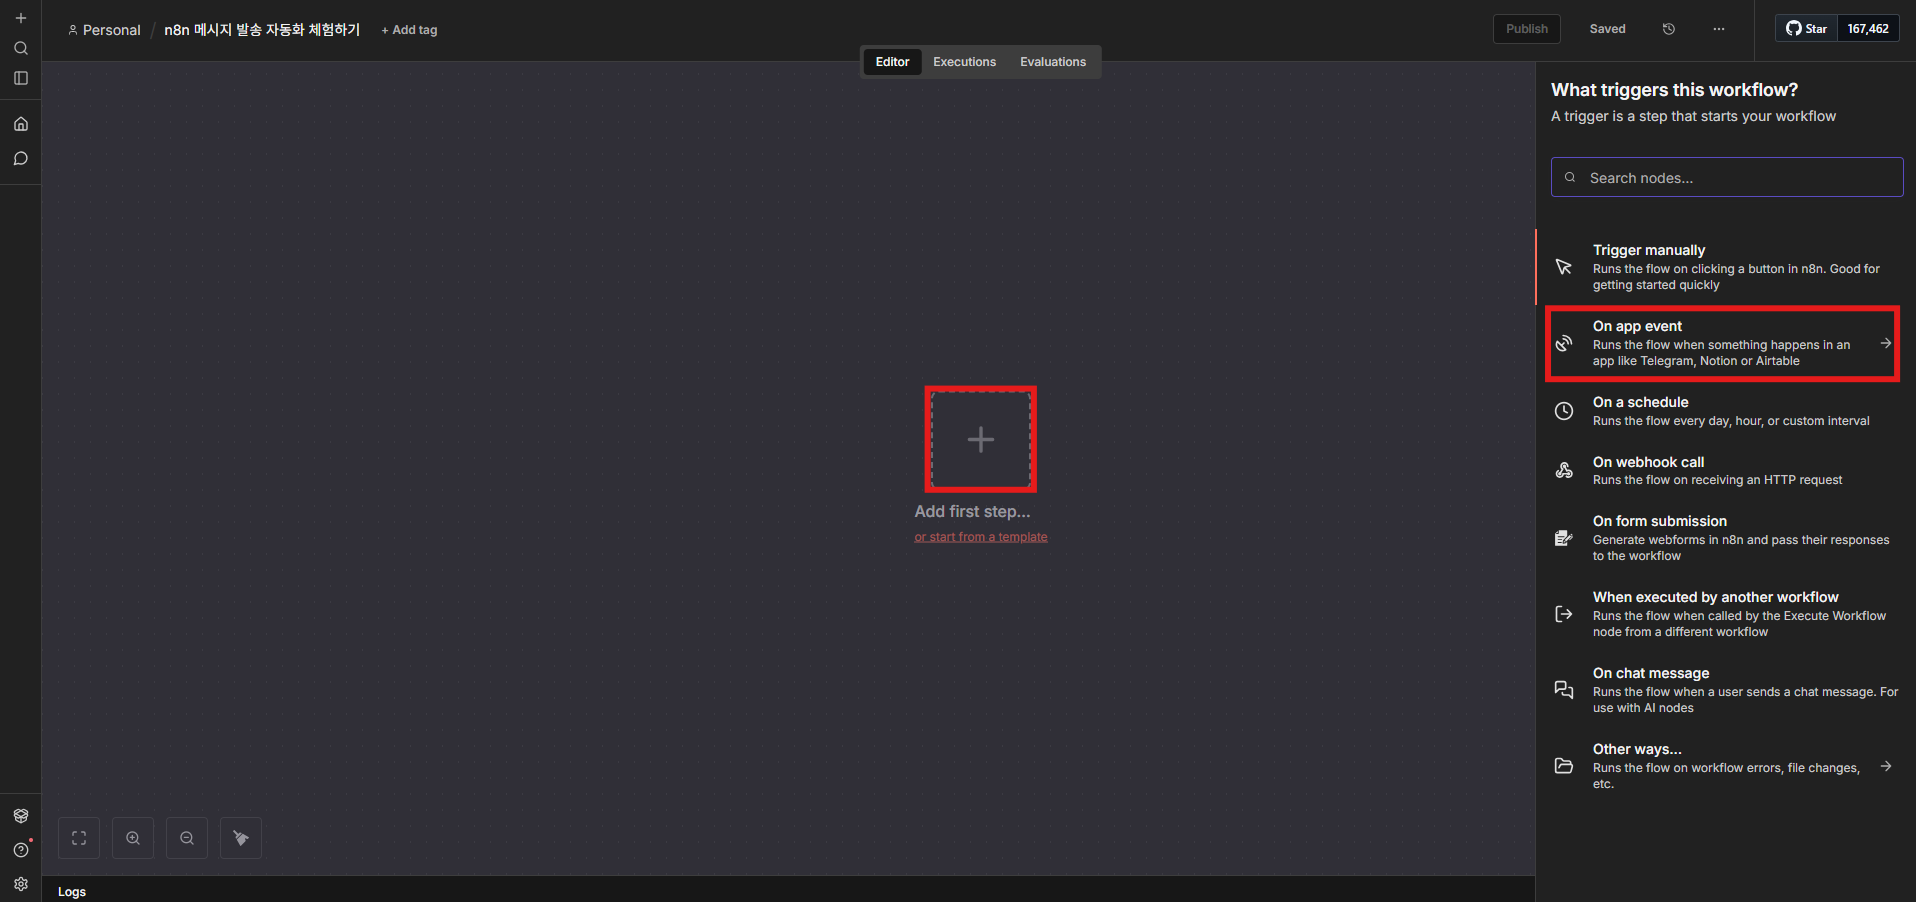
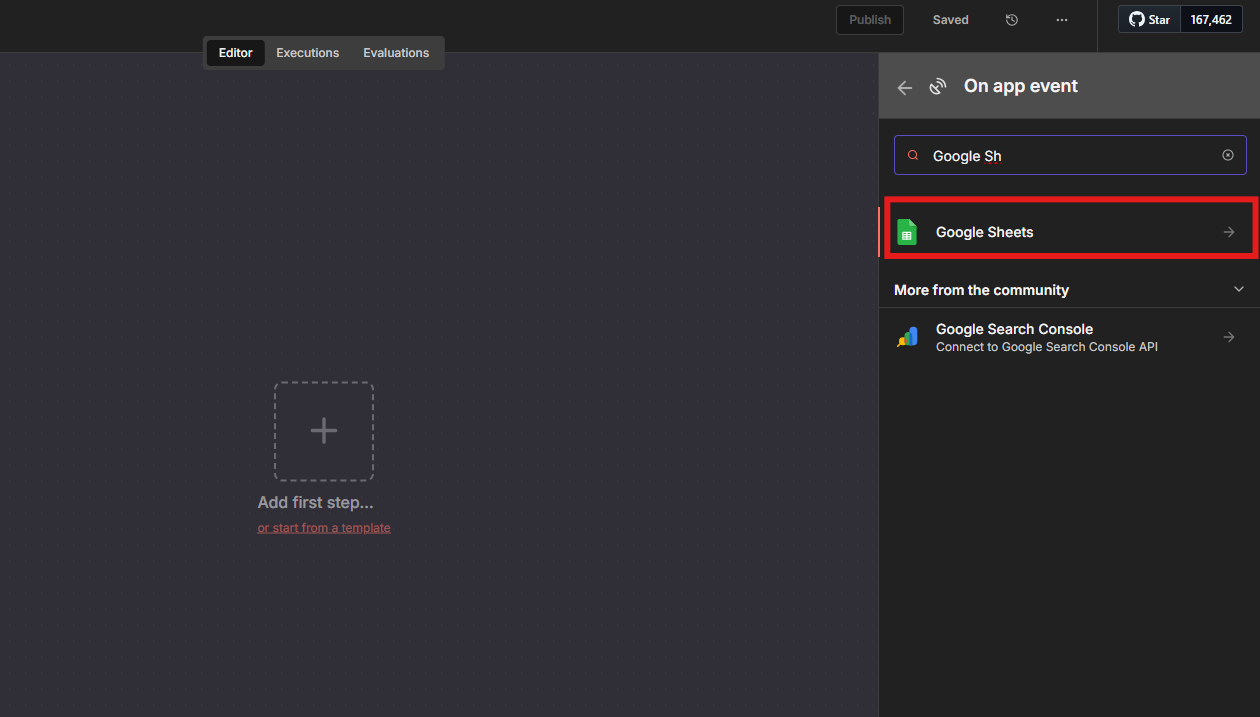
- Choose On app event → Google Sheets.
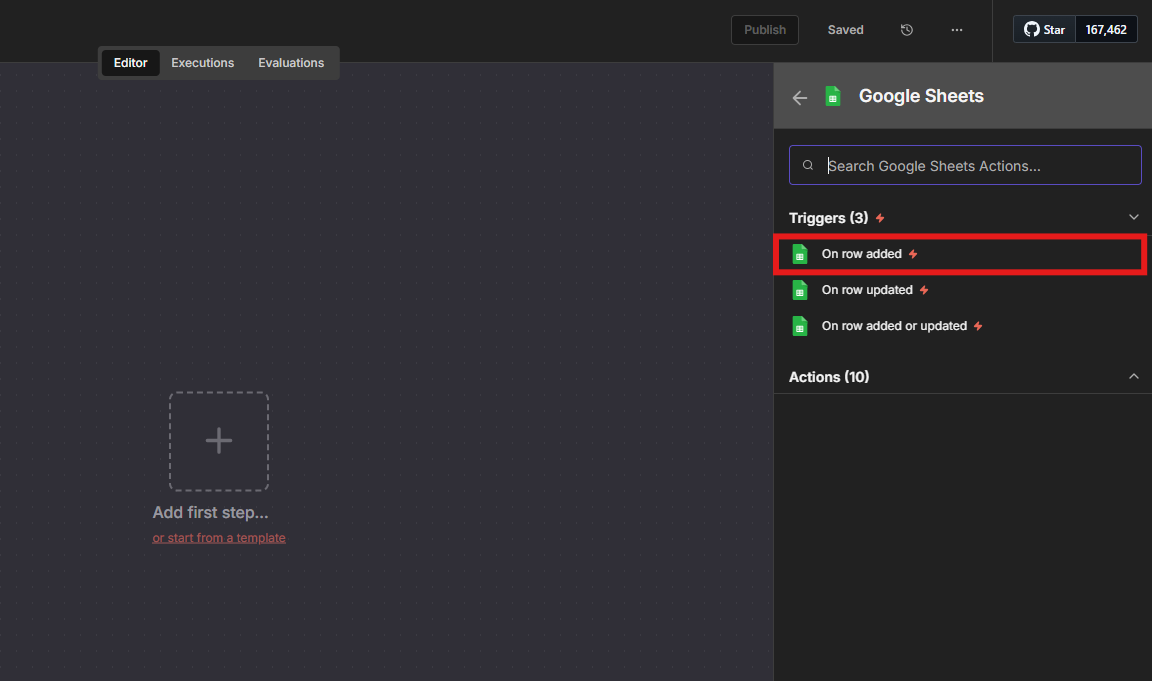
- Set Event to Row Added.
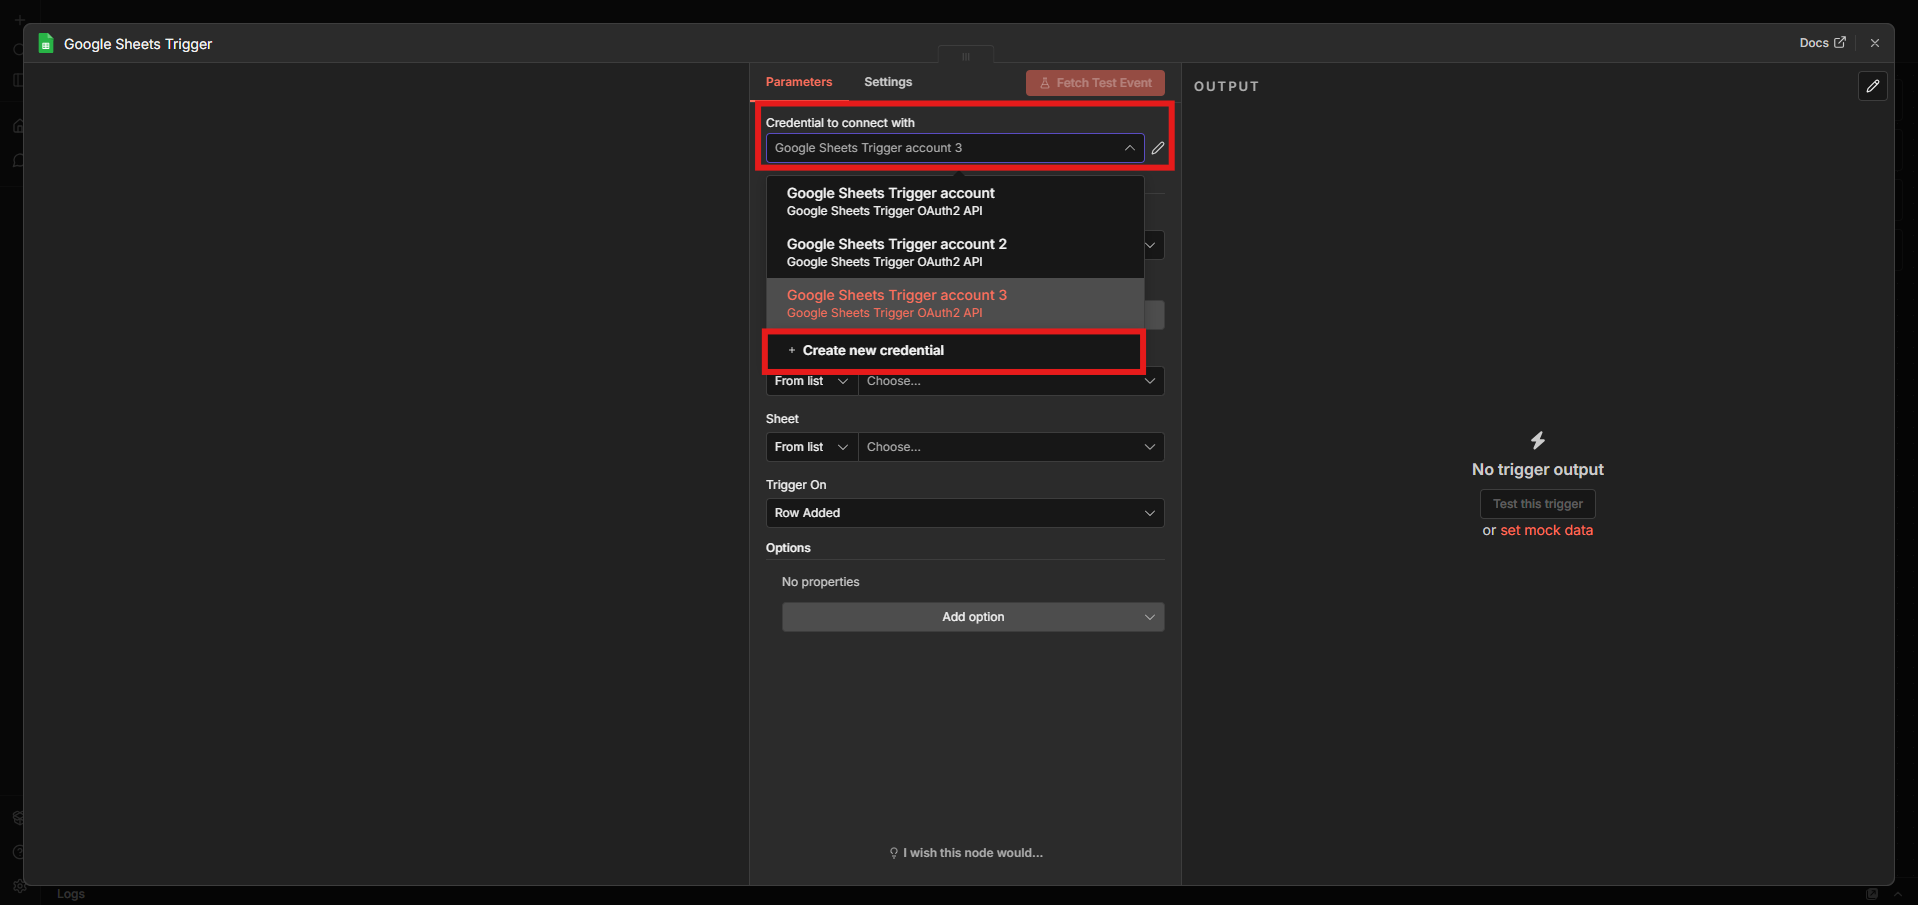
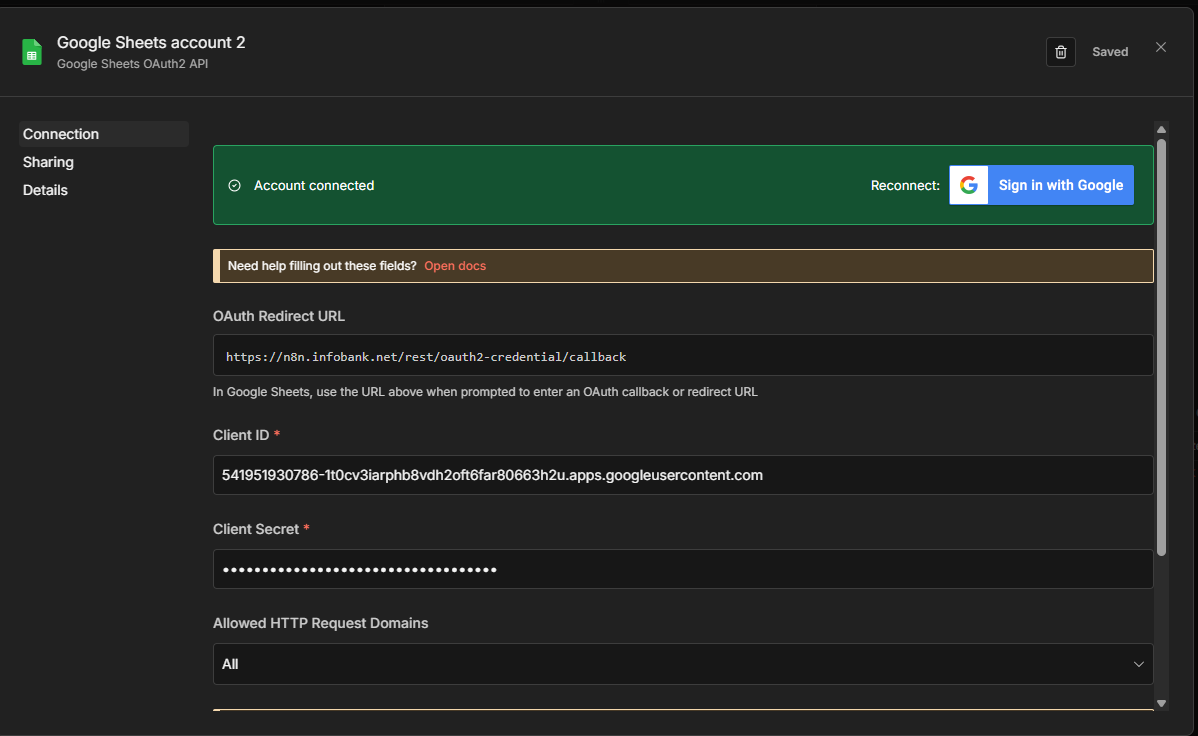
- Start connecting the Google credential.
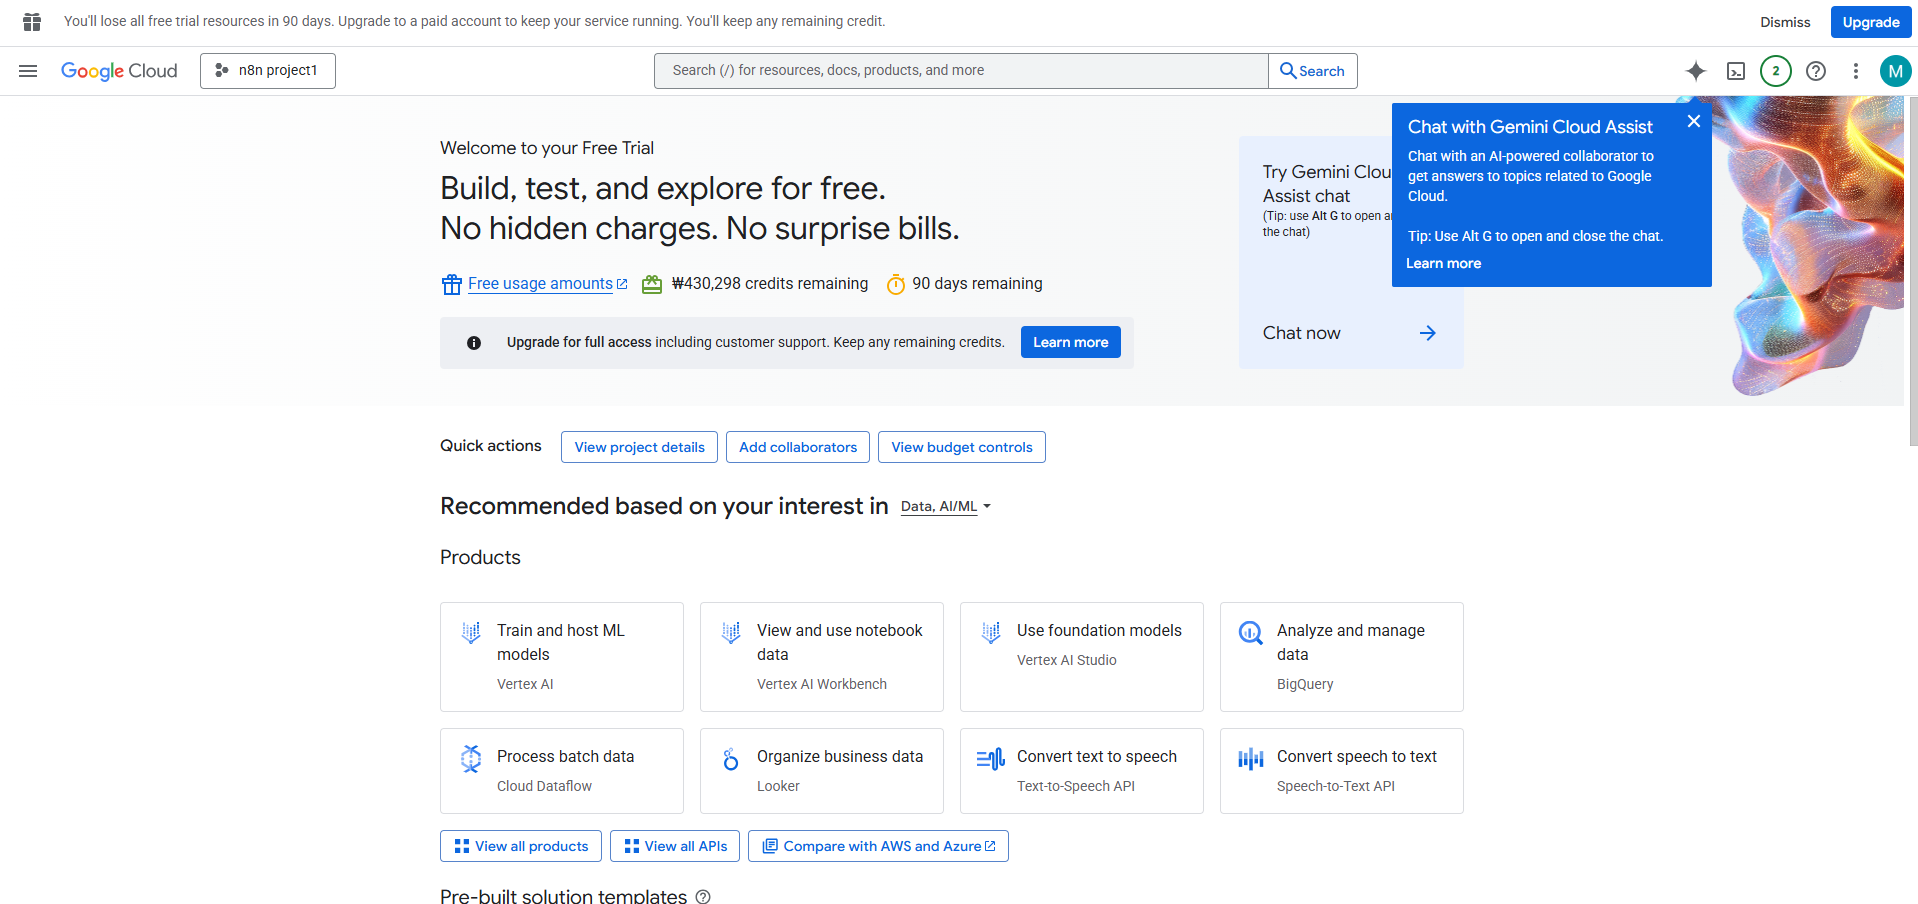
- Go to the Google Cloud Console.
- Create a new project.
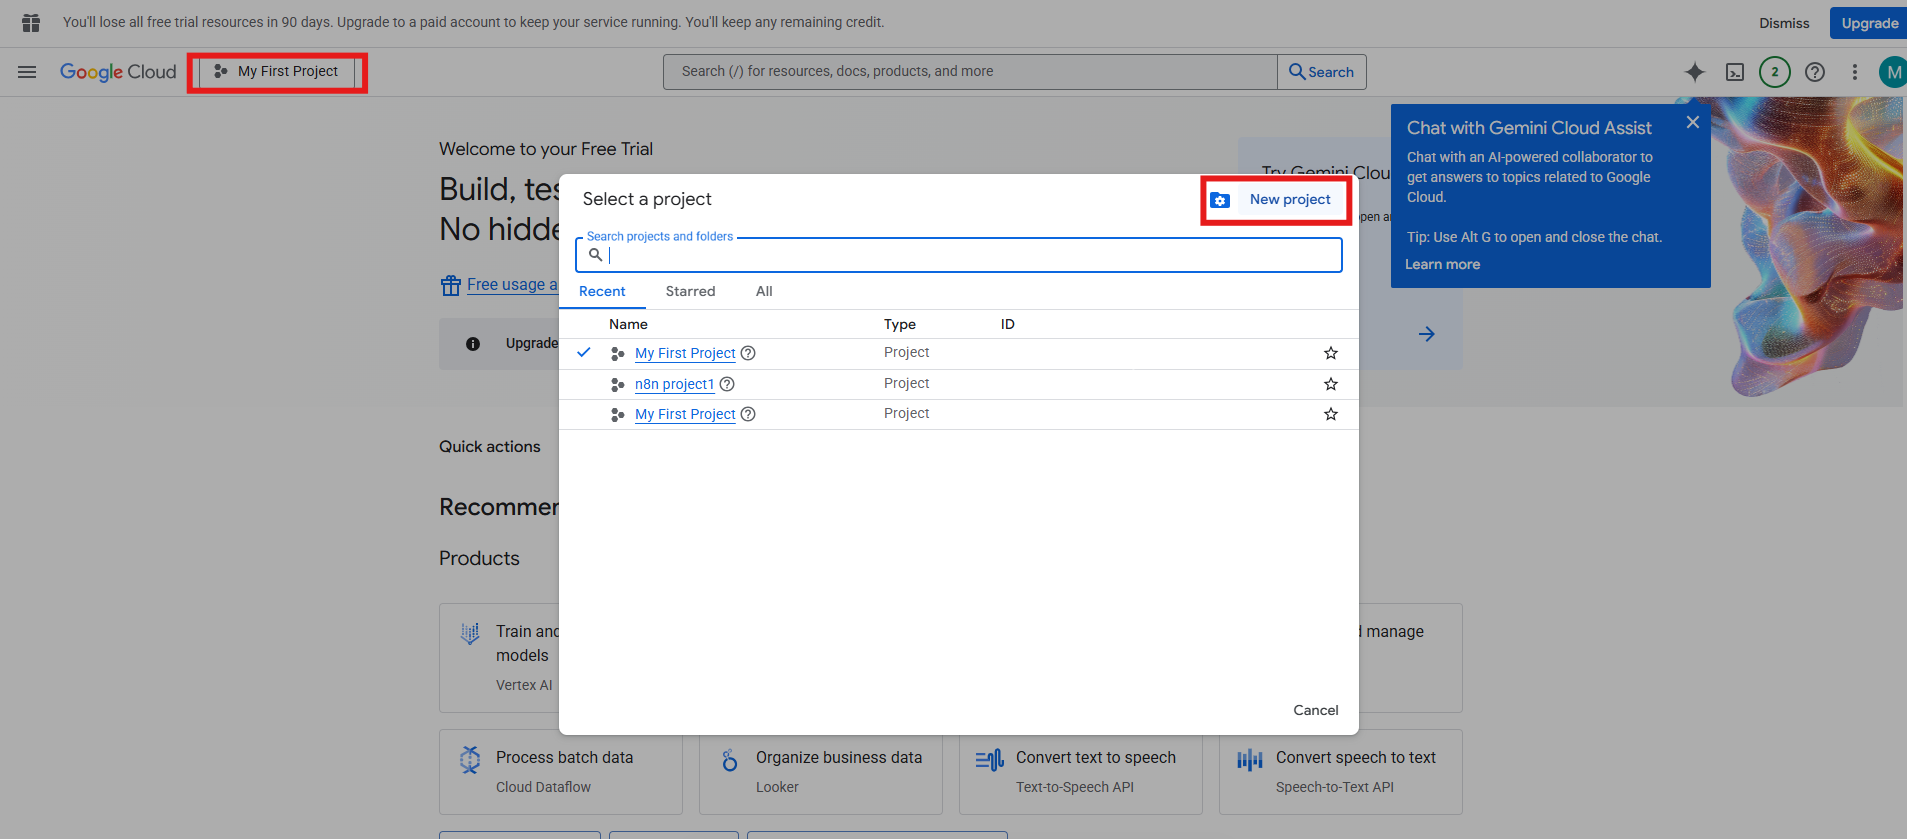
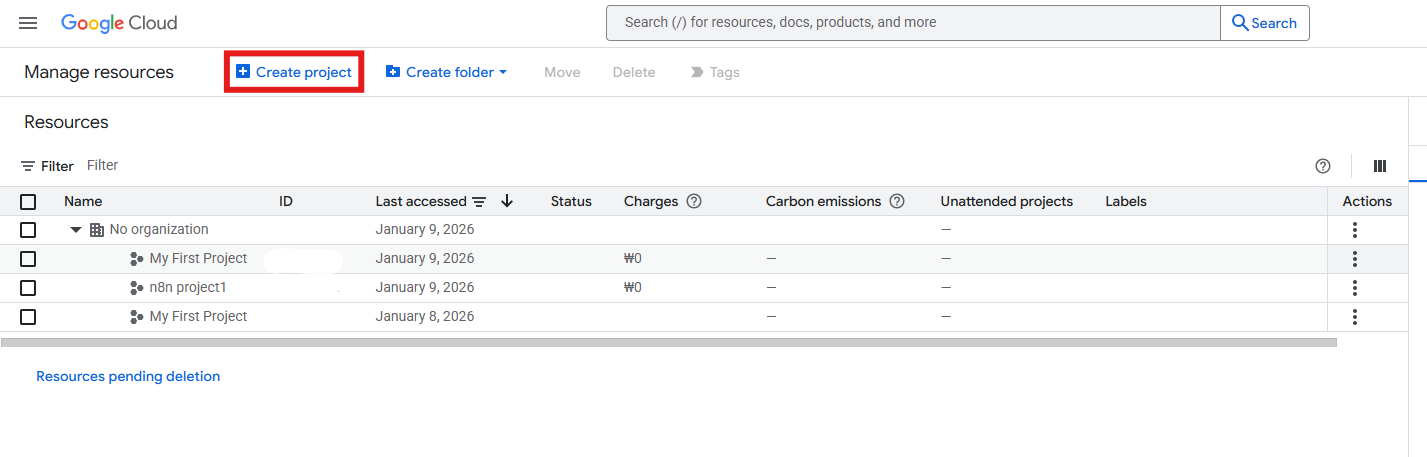
- Enter a project name and click Create.
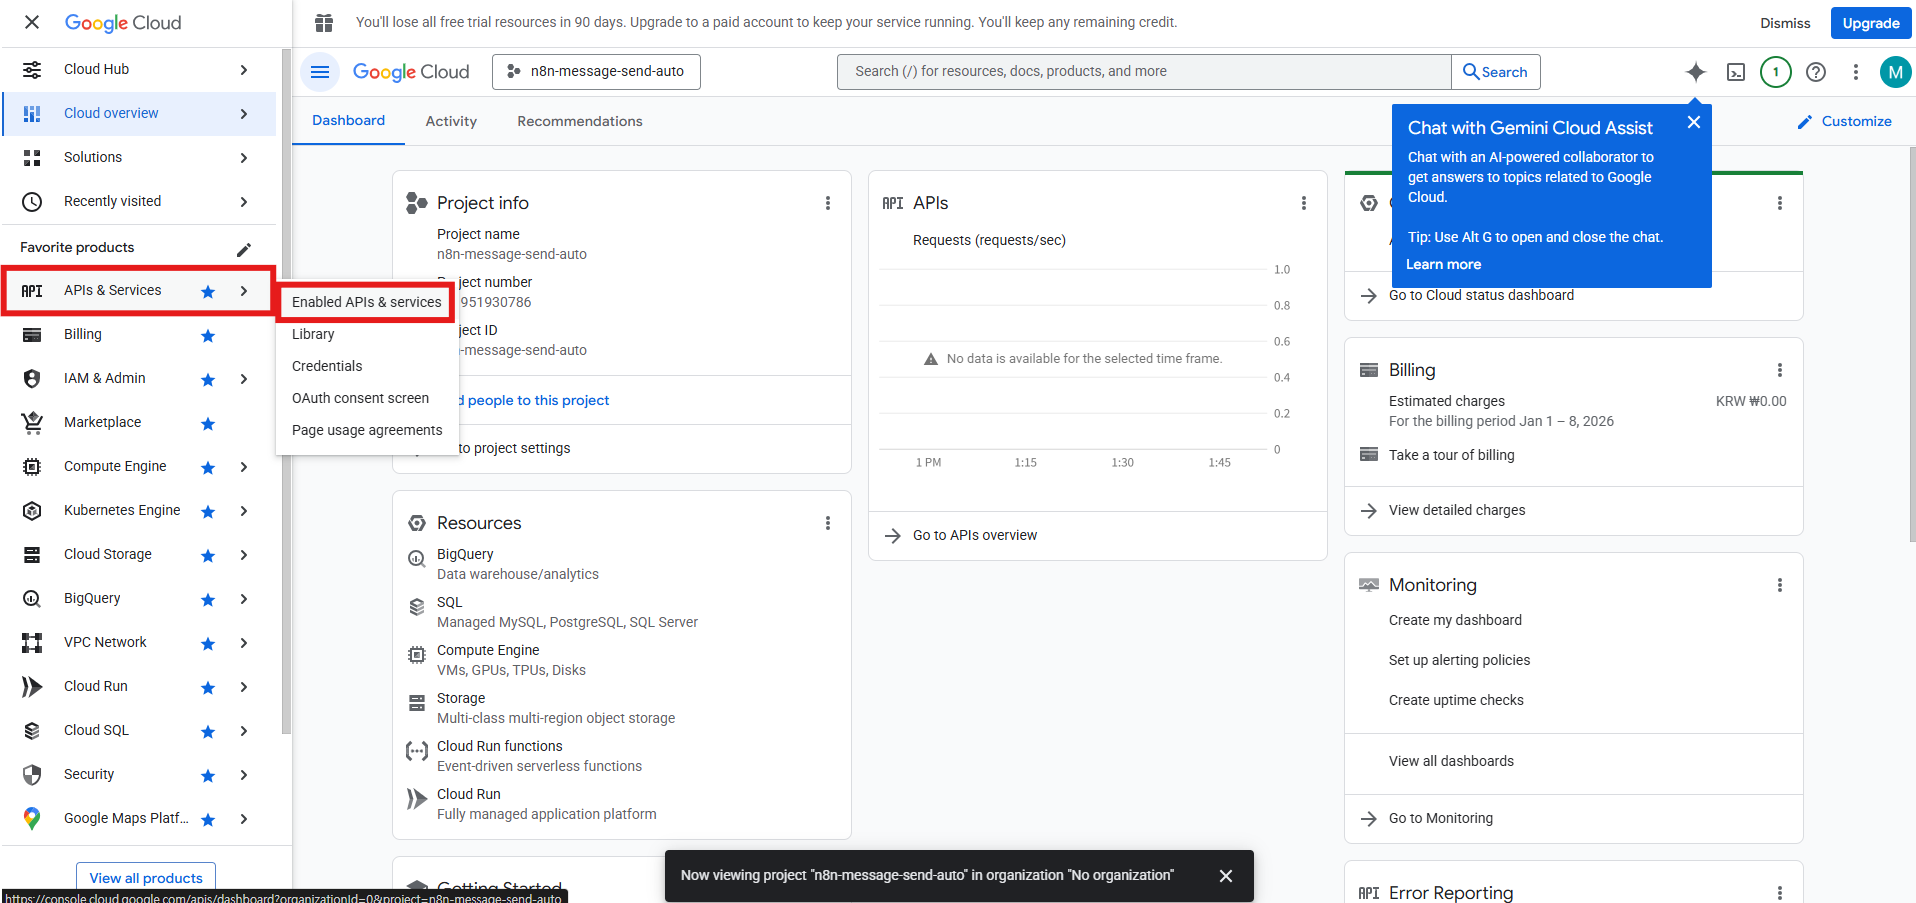
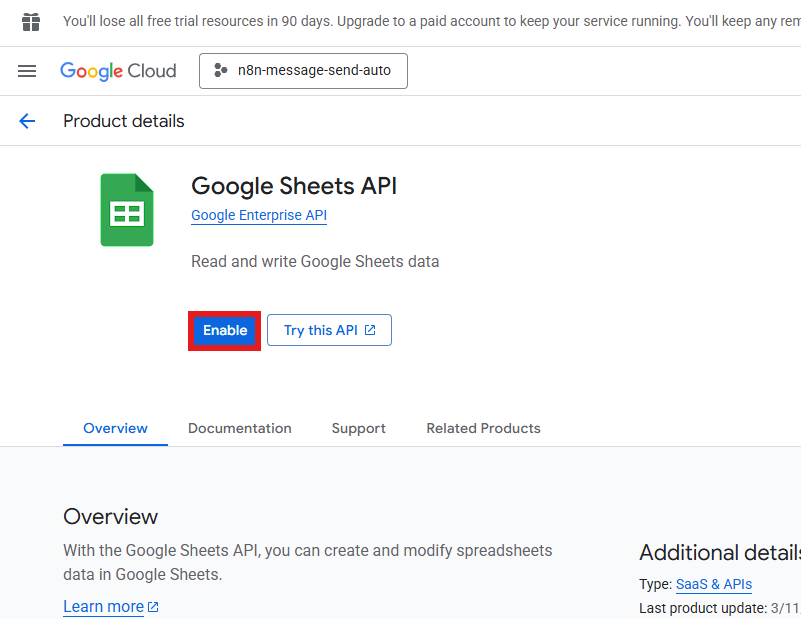
- Choose APIs & Services → Enabled APIs & services.
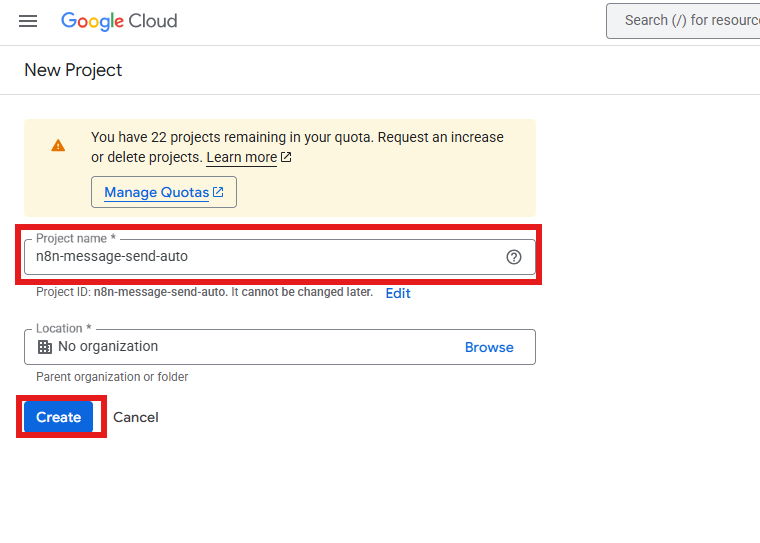
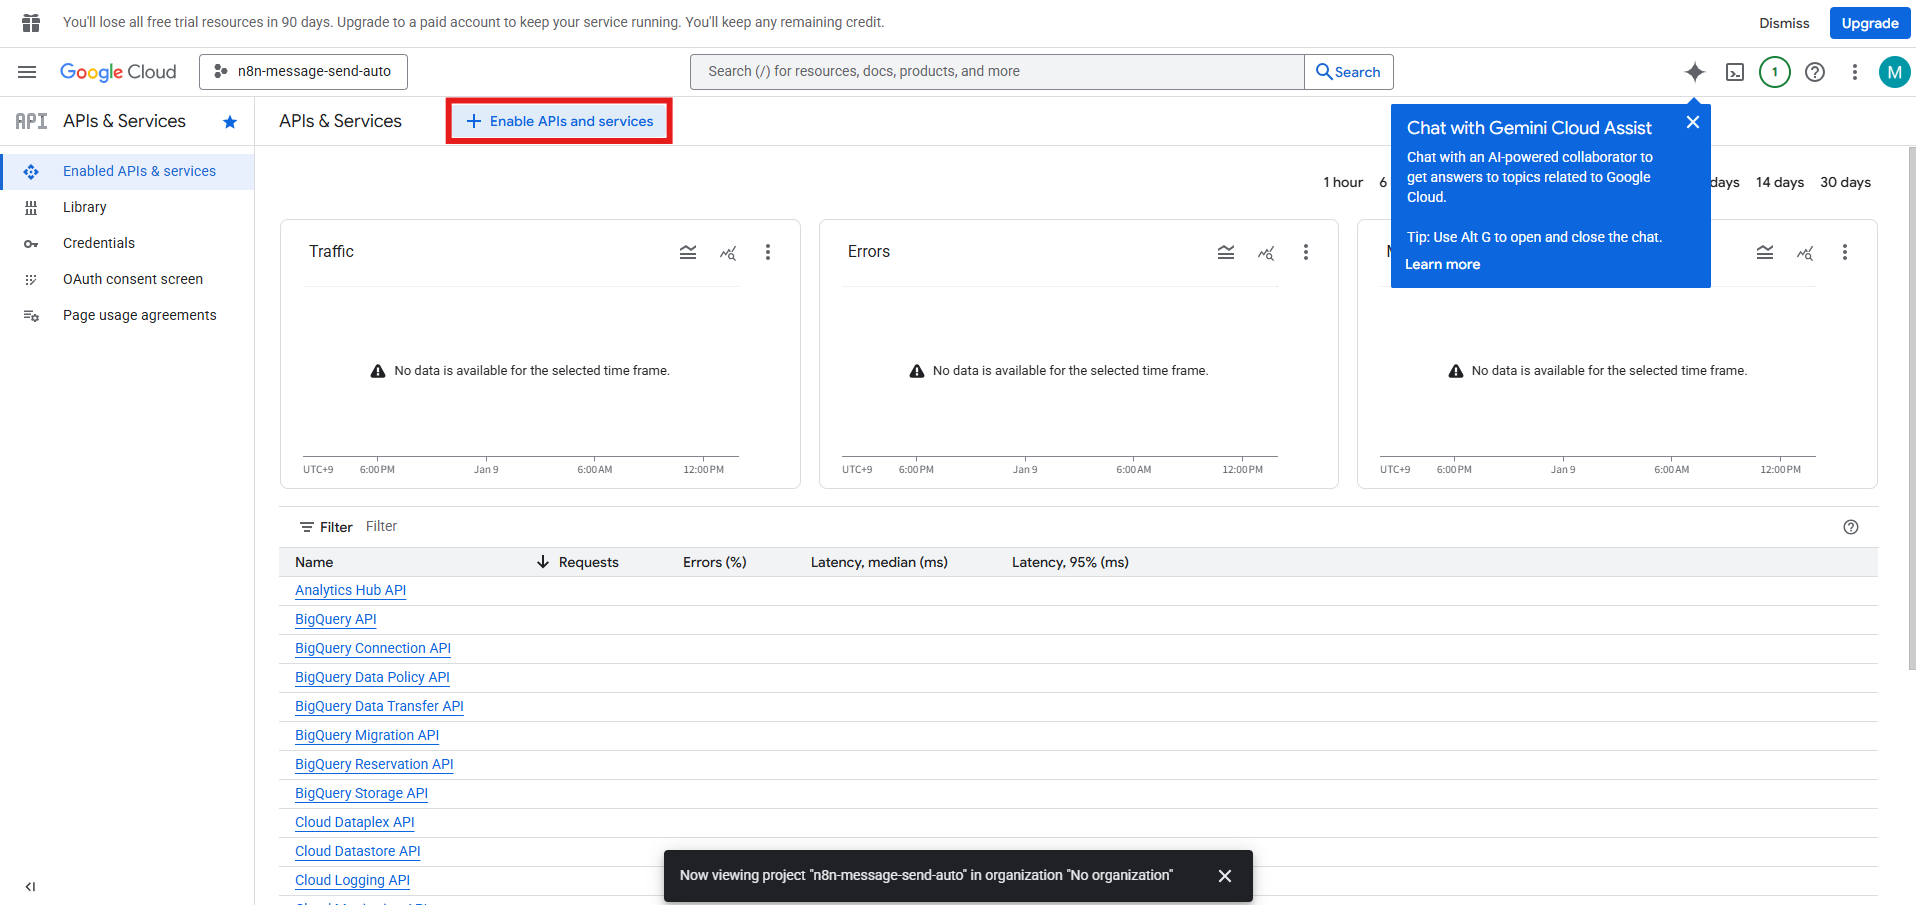
- Click Enable APIs and services.
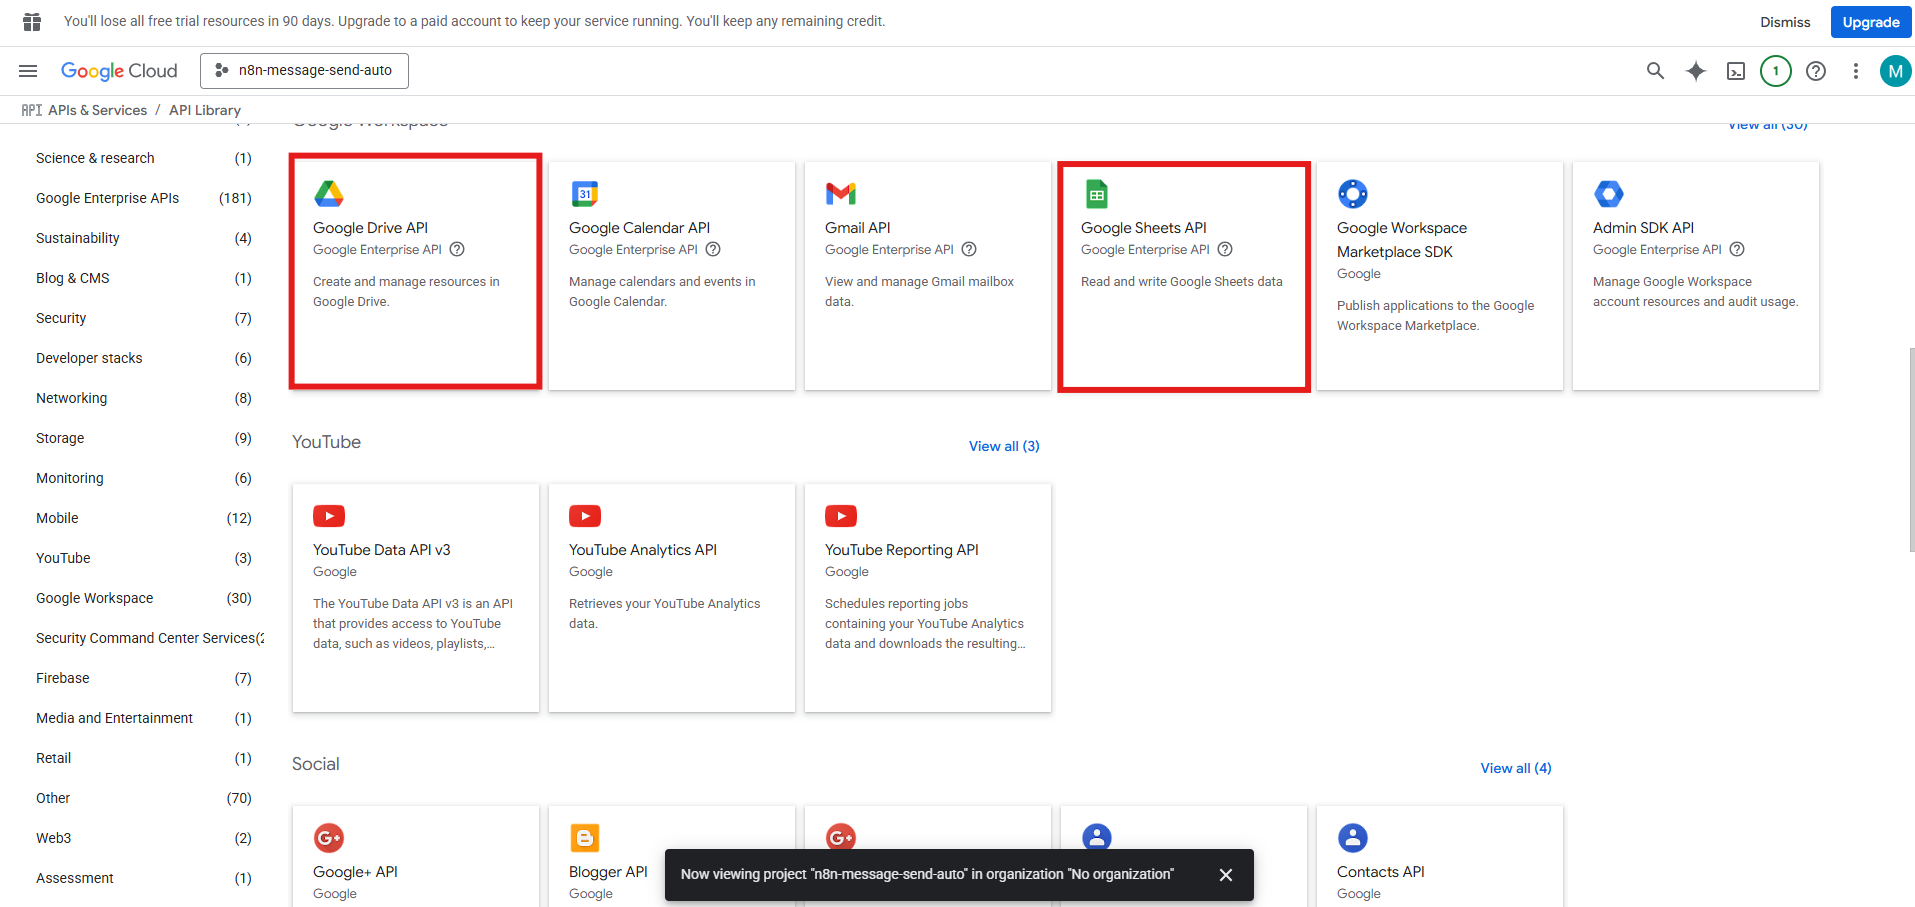
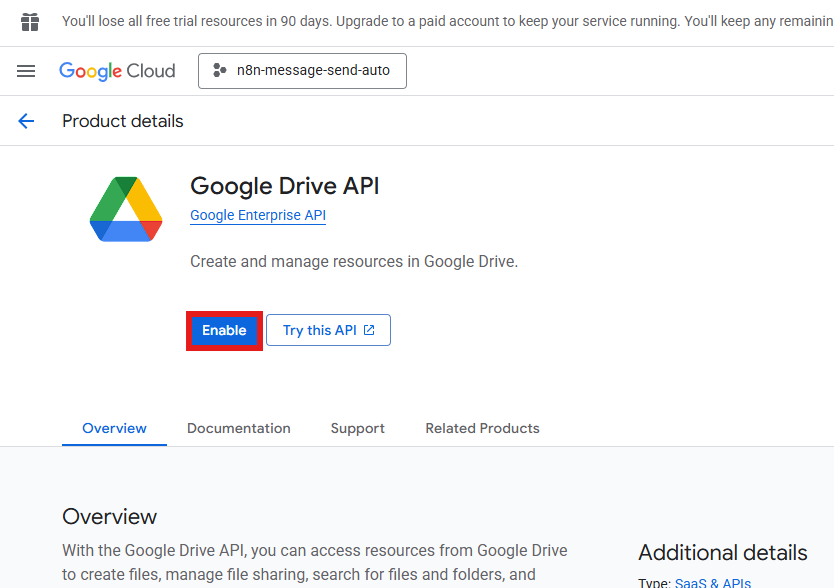
- Search for Google Drive API and enable it.
- Search for Google Sheets API and enable it.
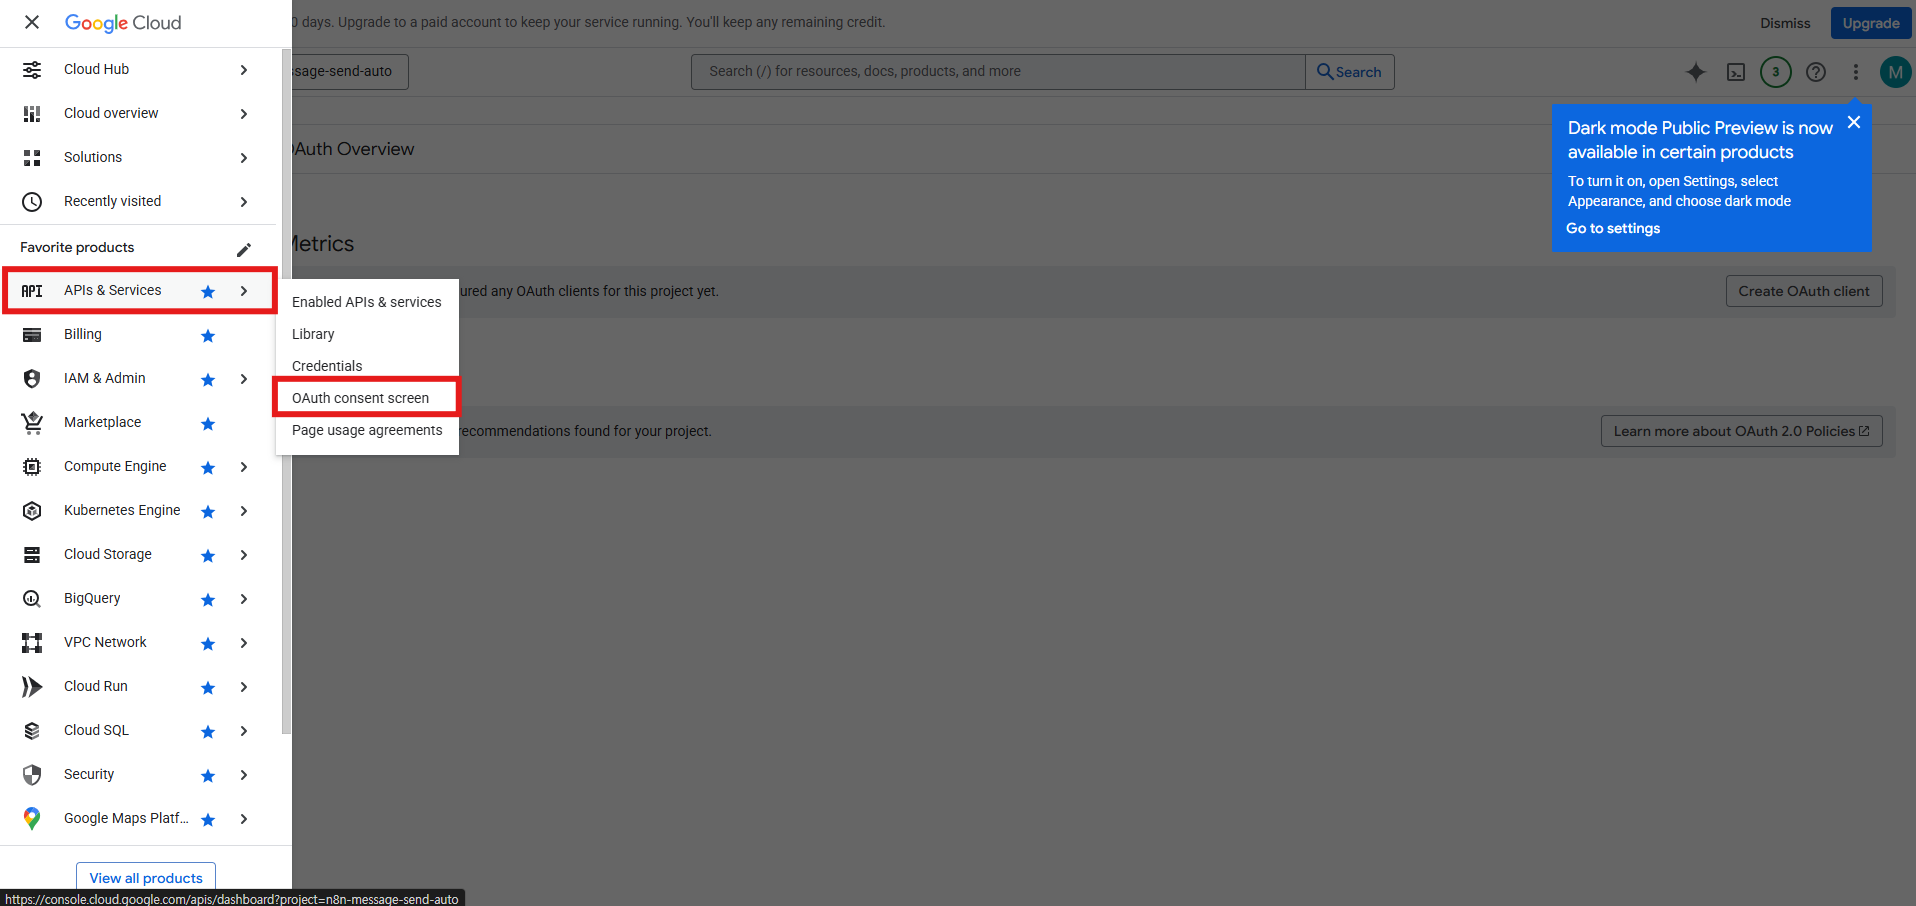
- Choose OAuth consent screen.
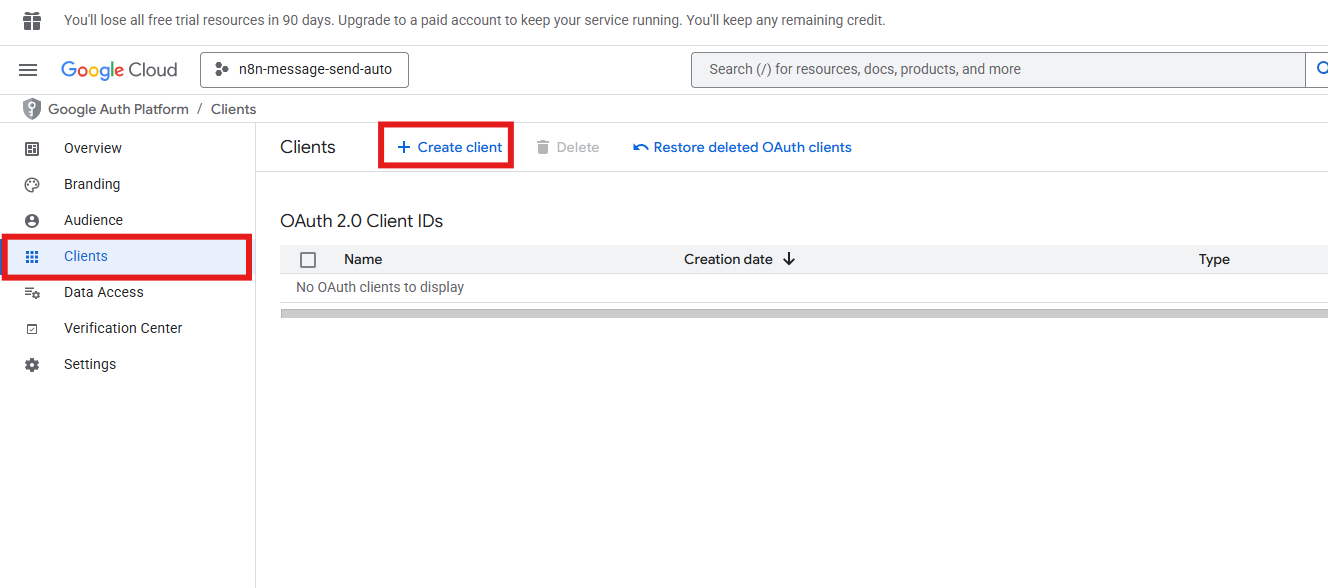
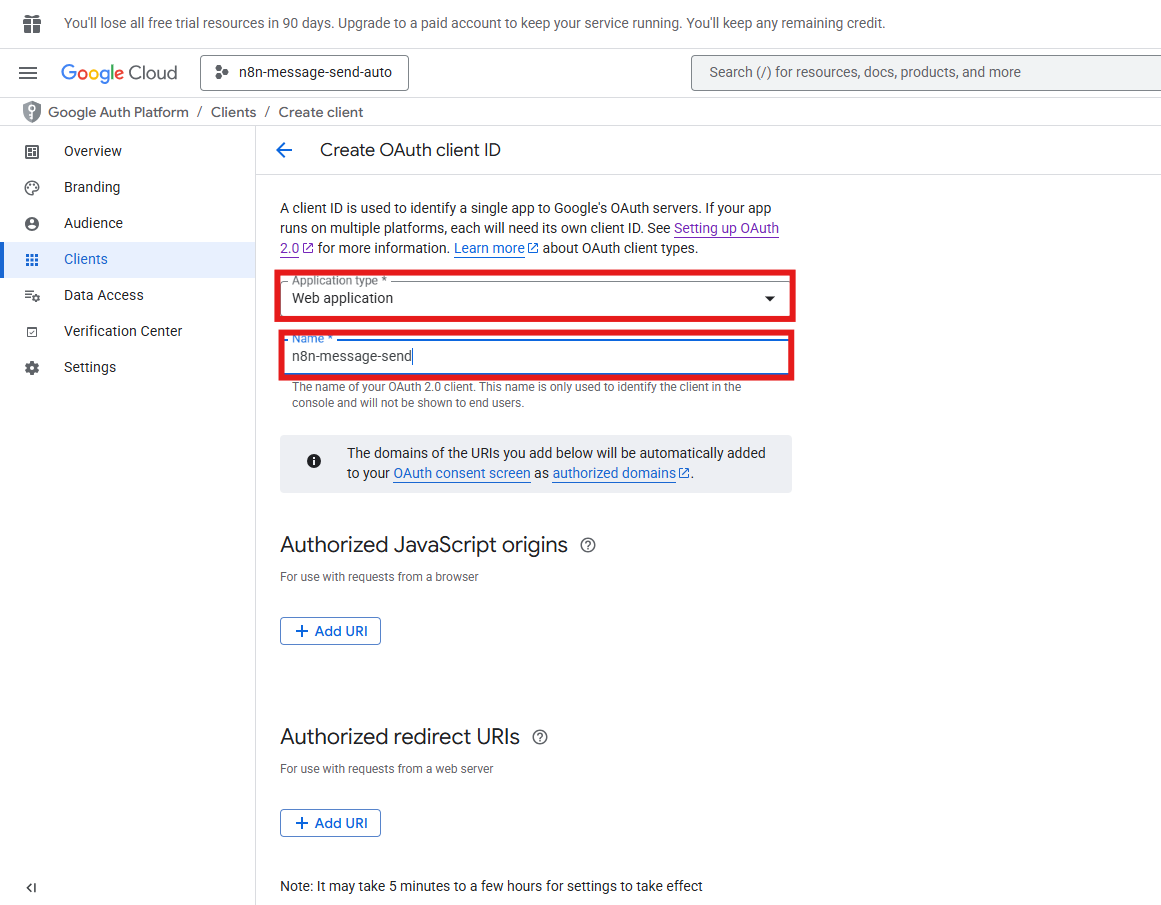
- Click Clients → Create client.
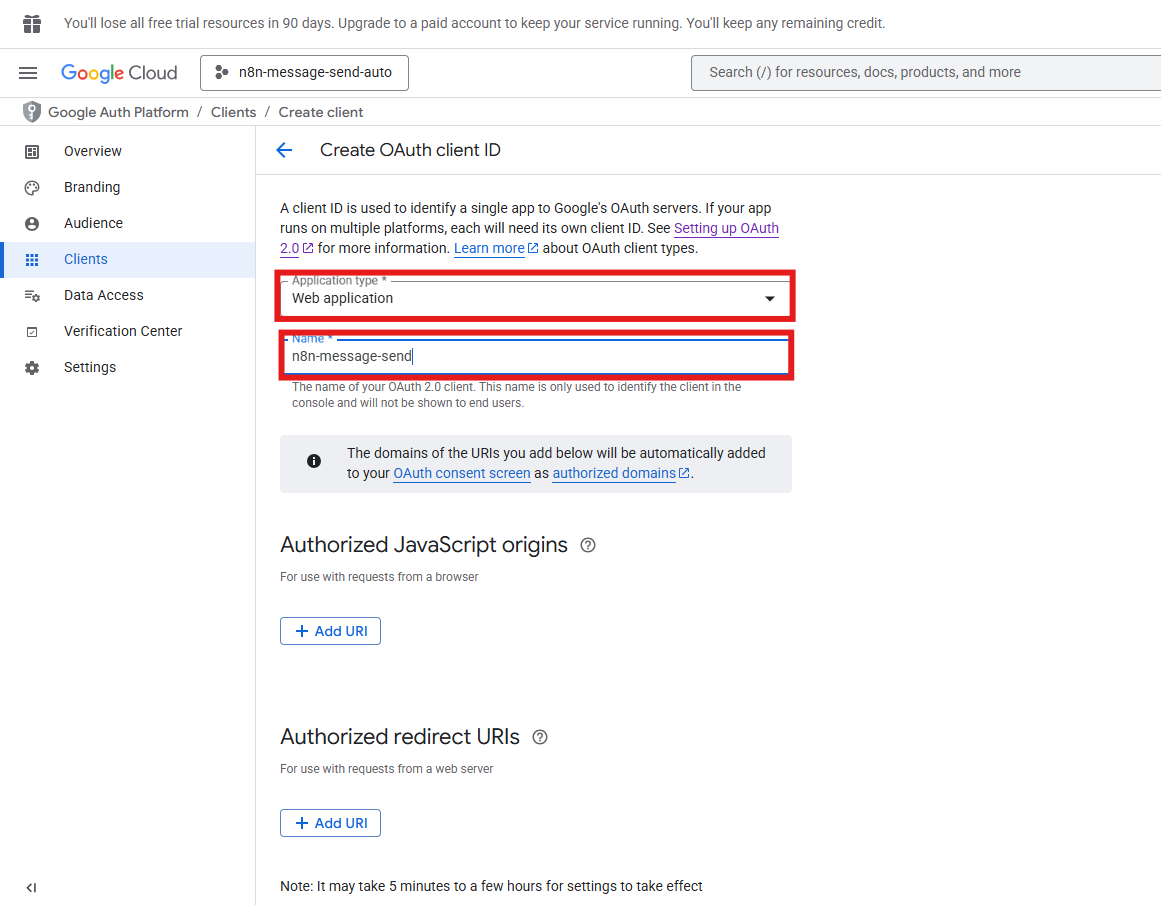
- Set Application type to Web application and enter a name.
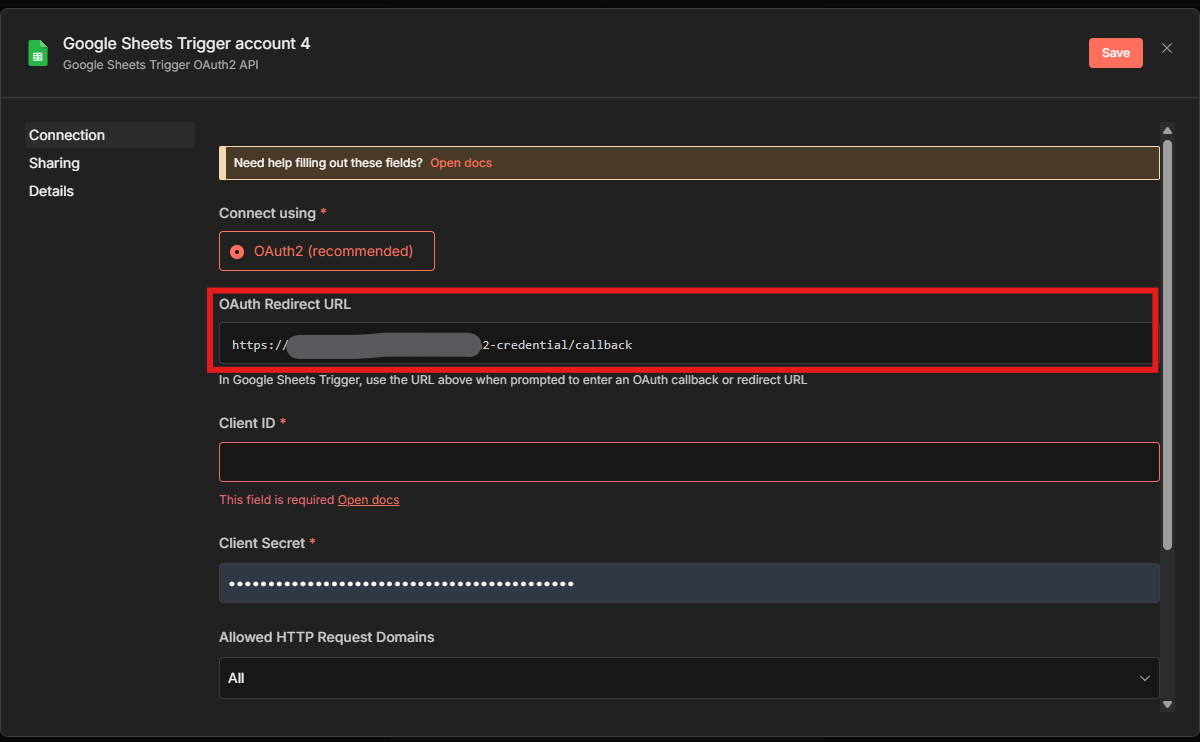
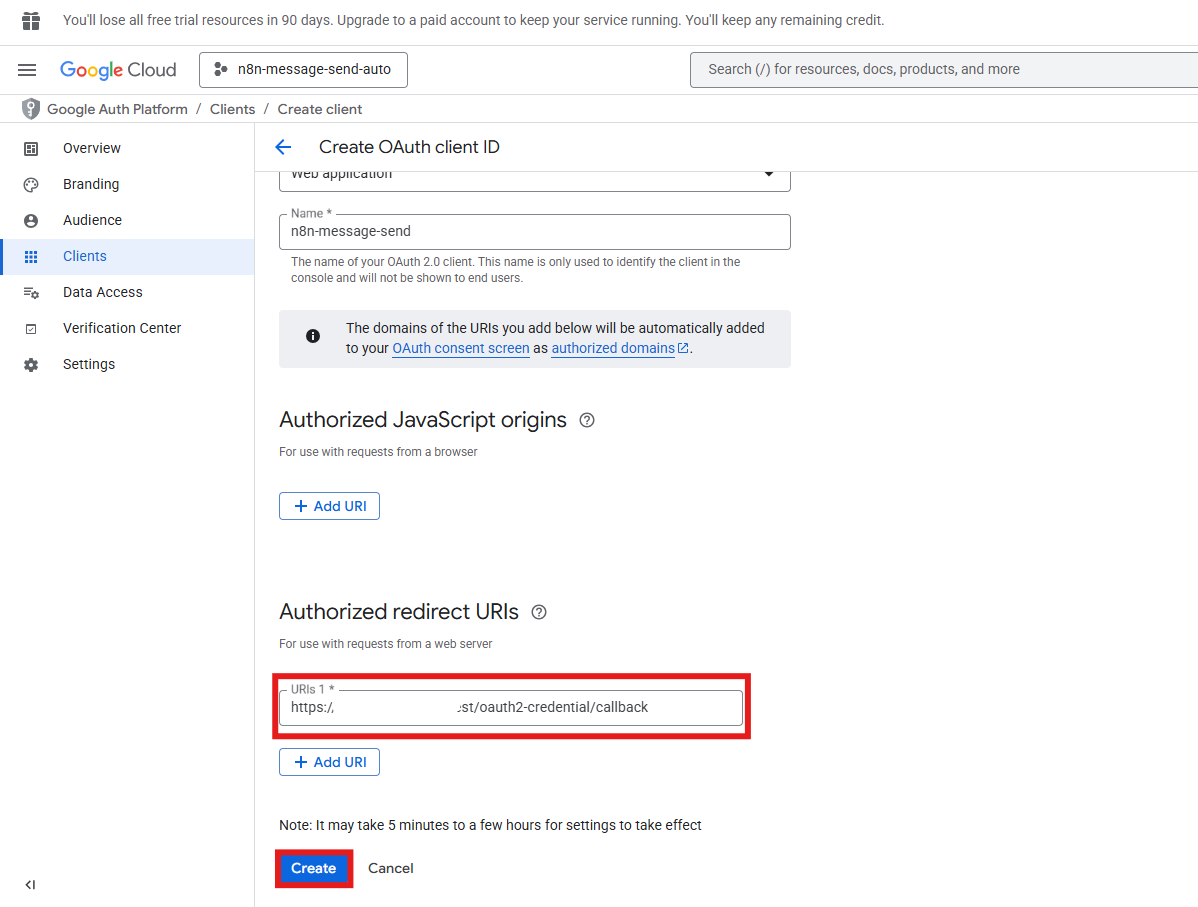
- Click Authorized redirect URIs → Add URL.
- Copy the OAuth Redirect URL from n8n and paste it in.
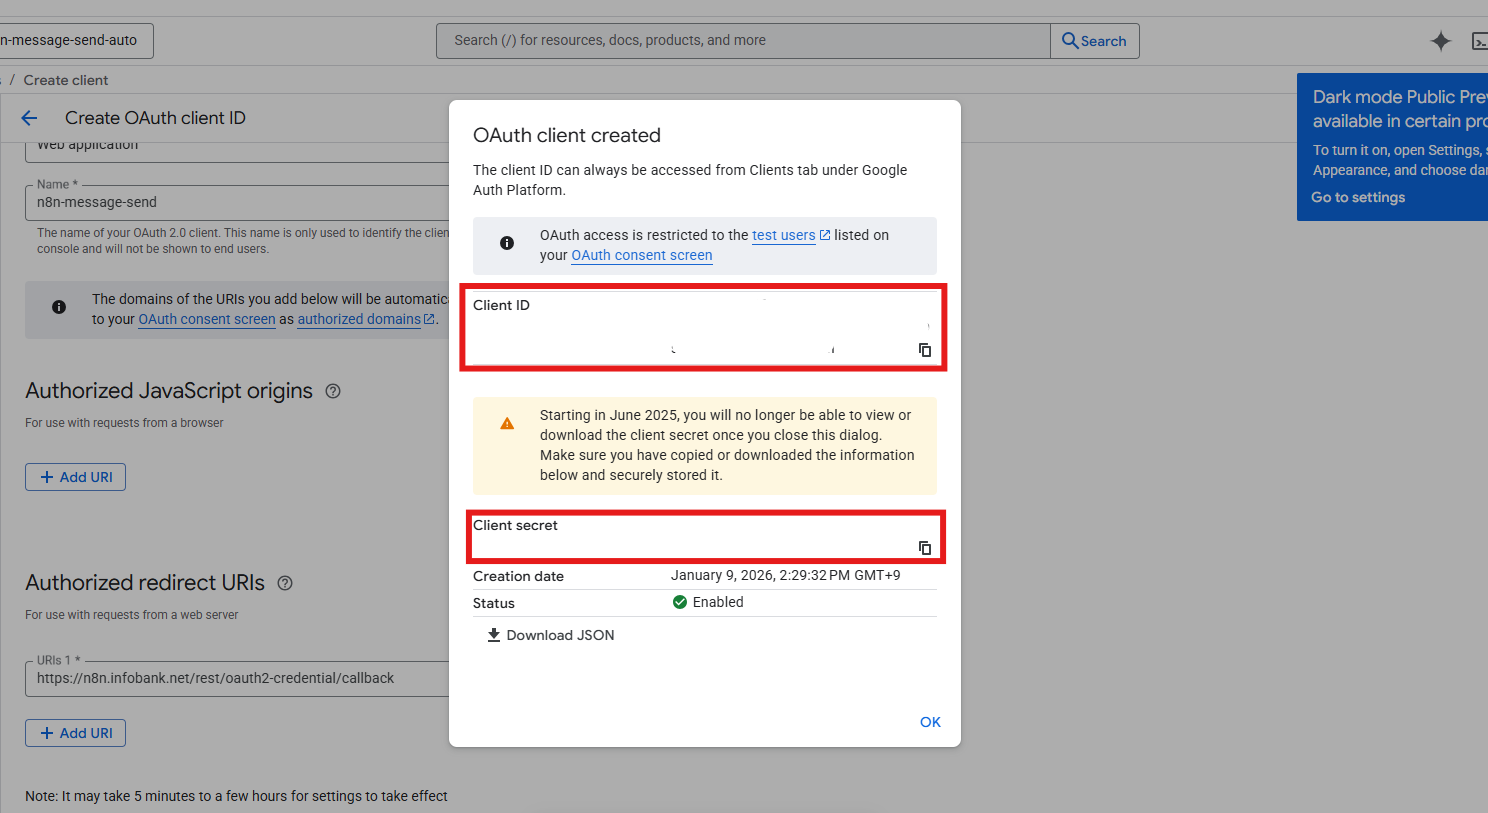
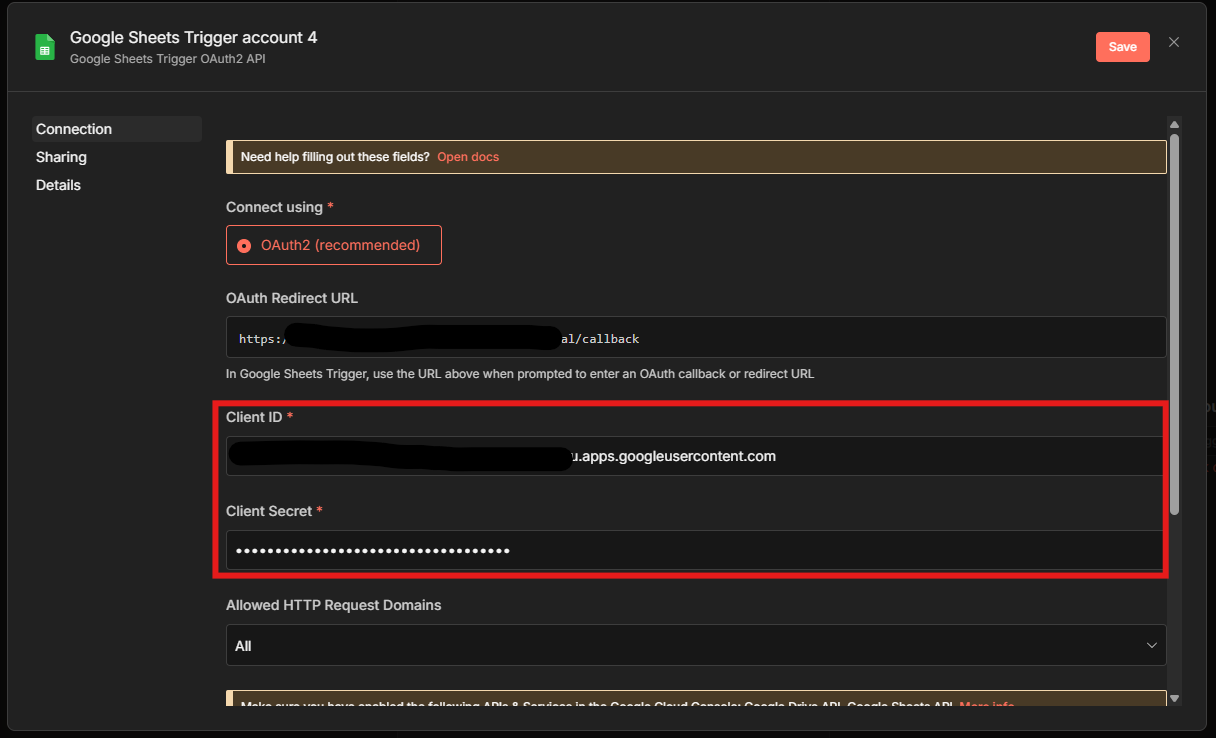
- Check the Client ID and Client secret that were created.
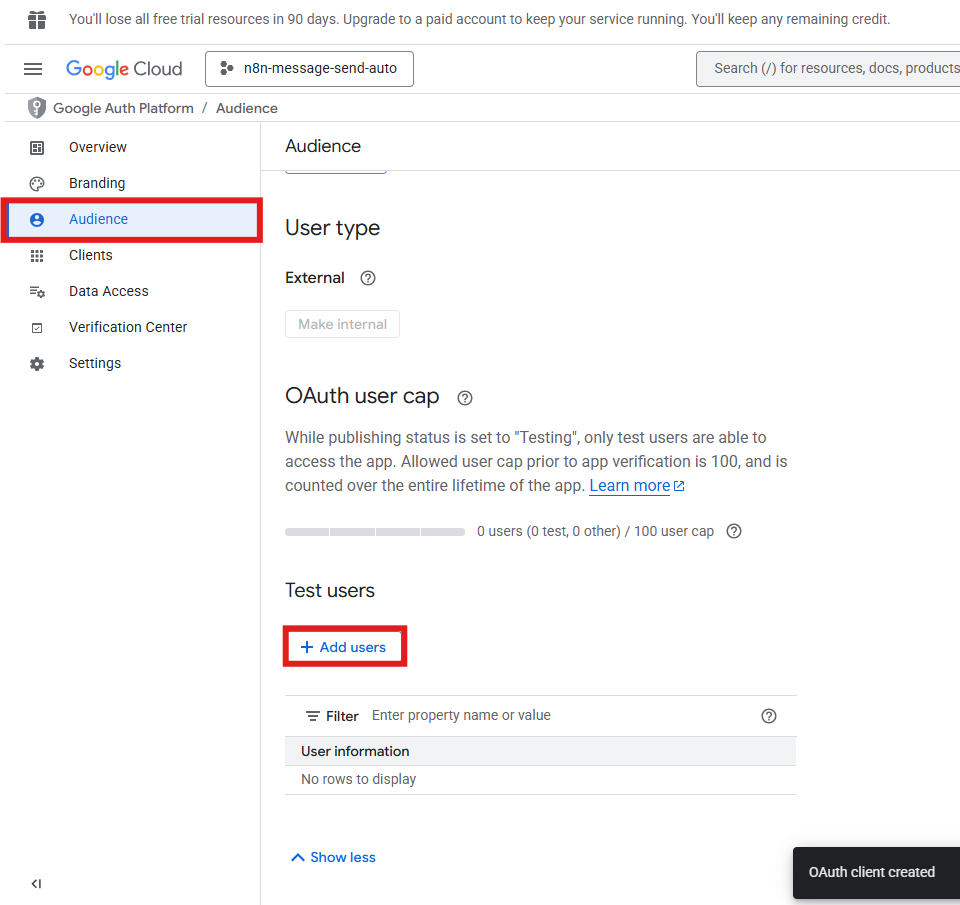
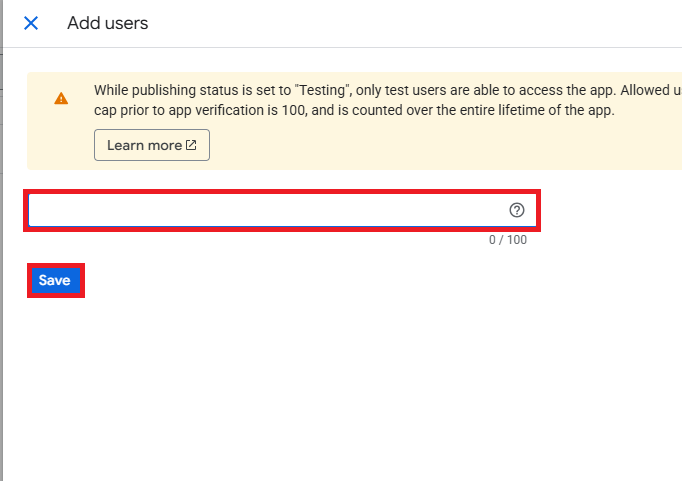
- Click Audience → Test Users → Add users.
- Enter the Google account you will use and click Save.
- Enter the Client ID and Client secret in the credential fields in n8n.
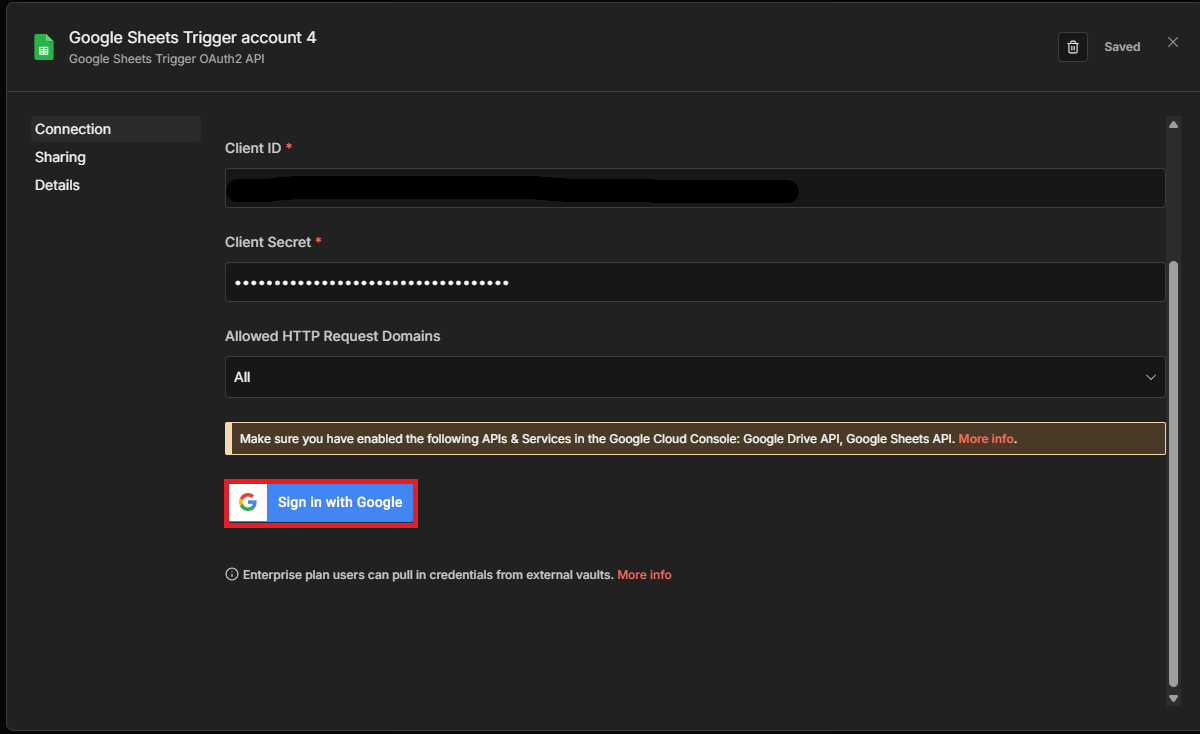
- Choose Sign in with Google.
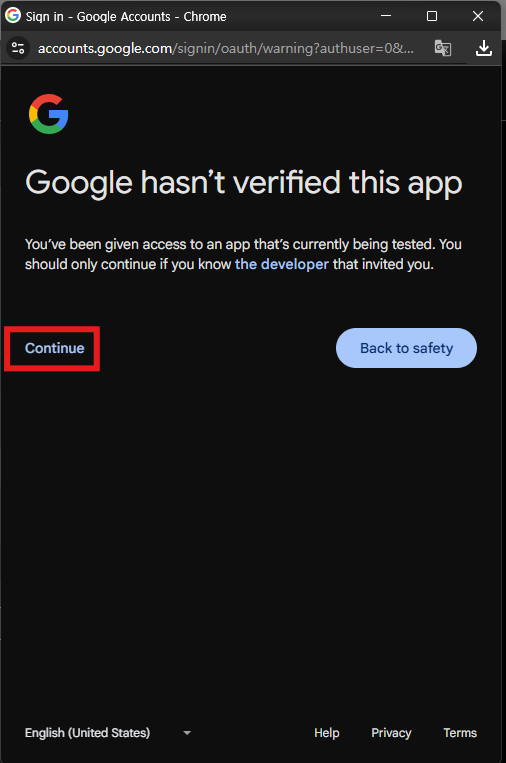
- Click Continue in the sign-in popup.
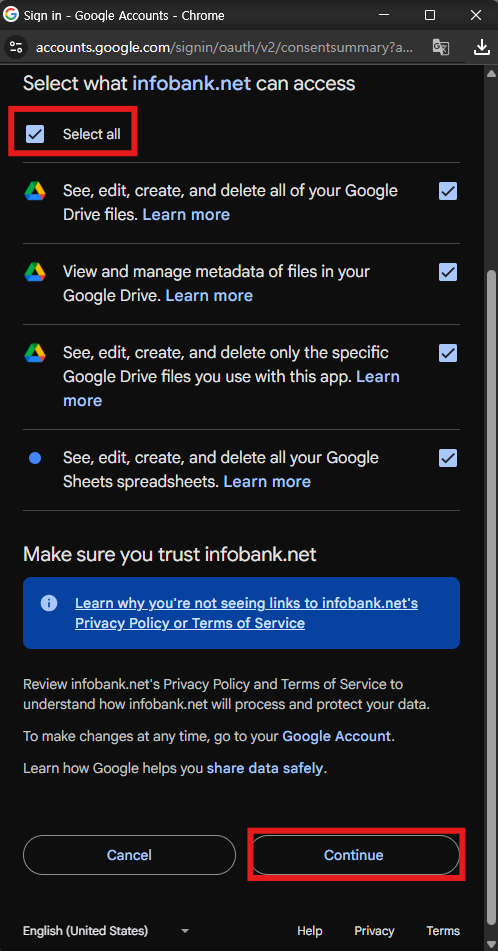
- Review the permission request and click Continue.
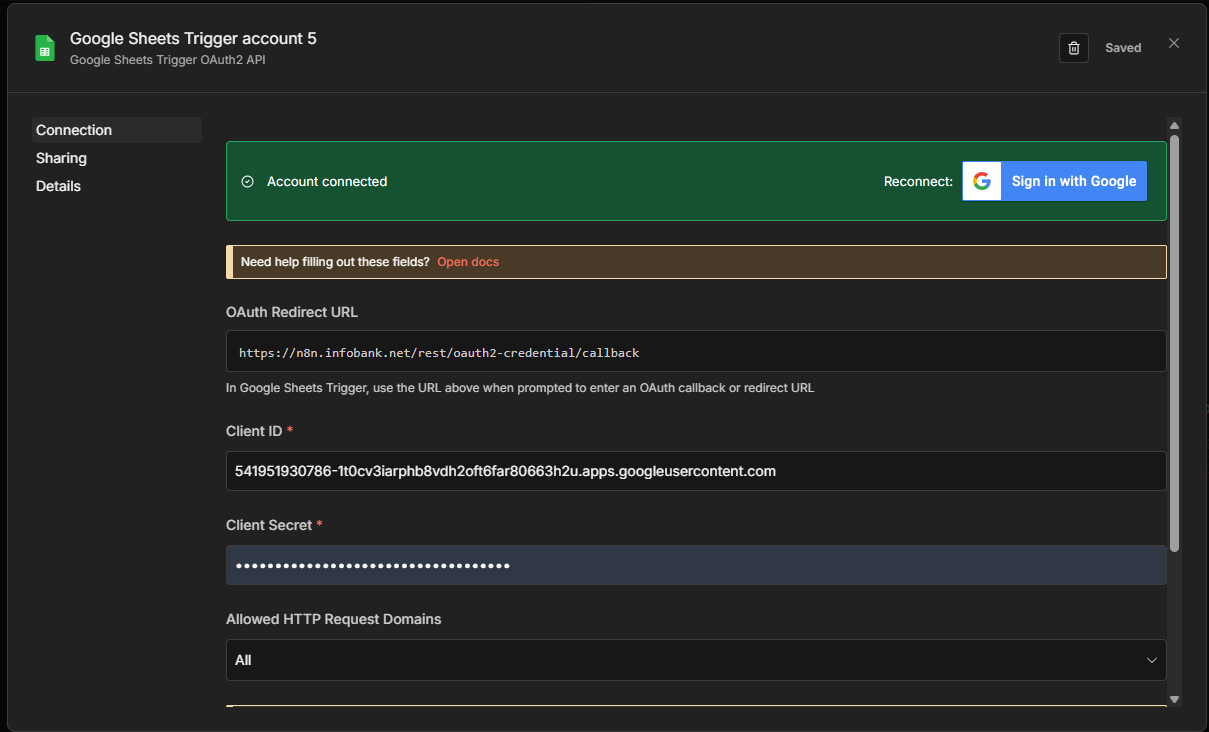
- Confirm that the Google account connected successfully.
Step 3: Configure the Google Sheets integration
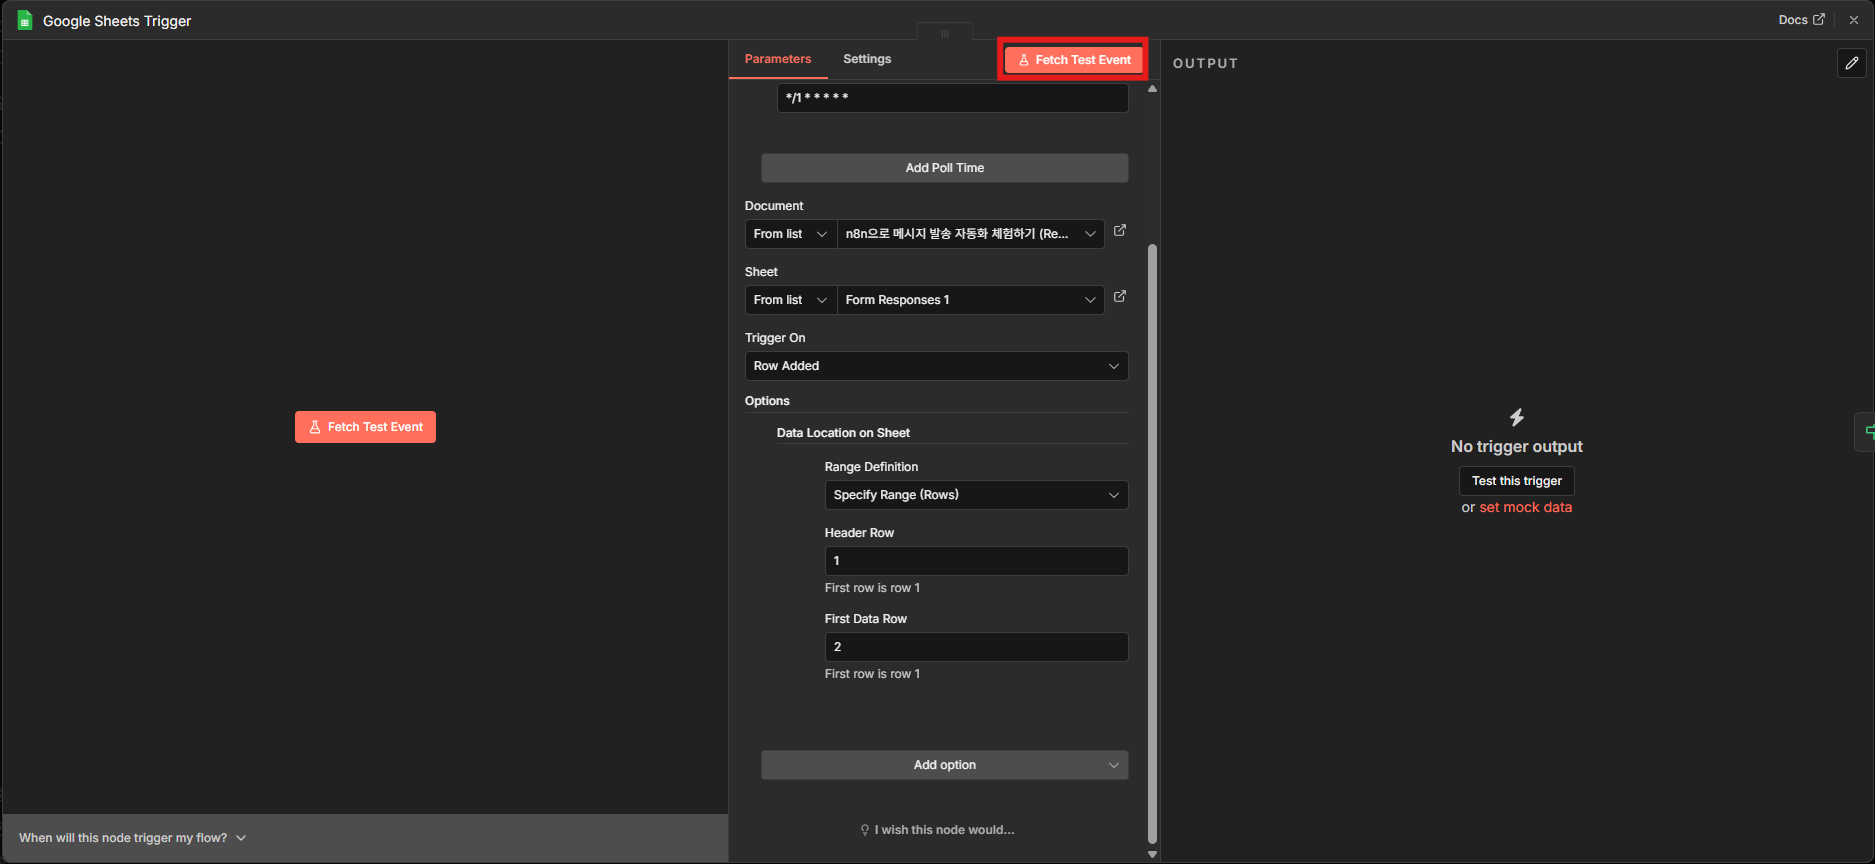
Set the spreadsheet the trigger runs against and the polling interval, then fetch test data.
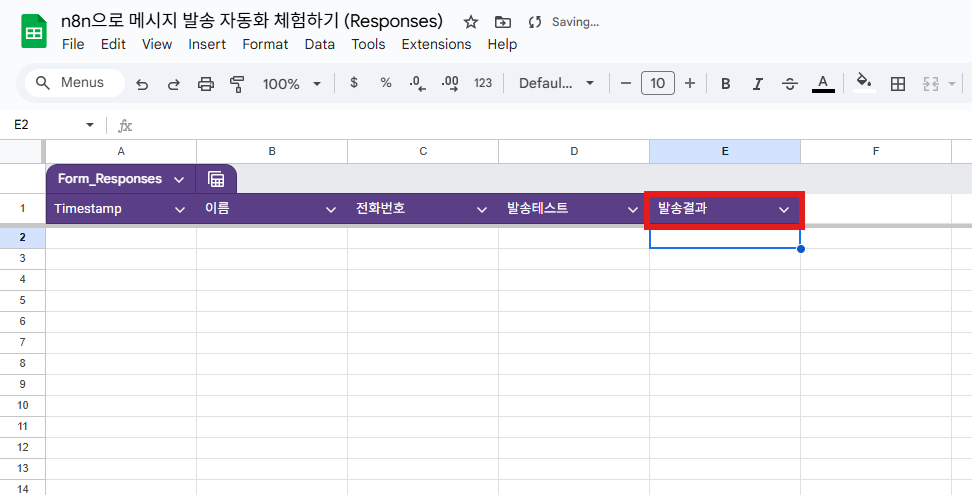
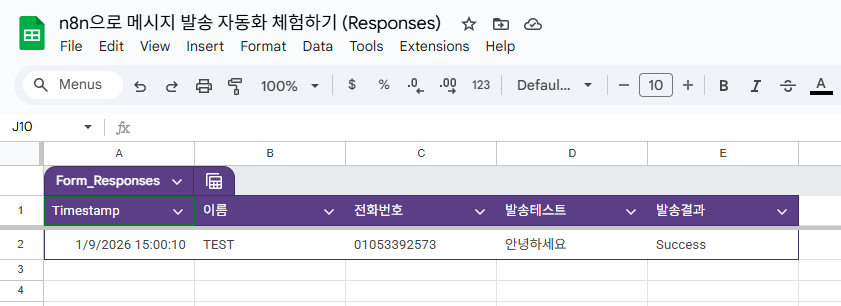
- Add a column to Google Sheets to store the delivery result.
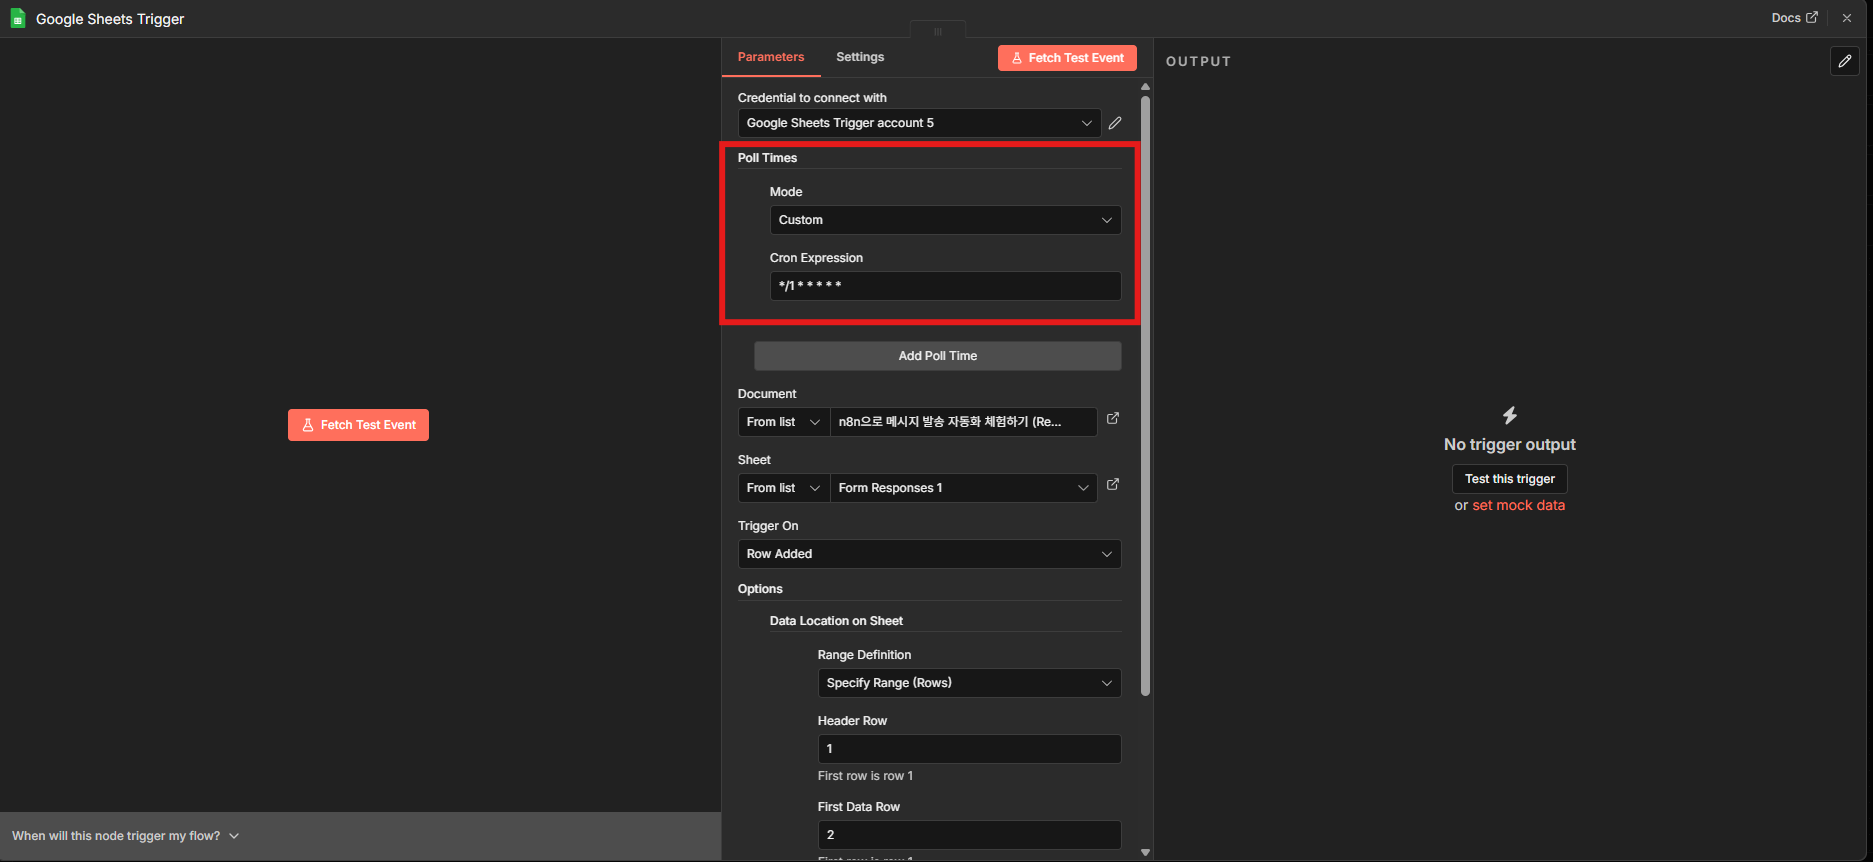
- Set Poll Times to Custom and enter the value below.
*/1 * * * * *
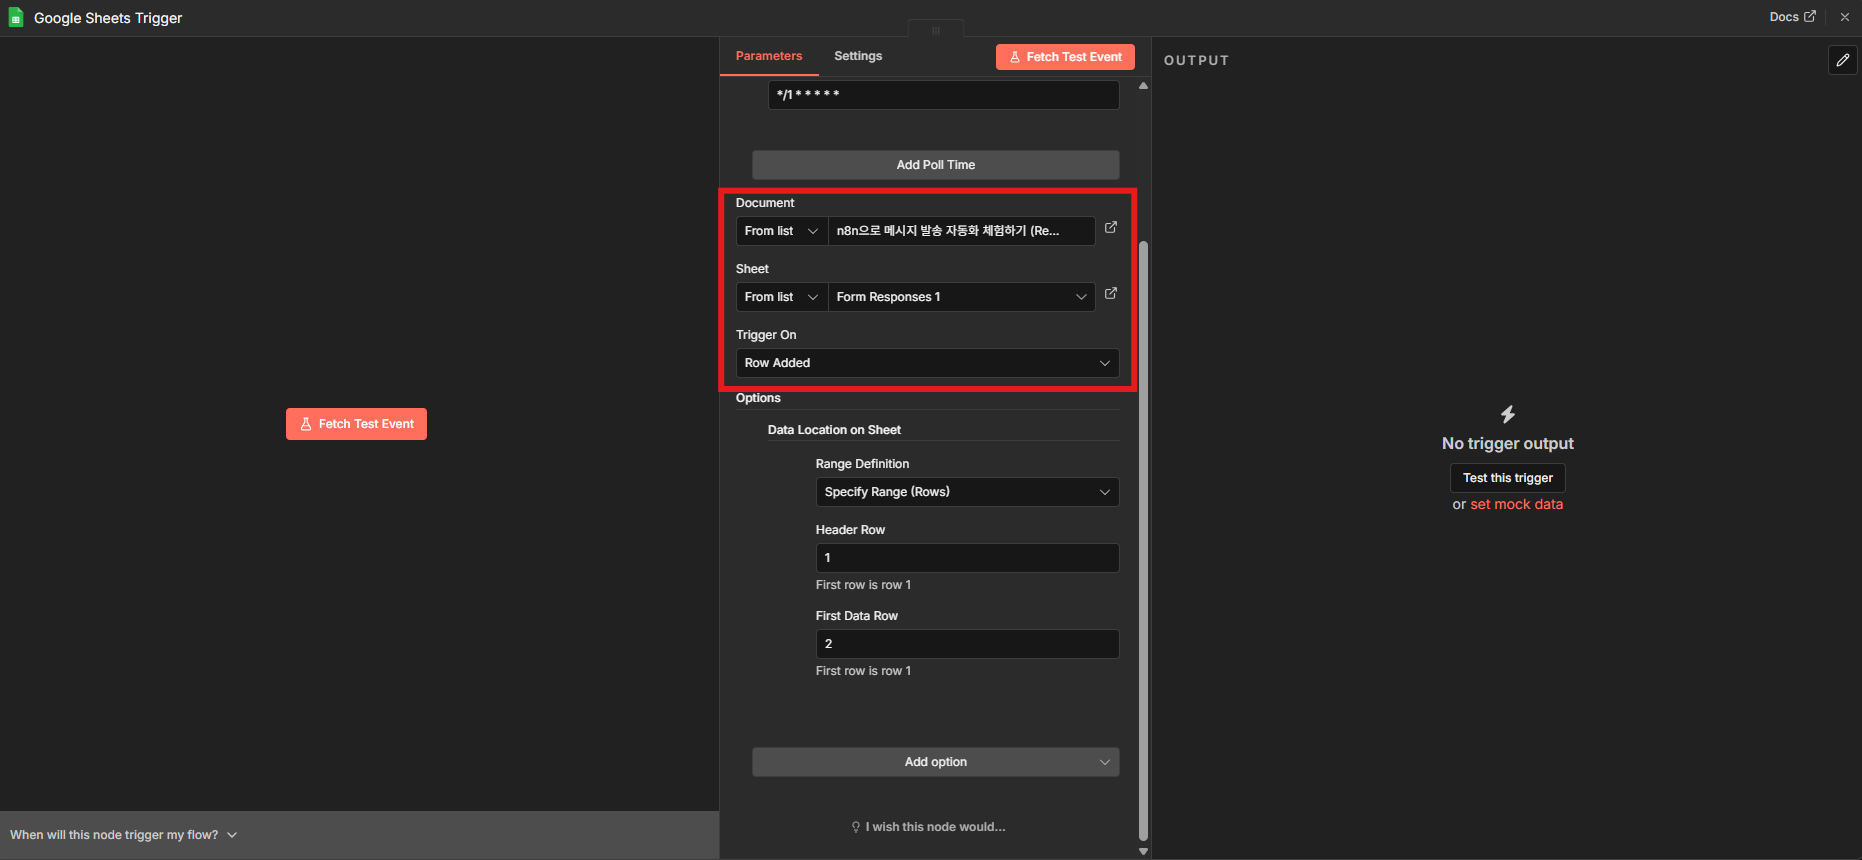
- Choose Document and Sheet, and set Trigger On to Row Added.
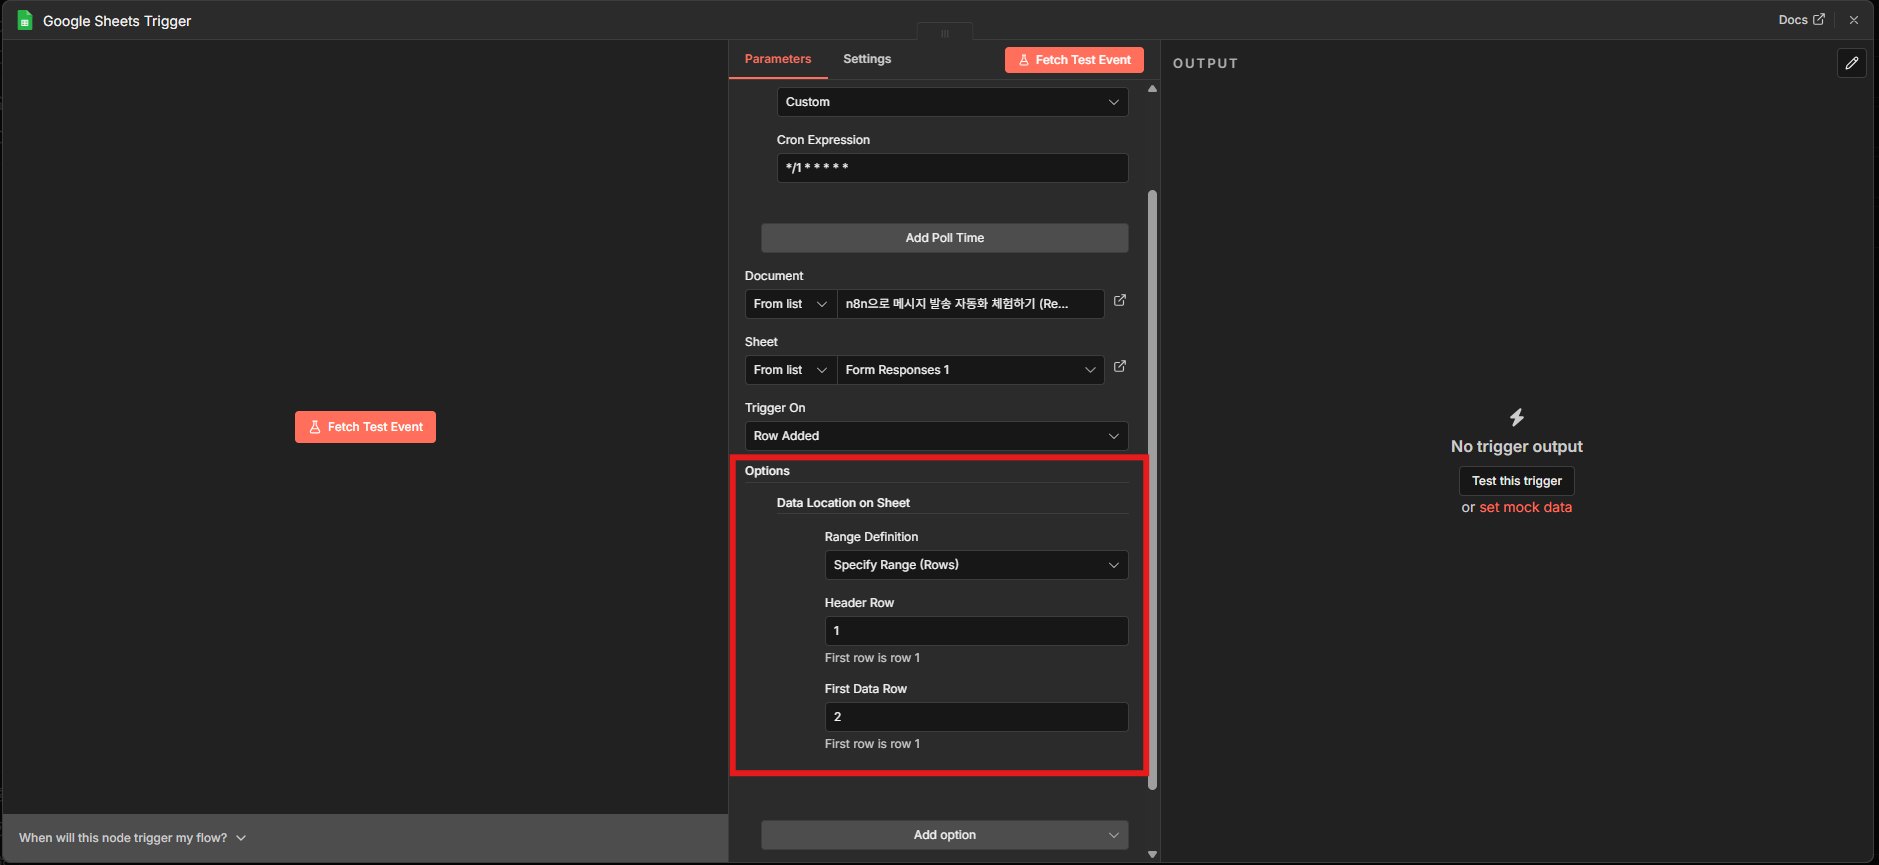
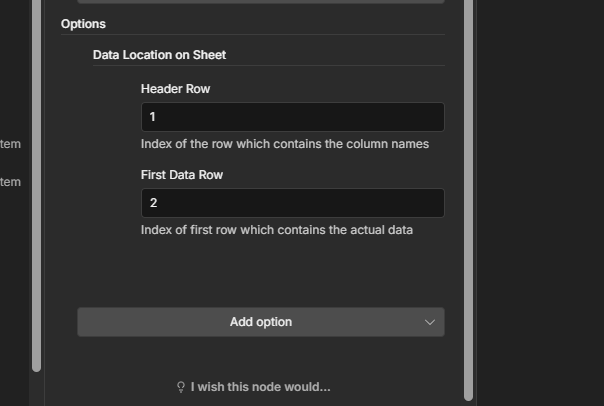
- Choose Add option → Data Location on Sheet and configure it as follows.
| Item | Value |
|---|---|
| Range Definition | Specify Range (Rows) |
| Header Row | 1 |
| First Data Row | 2 |
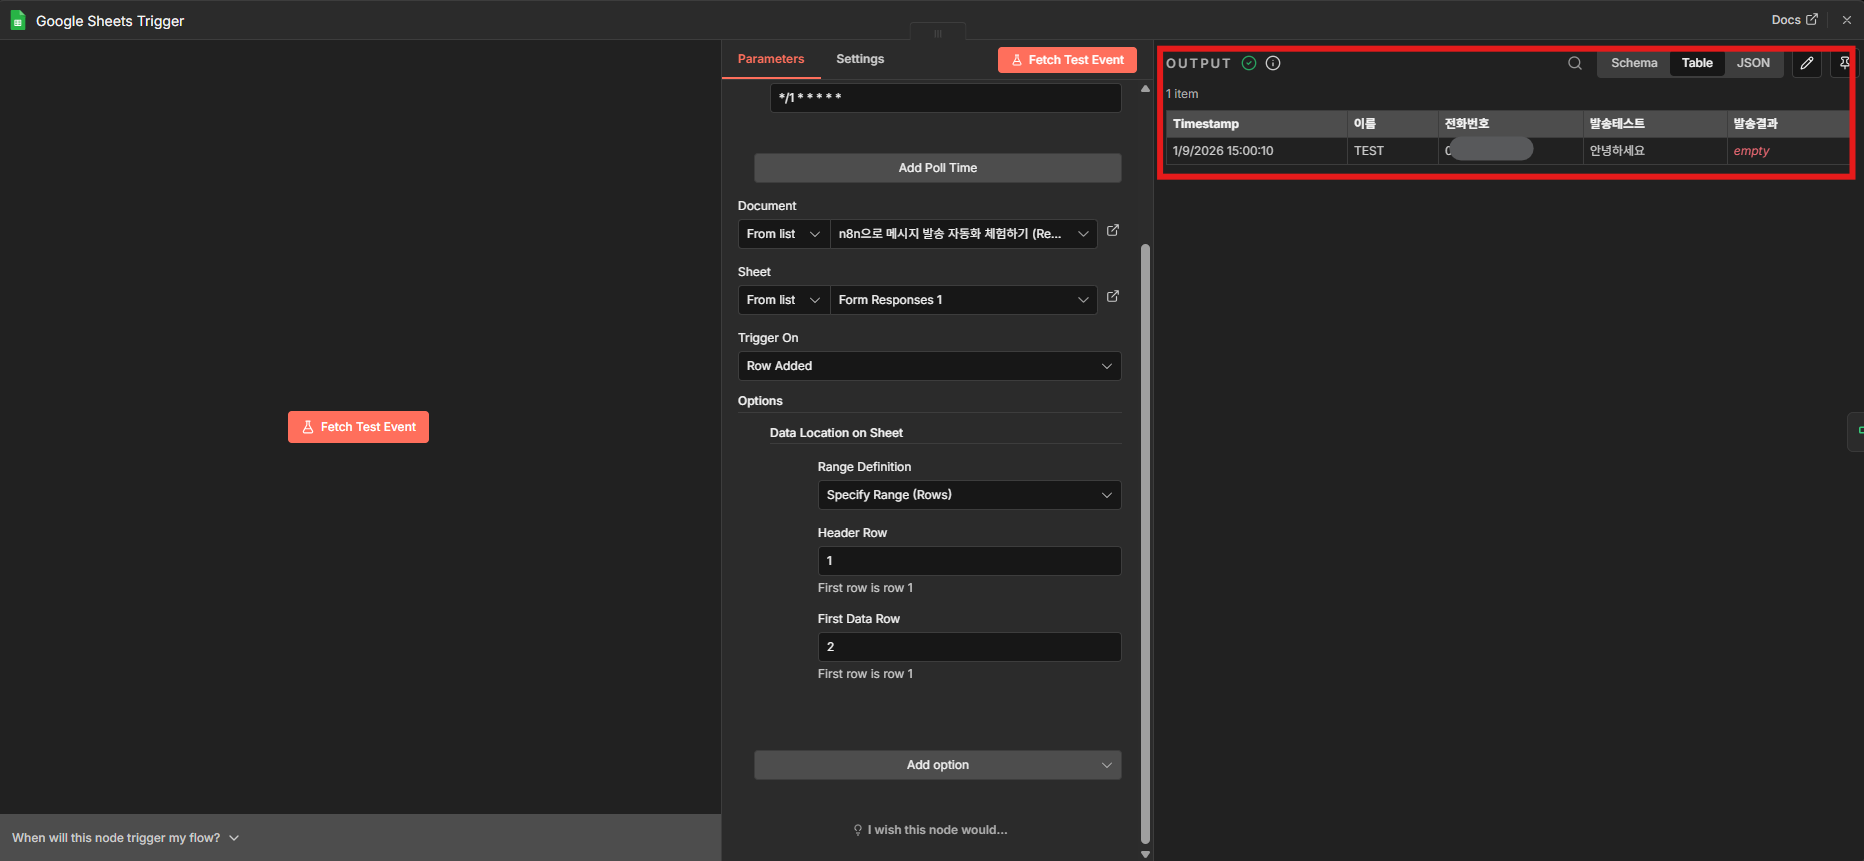
- Enter test data in the Google Form and submit it.
- Click Fetch Test Event.
- Check the Google Sheets data in OUTPUT.
Step 4: Set up conditional branching (Flow)
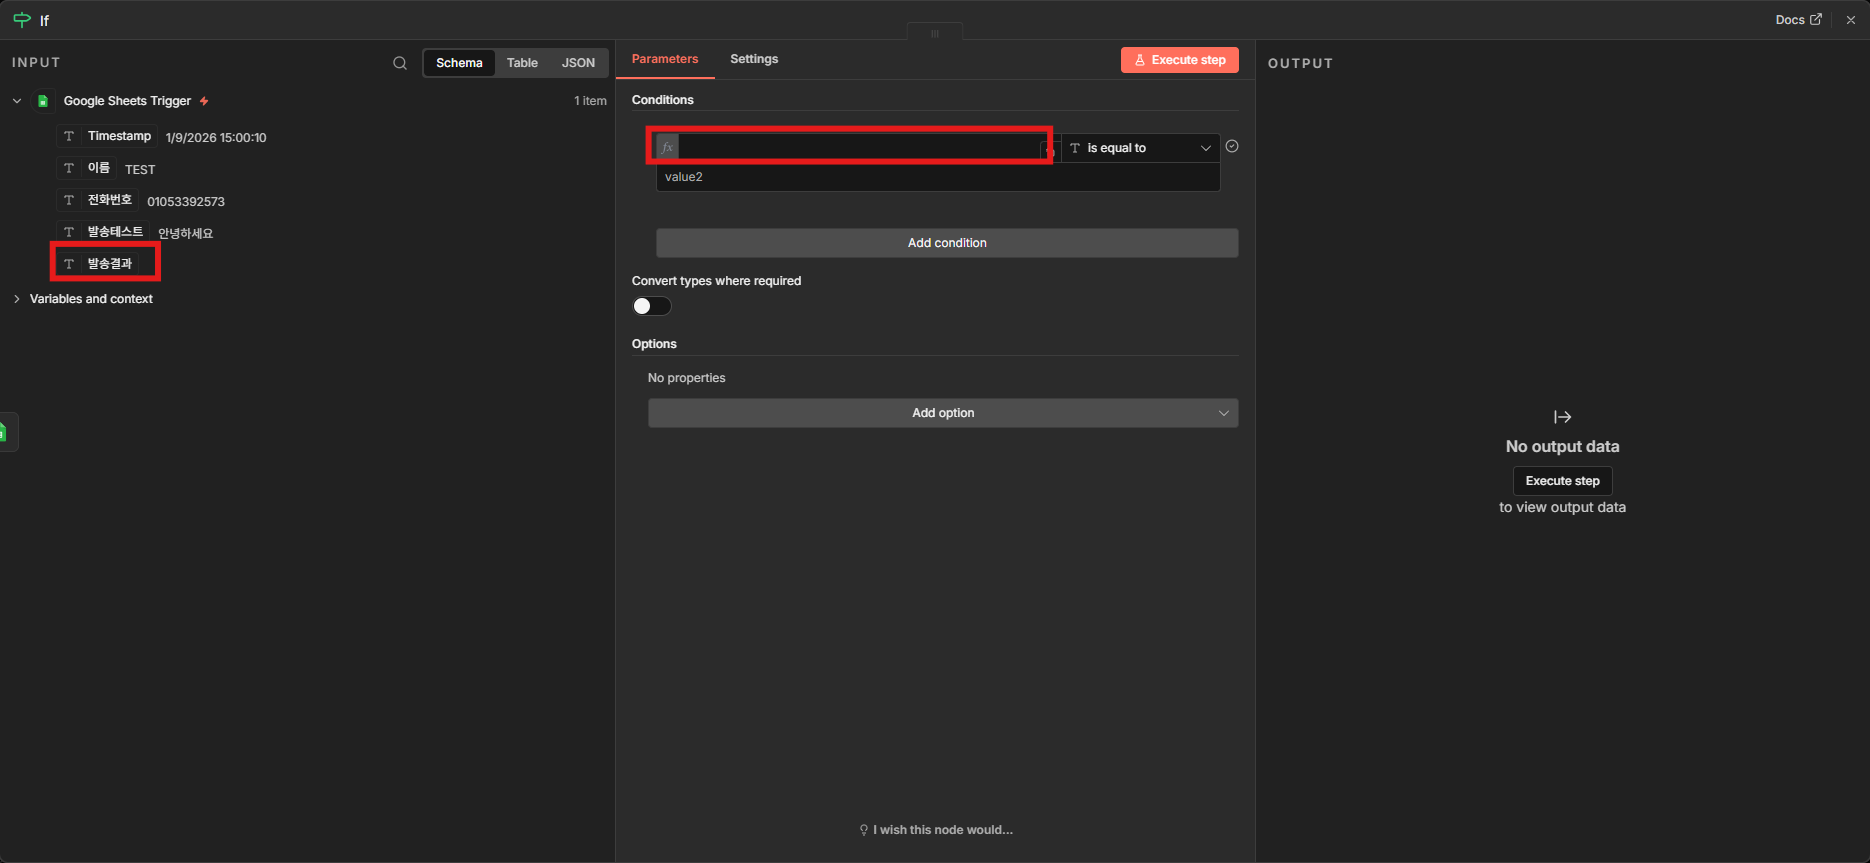
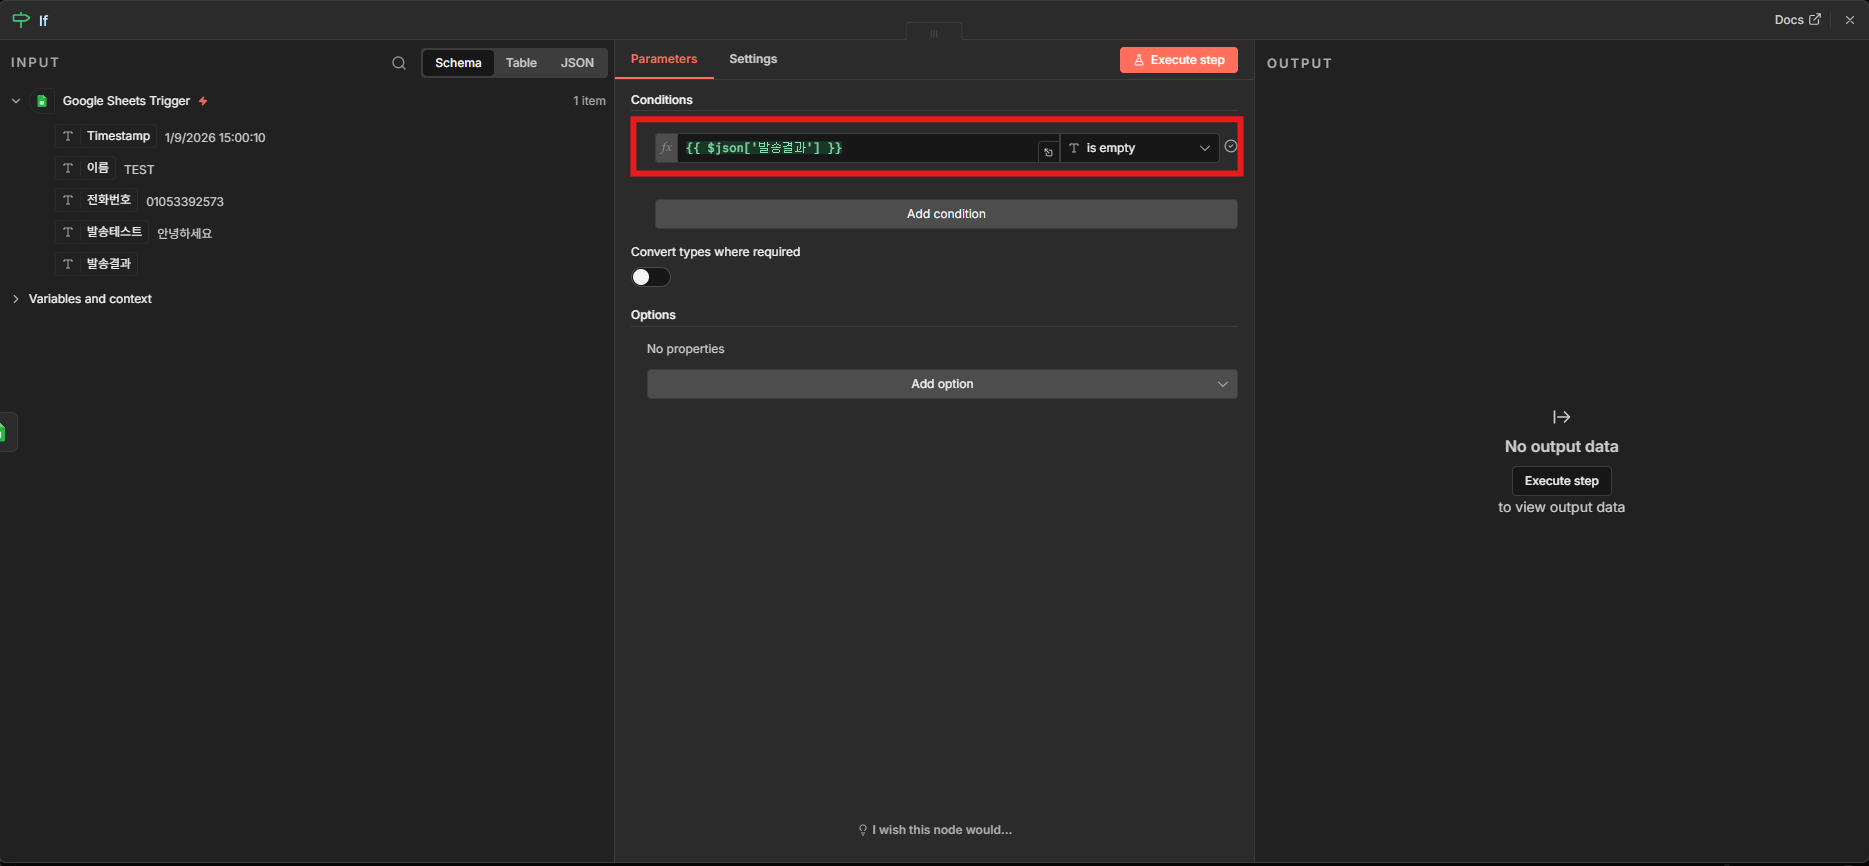
Add an if condition so that you send only when the delivery result column is empty.
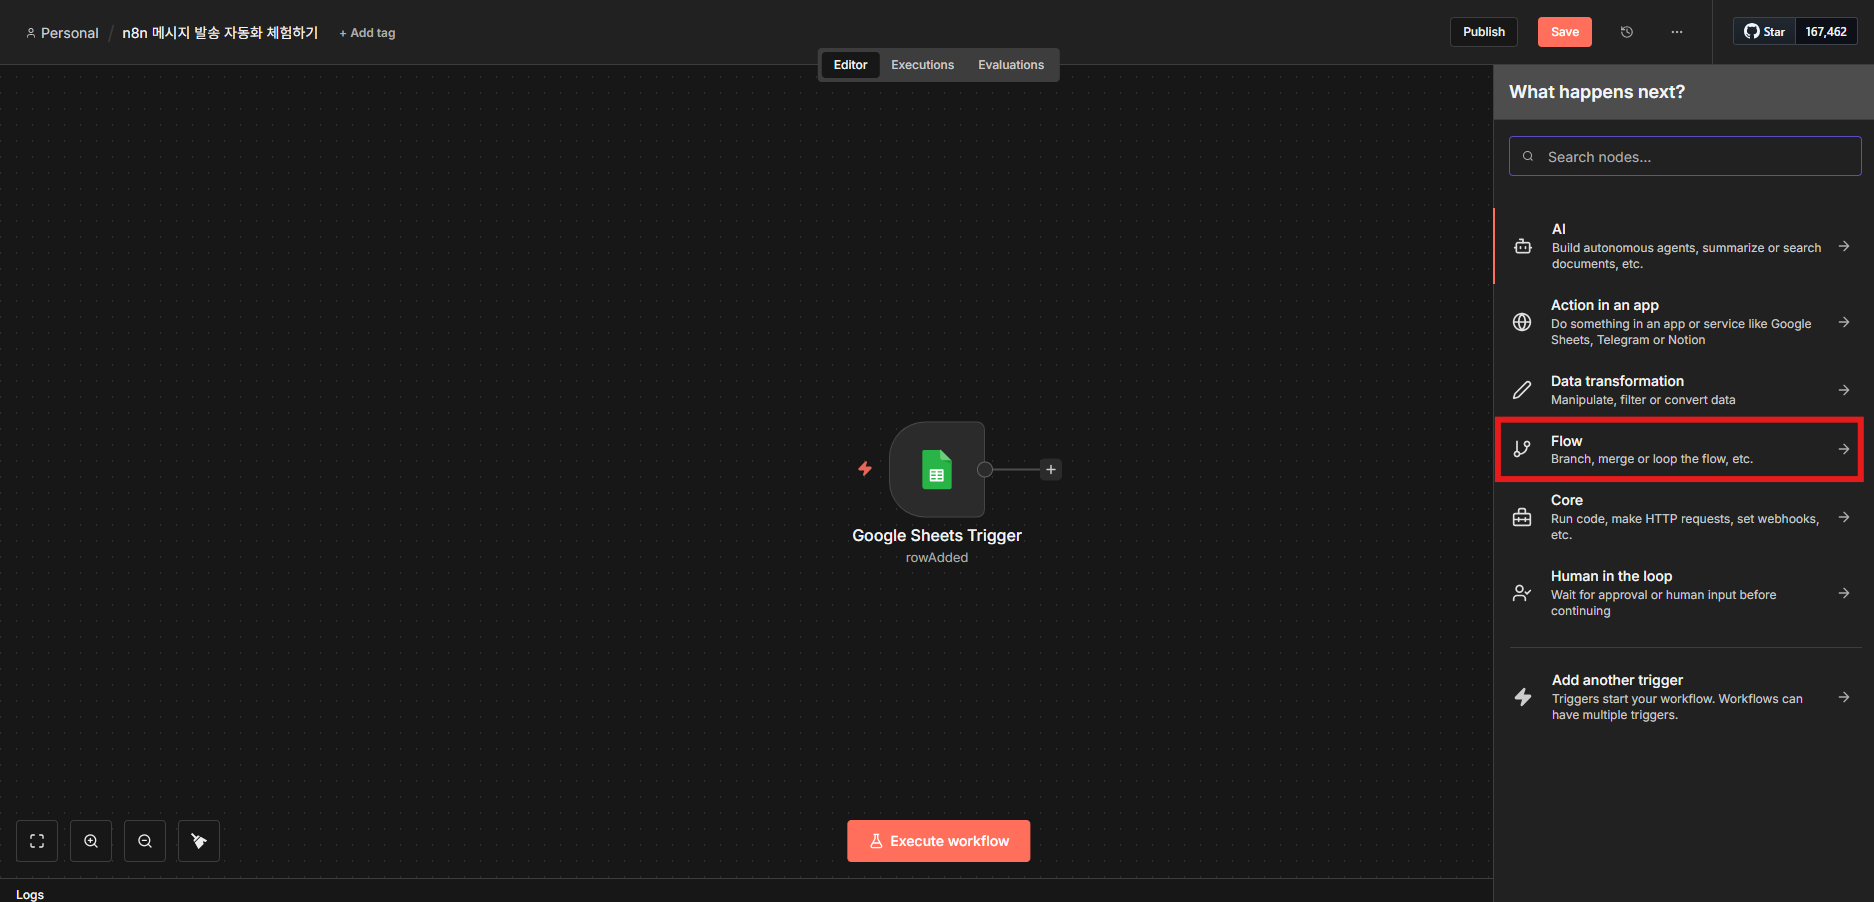
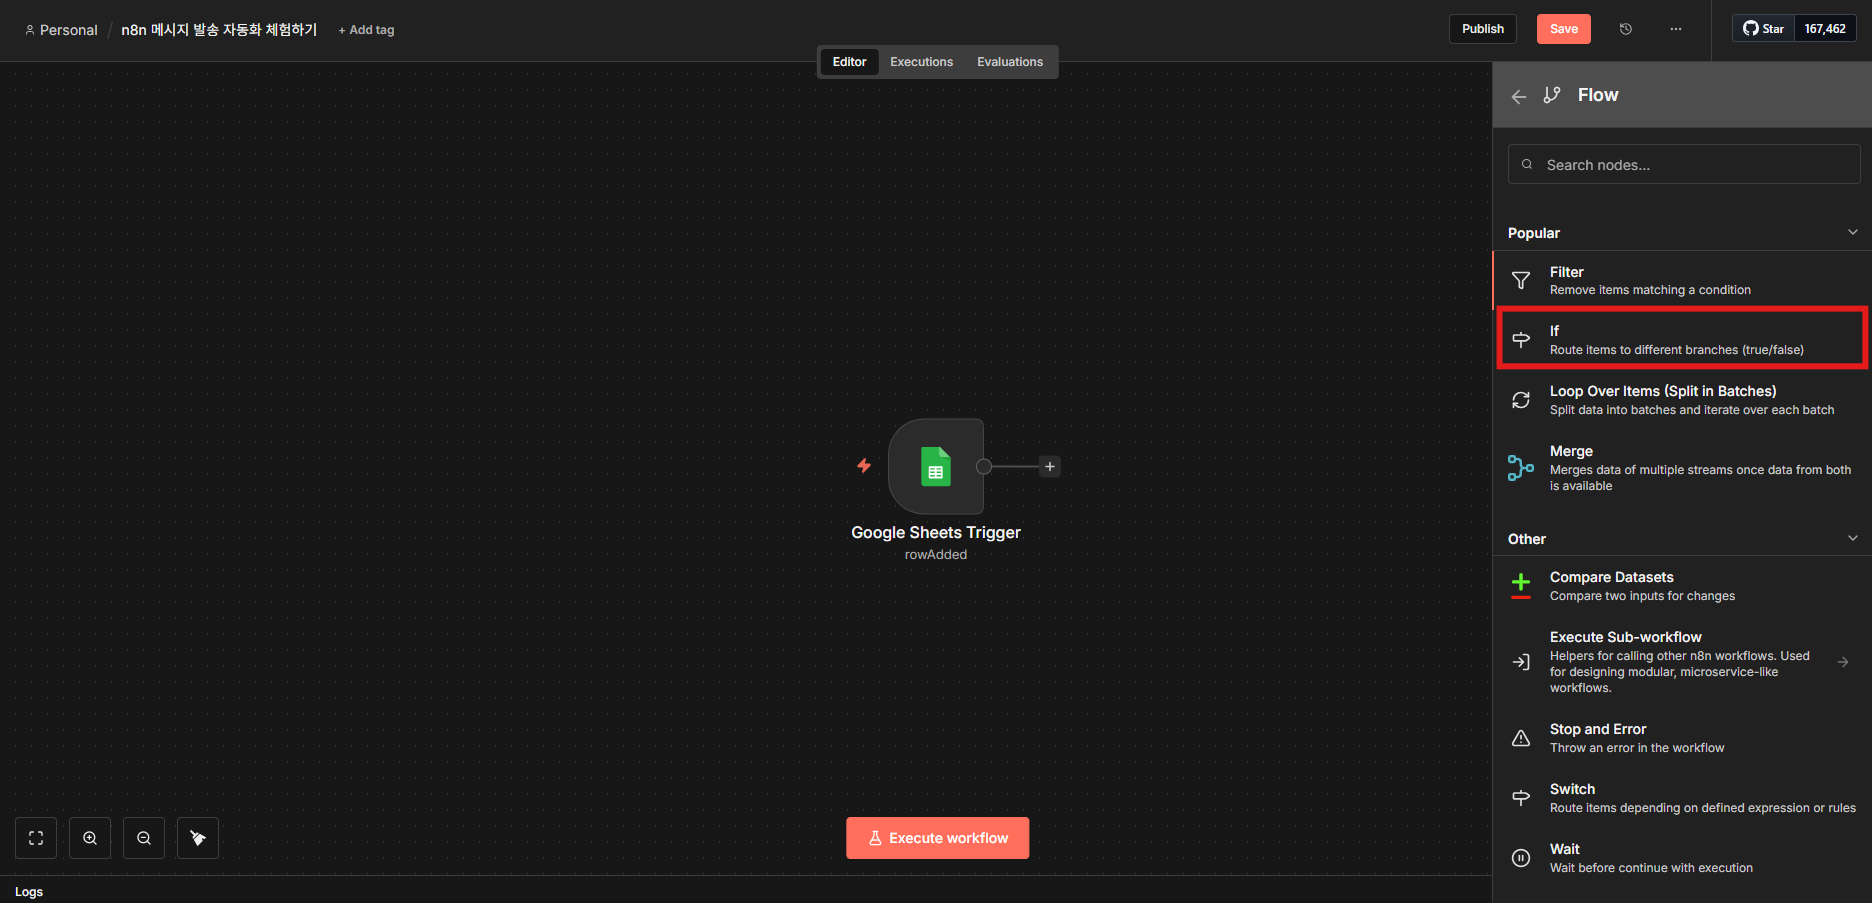
- Add Flow → if after the Google Sheets node.
- From INPUT, drag the delivery result field onto the if condition.
- Set the condition to is empty.
Step 5: Connect the Bizgo API
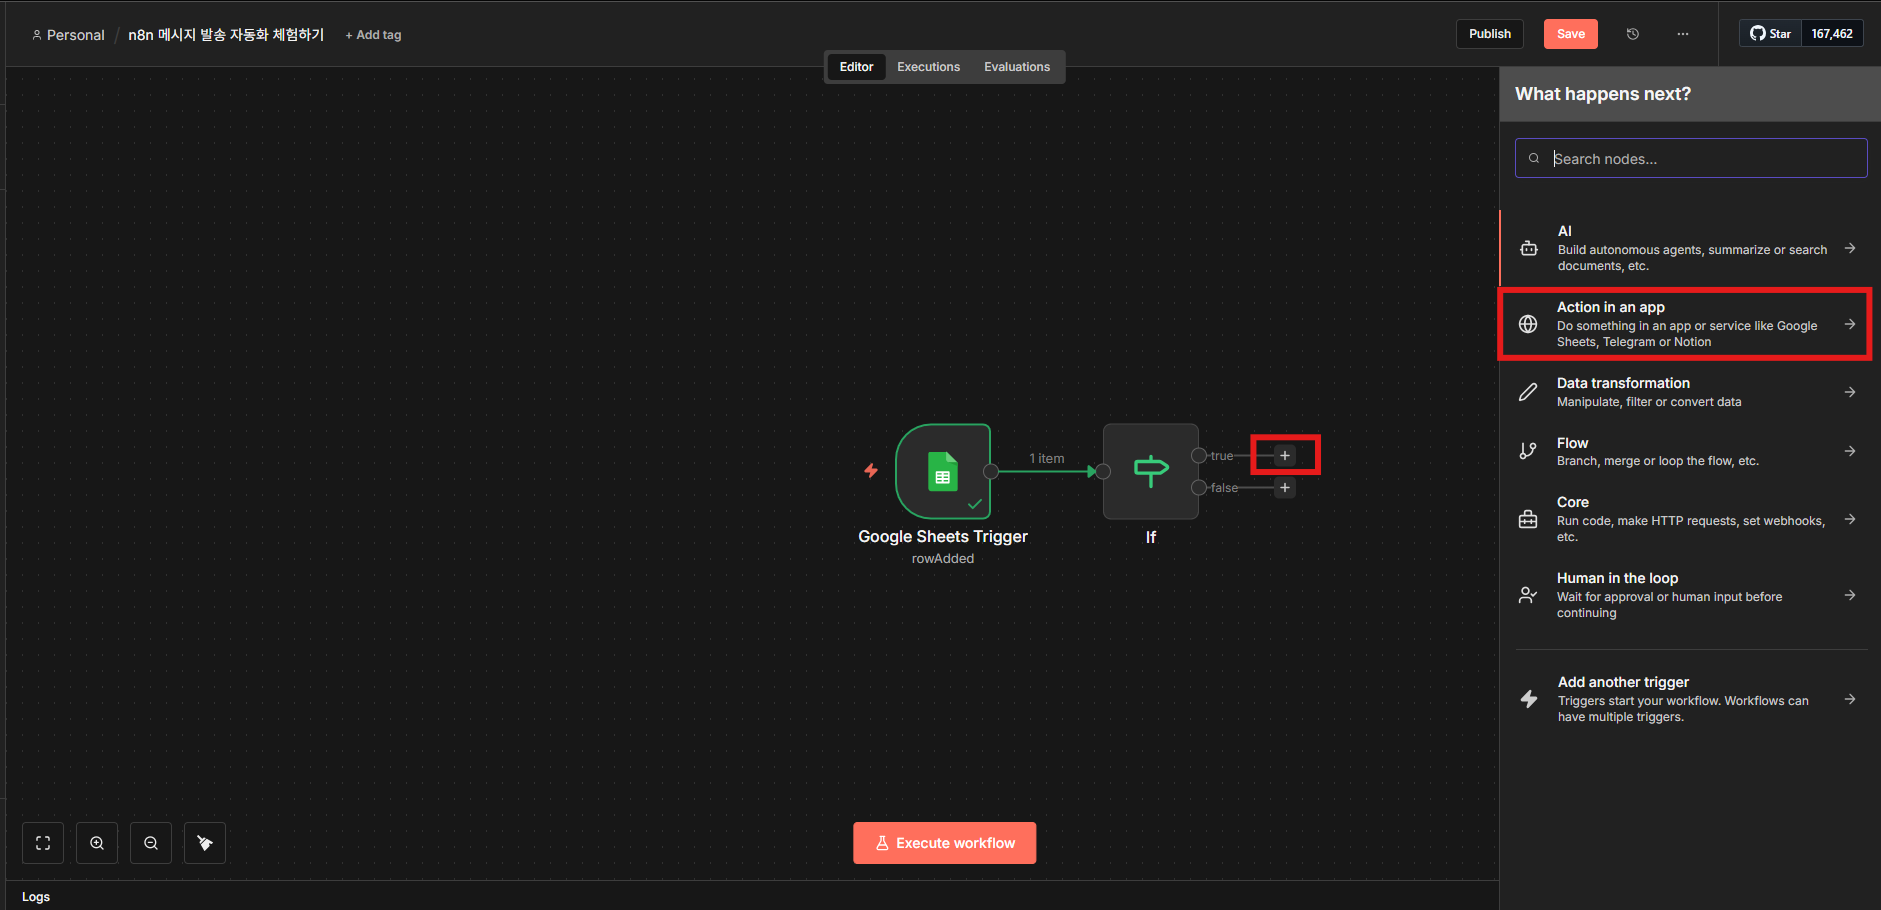
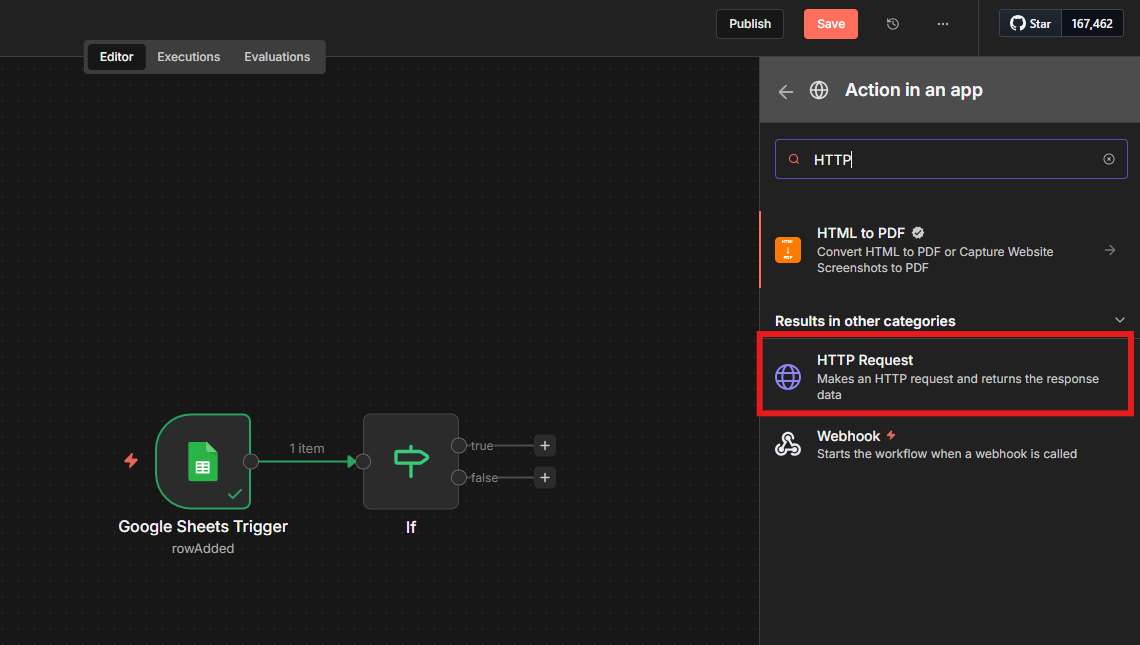
Add an HTTP Request node on the if true path to call the Bizgo send API.
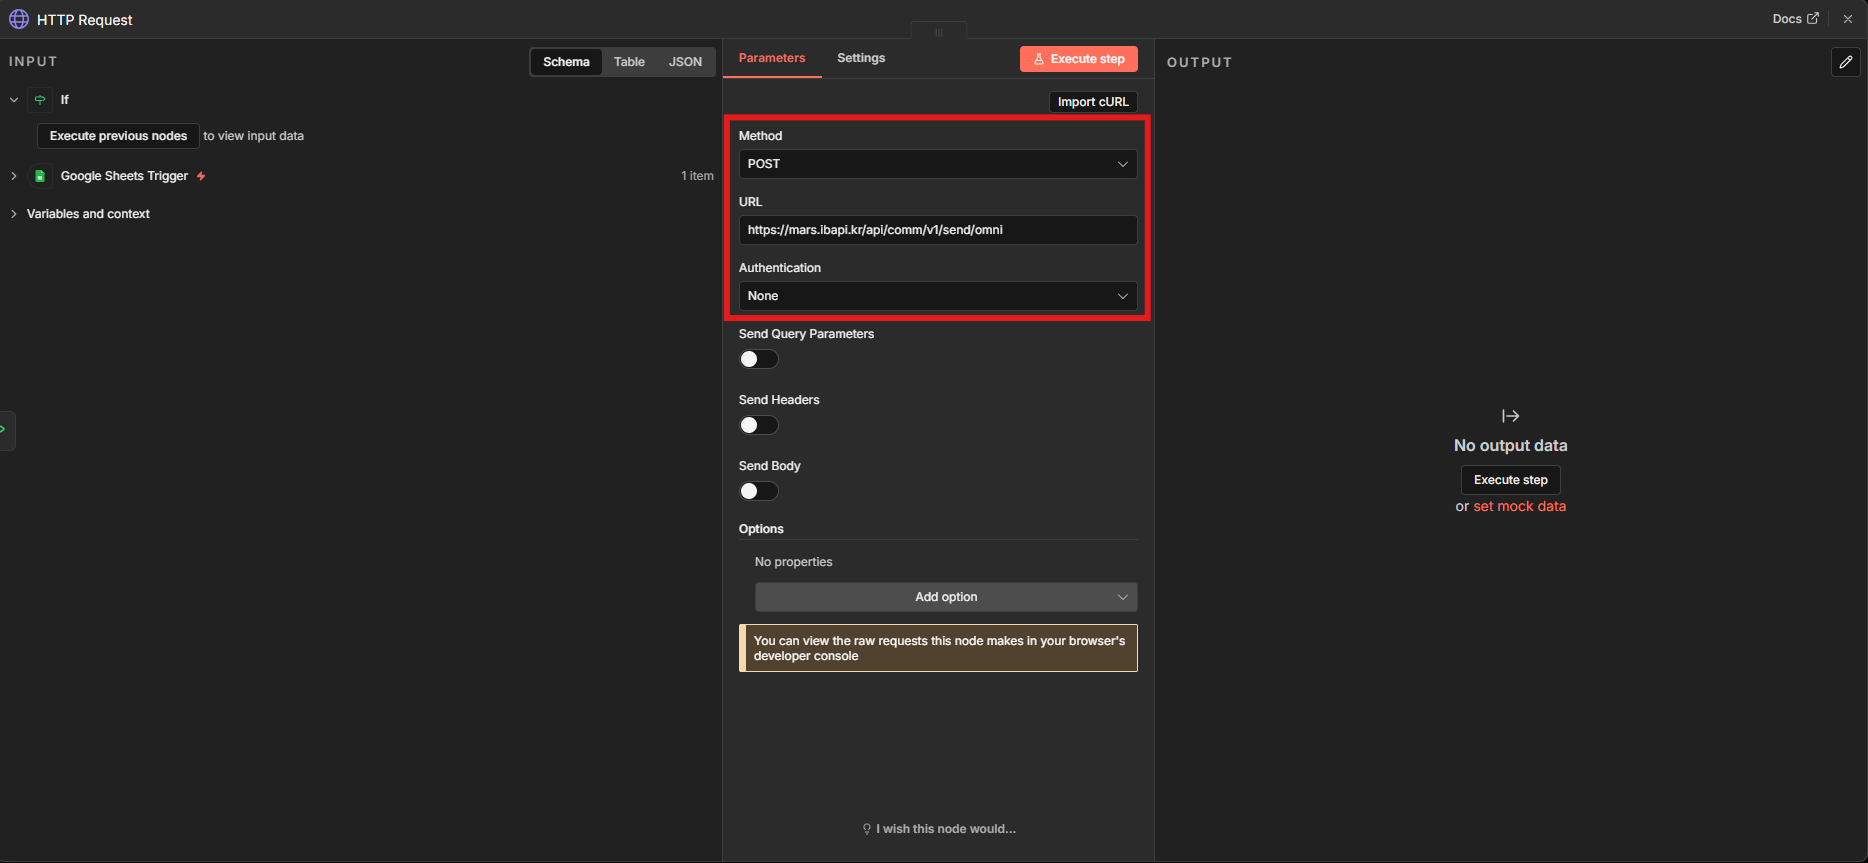
- On the if true path, add Action in an app → HTTP Request.
- Configure the basic HTTP Request items.
| Item | Value |
|---|---|
| Method | POST |
| URL | https://mars.ibapi.kr/api/comm/v1/send/omni |
| Authorization | None |
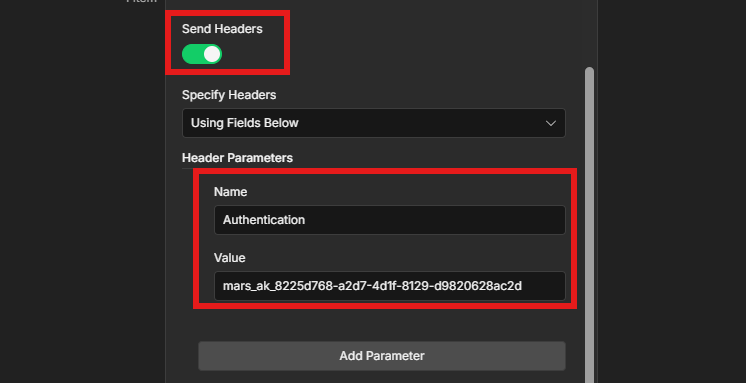
- Turn on Send Headers and enter
ApiKey {your Bizgo unified API key}in theAuthorizationheader.
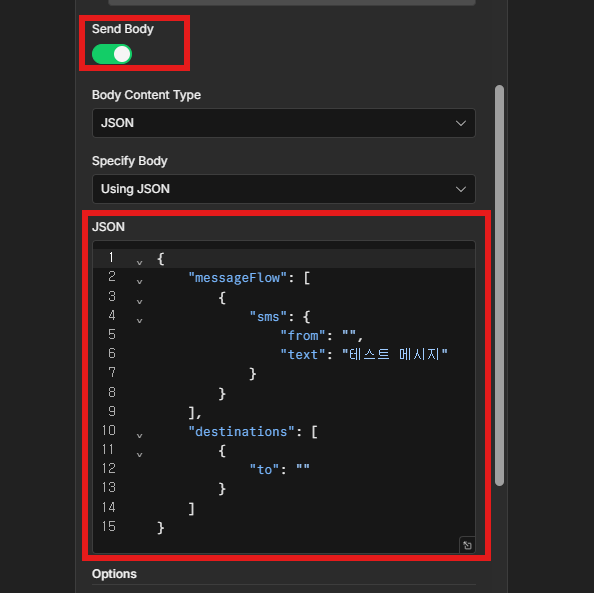
- Turn on Send Body, choose Using JSON, then enter the JSON below.
{
  "messageFlow": [
    {
      "sms": {
        "from": "{{CALLER_NUMBER}}",
        "text": "Test message"
      }
    }
  ],
  "destinations": [
    {
      "to": "{{PHONE_NUMBER}}"
    }
  ]
}
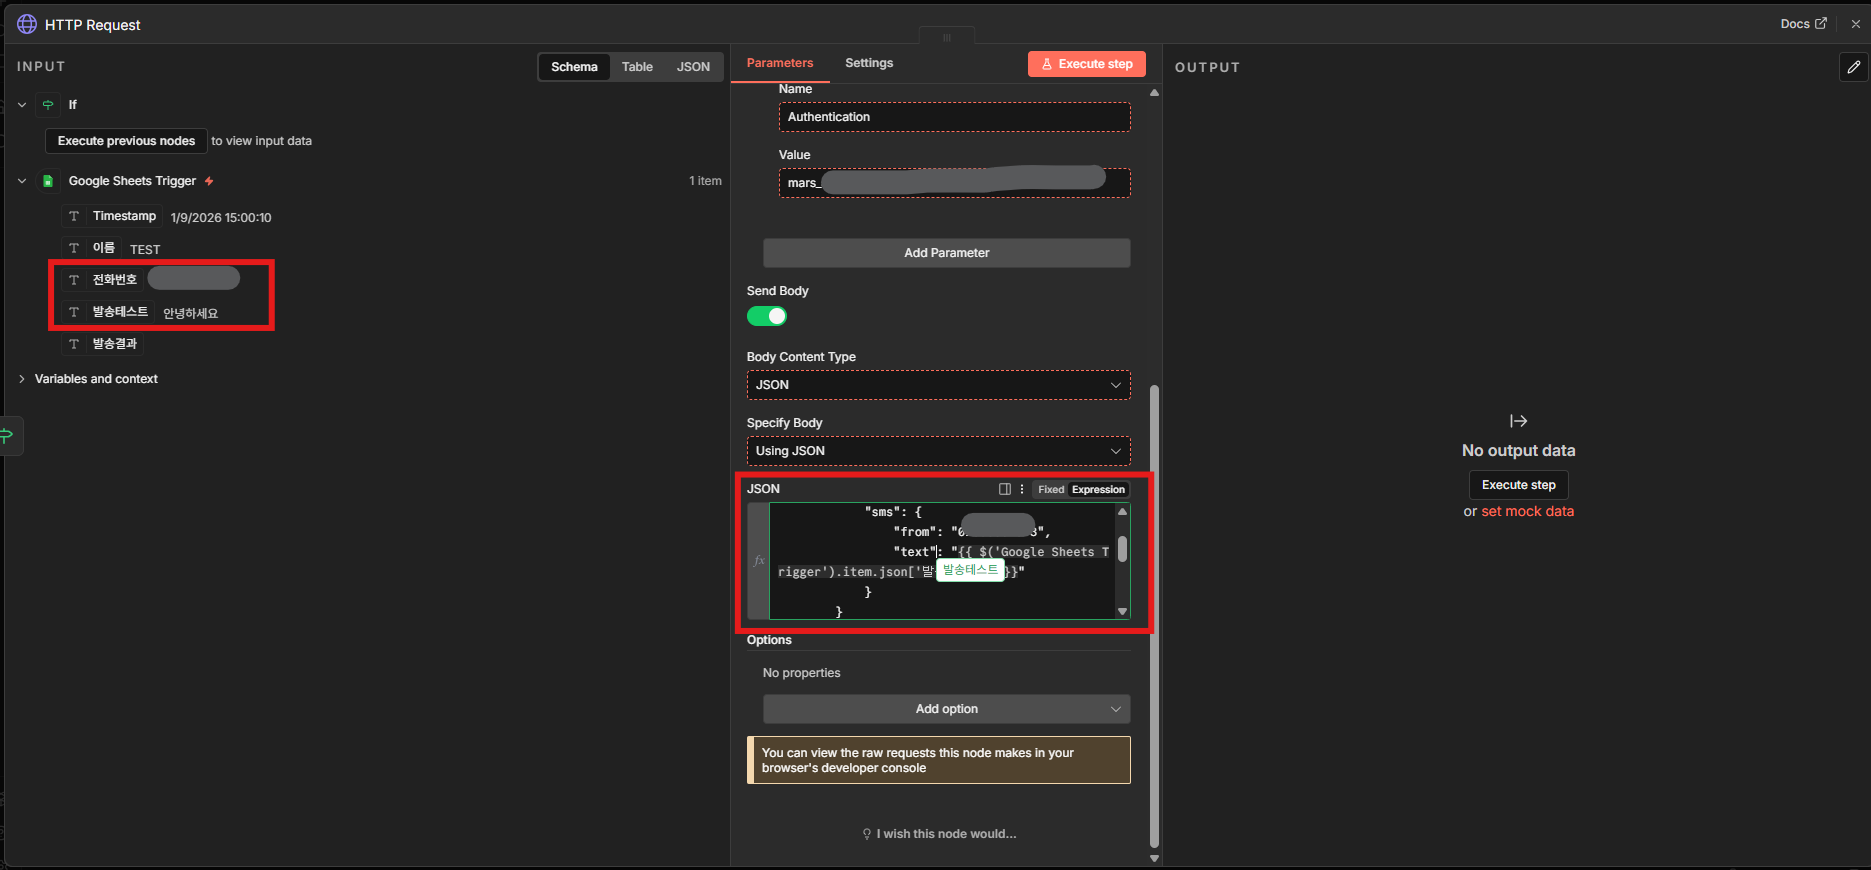
- From the INPUT fields, drag the phone number and message text data from Google Sheets to map them.
- Click Execute step to run a test send.
Step 6: Store the delivery result
Record the delivery result in Google Sheets to prevent duplicate sends.
- Add Action in an app → Google Sheets to the right of the HTTP Request node.
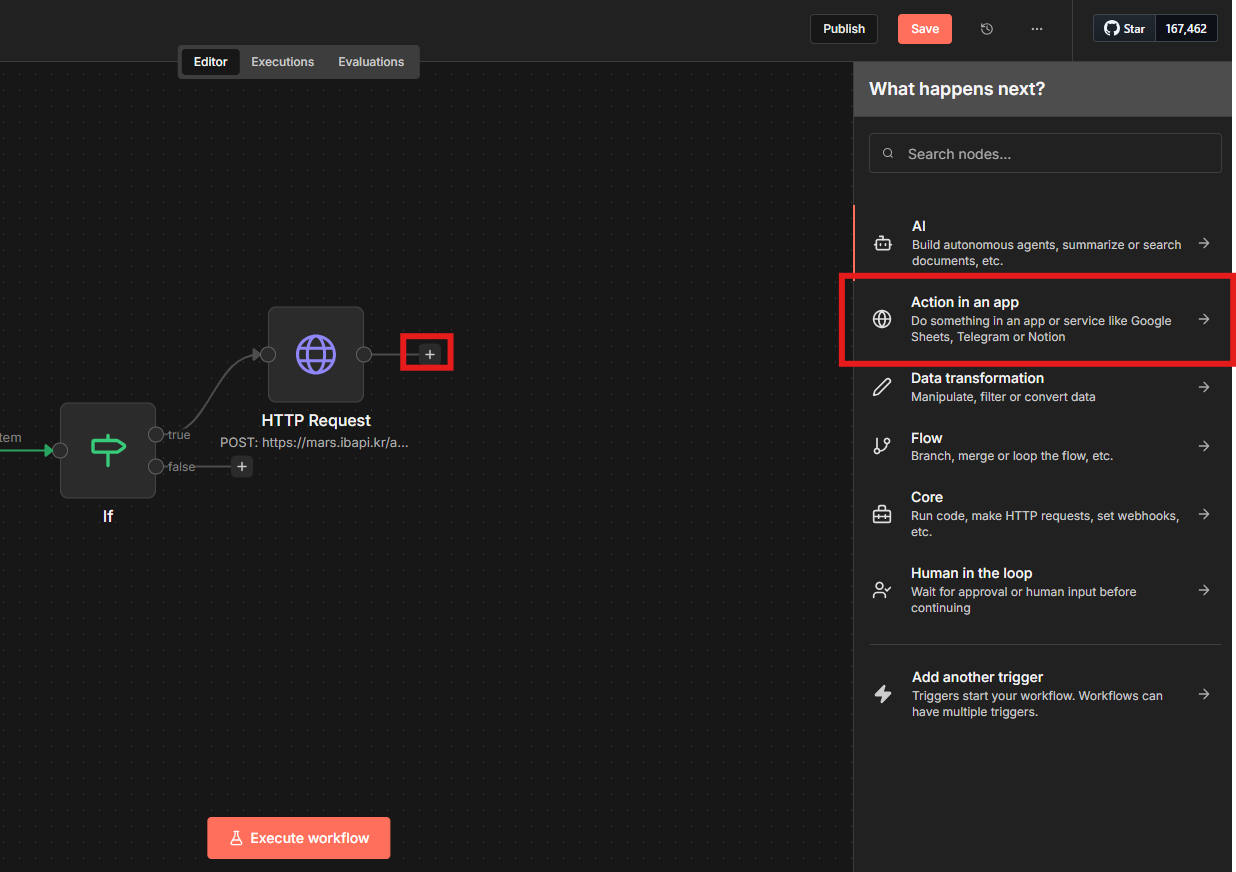
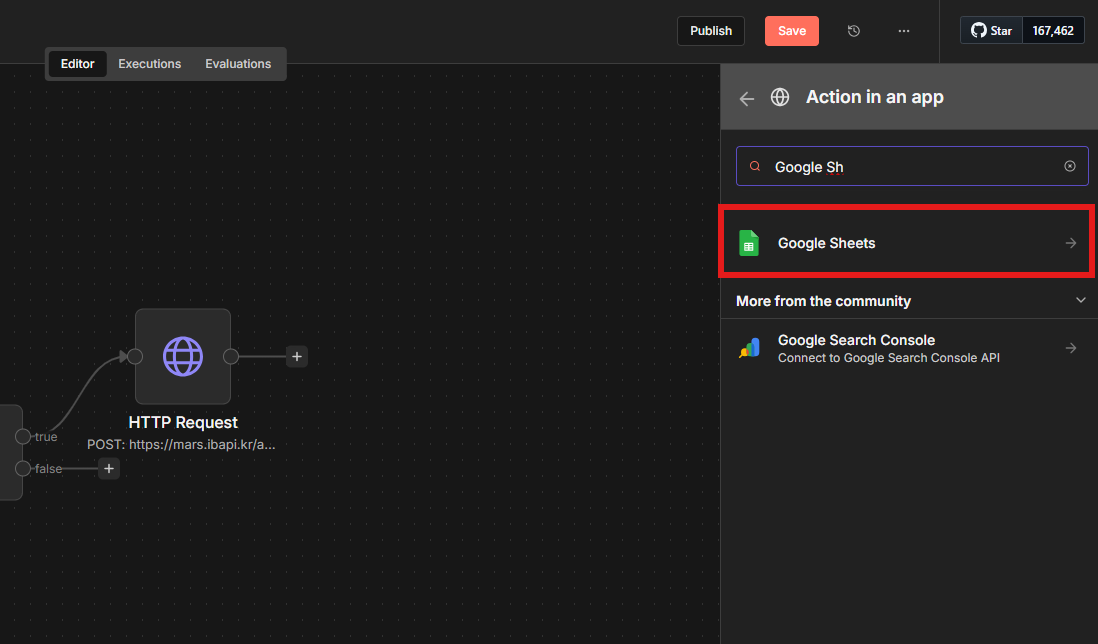
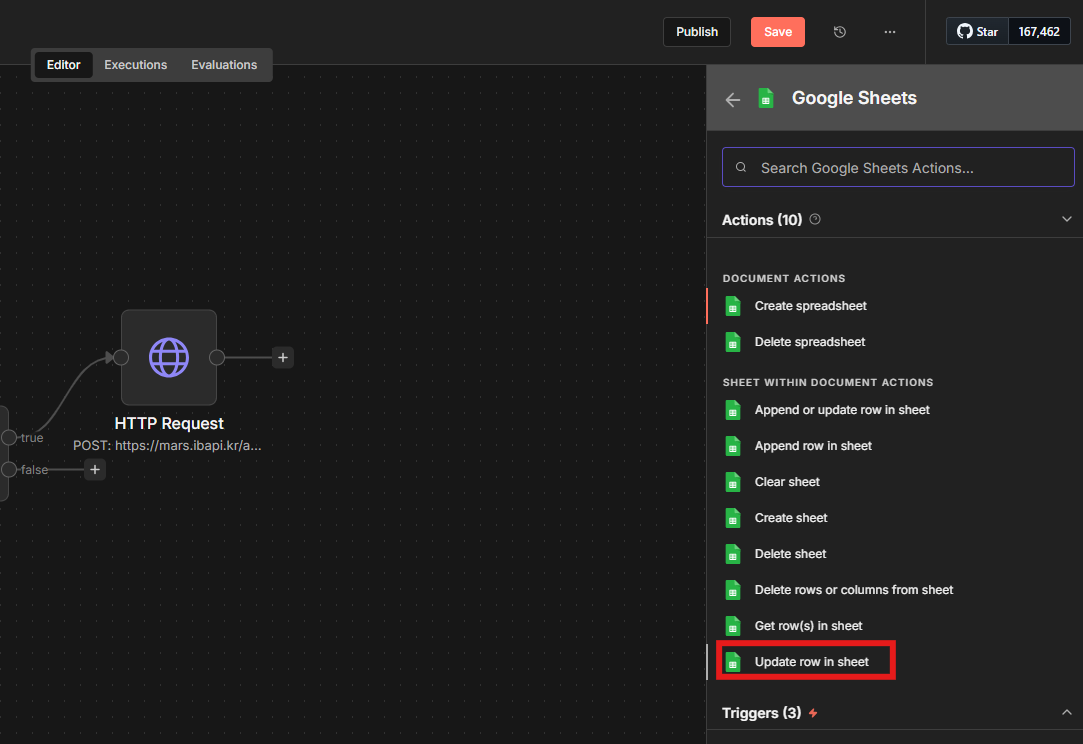
- Choose Update row in sheet.
- Connect with your Google account.
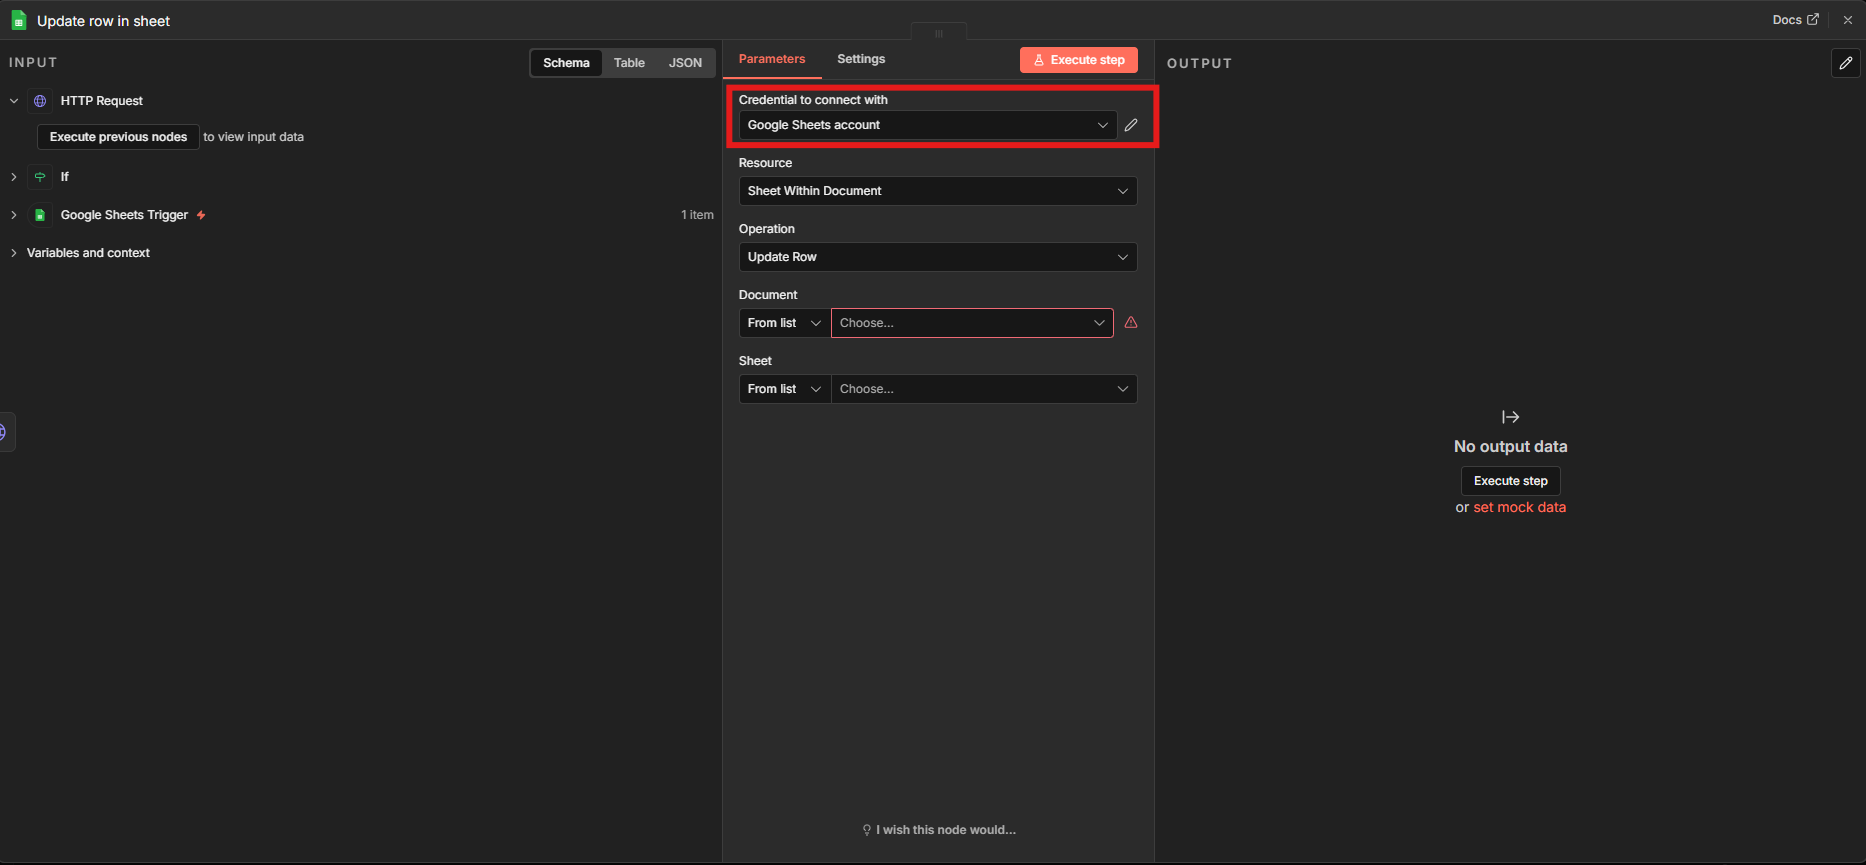
- Configure Parameters as follows.
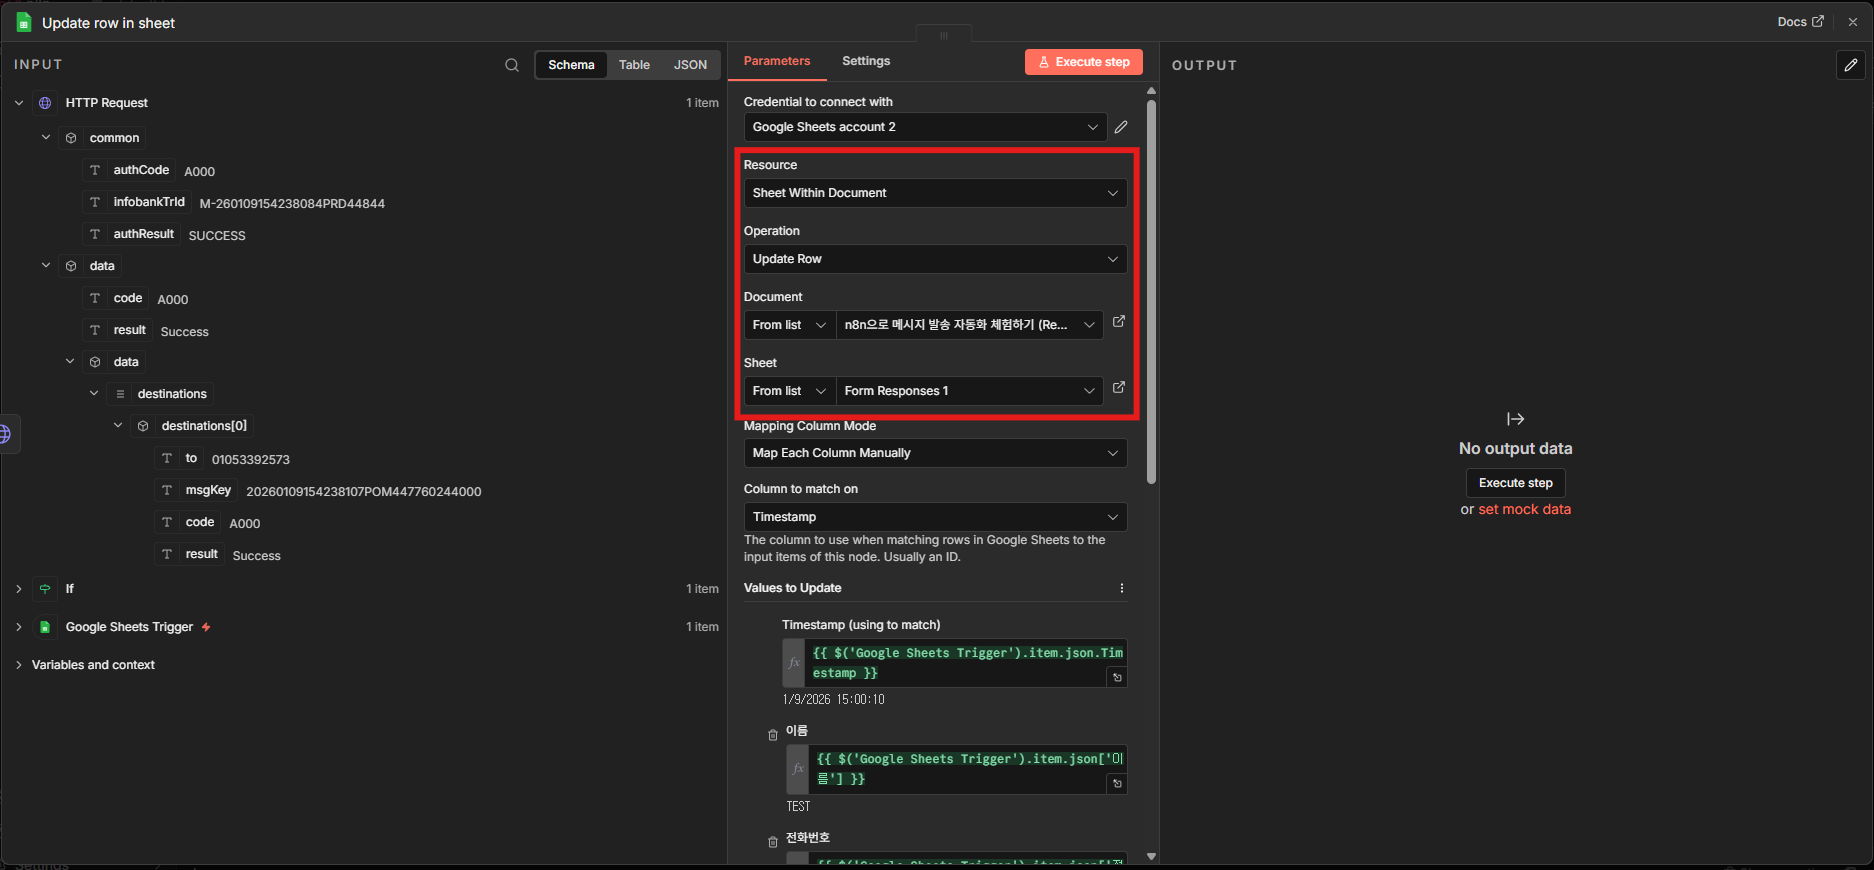
| Item | Value |
|---|---|
| Resource | Sheet Within Document |
| Operation | Update Row |
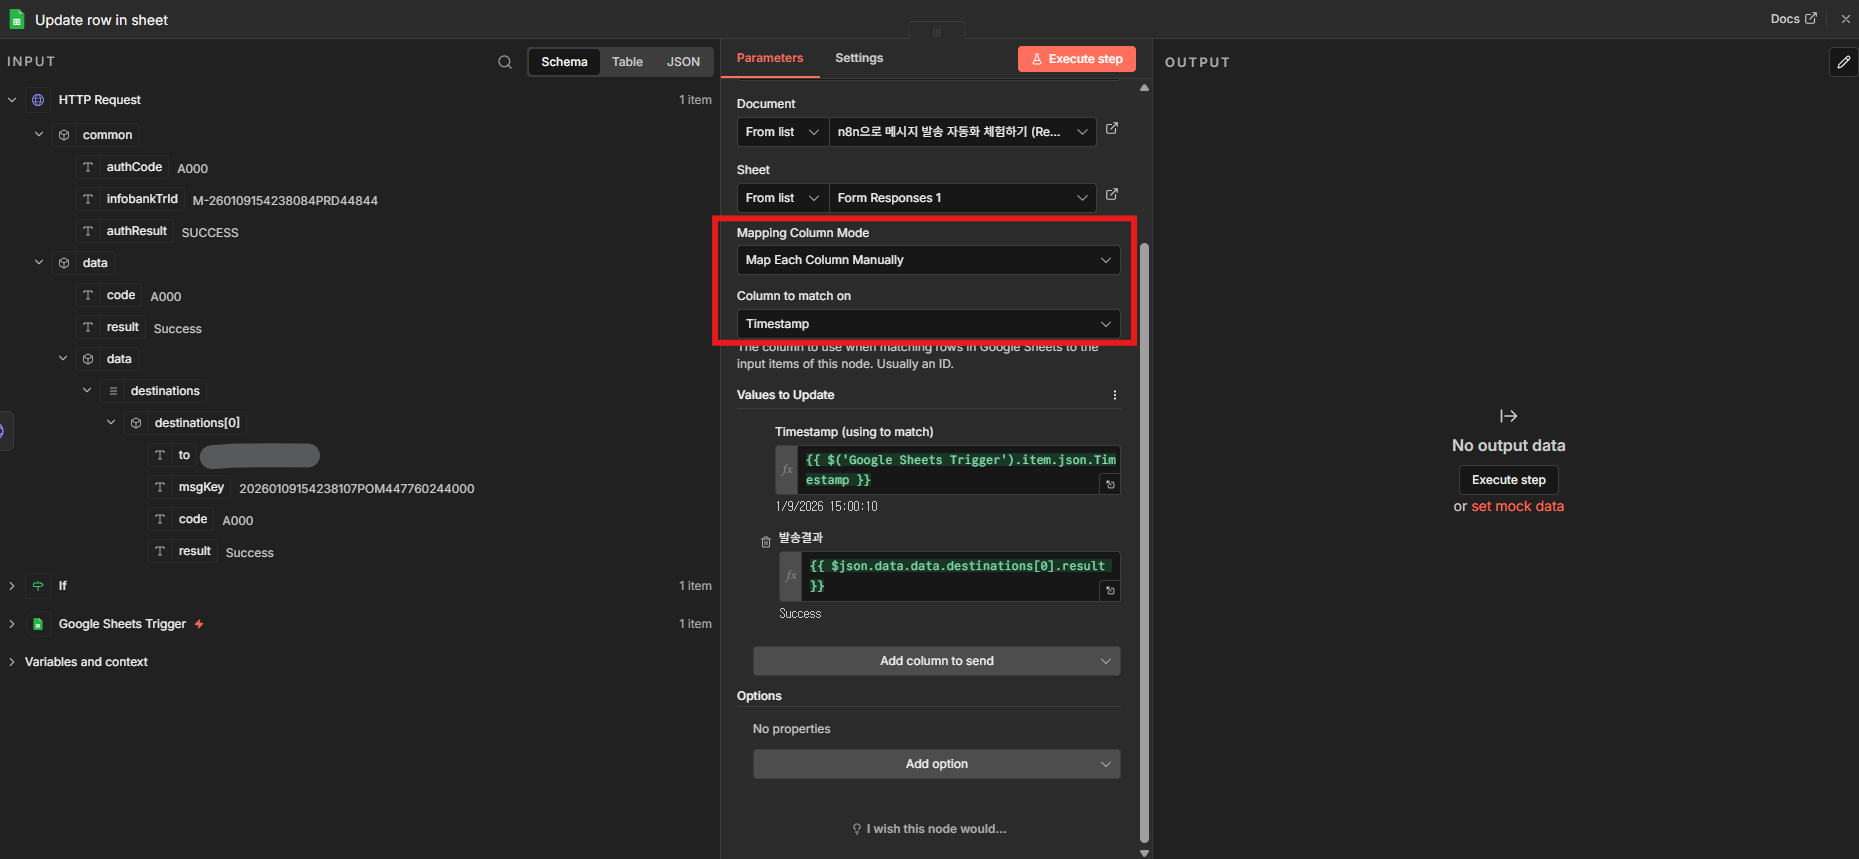
- Set Mapping Column Mode to Map Each Column Manually and set match on to Timestamp.
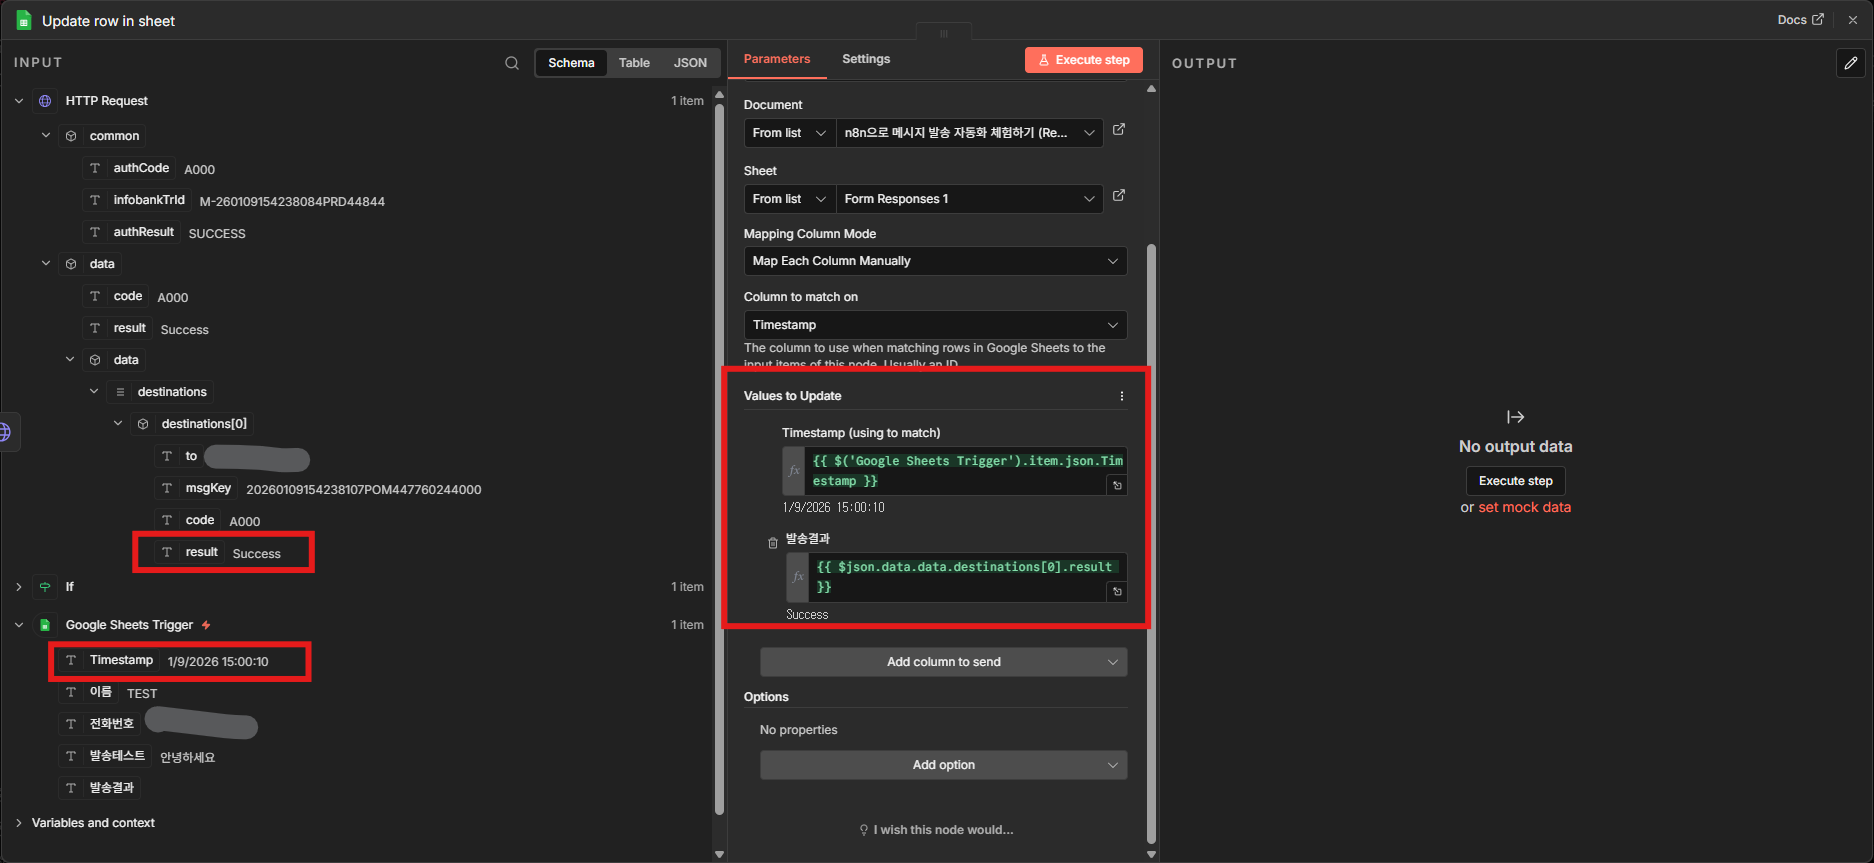
- Drag the Timestamp and the HTTP Request result values to map them.
- Choose Add option → Data Location on Sheet.
- Click Execute step.
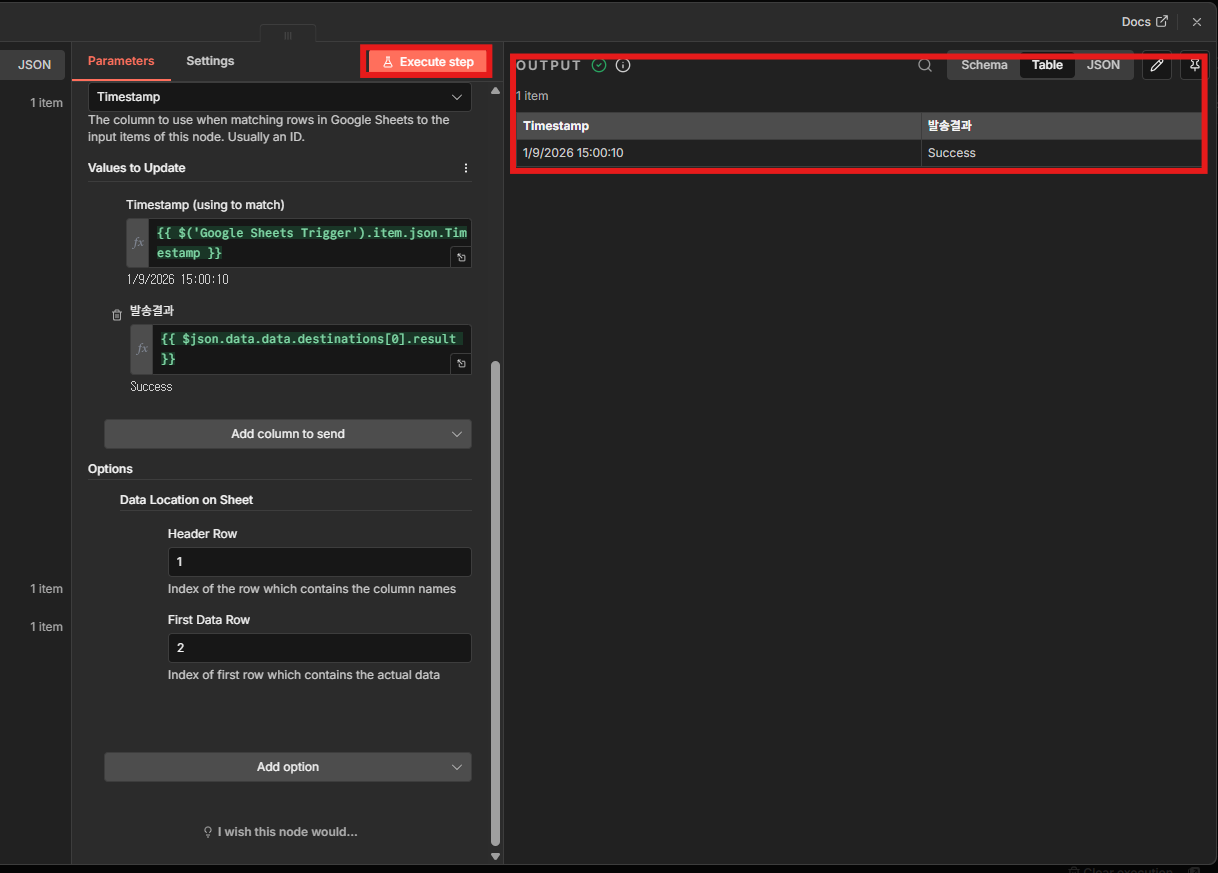
- Check the stored result in OUTPUT.
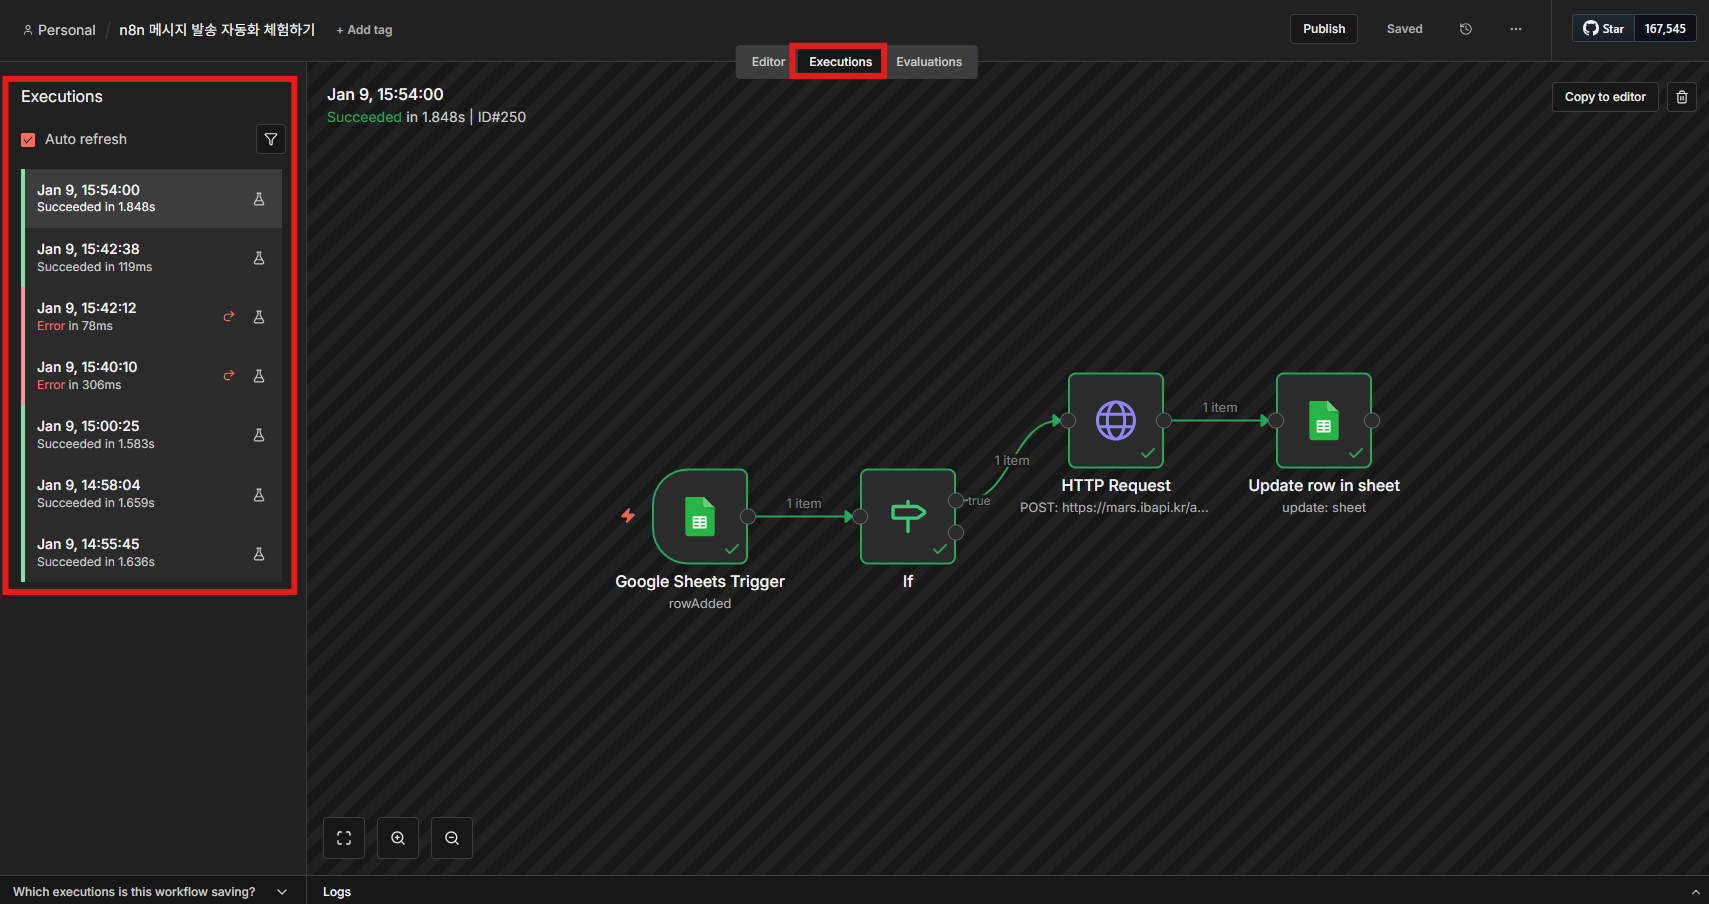
Step 7: Confirm the final run
- Check the workflow run history under Executions at the top right.
Troubleshooting
ACL error (A403)
A Bizgo unified API key only allows requests from registered IPs. If you see an error like the one below, copy the IP address from the response and register it in the ACL in Integration management.
{
  "common": {
    "authCode": "A403",
    "authResult": "NOT_PERMISSION ACL Not Allowed. Please register: '35.170.163.230'"
  }
}
Zapier
Use Zapier's Webhooks by Zapier action to map trigger data into a Bizgo message send request.
The integration flow
- Create a Zap and choose a trigger app. For example: Typeform, Google Sheets, Shopify
- Choose Webhooks by Zapier as the Action app.
- Choose Custom Request as the Action Event.
- Configure URL, Method, Headers, and Data.
- Map the trigger data into the JSON body.
- Test it, then turn the Zap on.
Request settings
| Item | Value |
|---|---|
| Method | POST |
| URL | https://mars.ibapi.kr/api/comm/v1/send/omni |
| Authorization | ApiKey YOUR_API_KEY |
| Content-Type | application/json |
| Data Pass-Through | false |
Data example
{
  "destinations": [
    {
      "to": "{{phone}}",
      "replaceWords": {
        "name": "{{name}}"
      }
    }
  ],
  "messageFlow": [
    {
      "sms": {
        "from": "0200000000",
        "text": "#{name}, your request has been received."
      }
    }
  ]
}
Next steps
See every Bizgo automation method, including Naver Smart Store commerce integration and no-code tool integration.
Connect order and shipping events to Bizgo and send customer notification messages automatically.
Review the full structure and parameters of the Bizgo message send API in detail.