
Using the console
The Bizgo console separates preparation, sending, and operational lookups into different menus.
Dashboard (대시보드)
The console dashboard shows the current month's billed amount, registered members, team spaces, and notices at a glance.
Team space (팀스페이스)
A team space is a dedicated workspace where a department, branch, or business unit can use and manage services in the way that suits it. Team spaces provide the following capabilities.
Issue and manage integration accounts for system-integrated sending
You can issue the integration accounts required for system-integrated sending, and review integration account details — such as the integration specification and report reception — along with the G/W (gateway) connection information. Each team space can issue up to 5 integration accounts. If you need more than 5, contact customer support (고객센터).
Web send
You can send messages individually or in bulk directly from the website, with no system integration. Under the Korea Communications Commission's anti-spam policy, new accounts get a sending limit of 2,000 messages per month and 300 per day. If you need a higher cap, contact customer support. Limits are adjusted per team space.
Register sender information
You can register and manage the sender information each service requires for sending — such as sender numbers and sender profiles — per team space. For sender numbers, you can import a number that is already registered in another team space and use it right away.
Apply for and manage the 080 opt-out service (080 수신 거부 서비스)
Bizgo provisions an 080 number through its partner carrier (Sejong Telecom / 세종텔레콤) so recipients can opt out from the footer of a promotional message. The 24-hour ARS system collects the opt-out numbers, which you can review on the Bizgo web pages or receive in your own system through an API.
Opt-outs are not applied automatically to API sends
Numbers blocked through the 080 opt-out service are excluded automatically only when you send from the Bizgo console. They are not applied to sends made through the API, so you have to remove them from your recipient list yourself.
Download the opt-out list from Console > 080 opt-out (080 수신 거부) and apply it in your sending system. The list is also available through an API.
Dashboard
You get a single summary of the steps you need to complete before sending messages, plus the current status of the integration accounts, sender information, and templates in use in the team space.
Create a team space
To create an additional team space, go to Console (콘솔) > Team space and click Create new team space (새 팀스페이스 만들기).
You can create up to 50 team spaces, and you can register different billing information for each one.
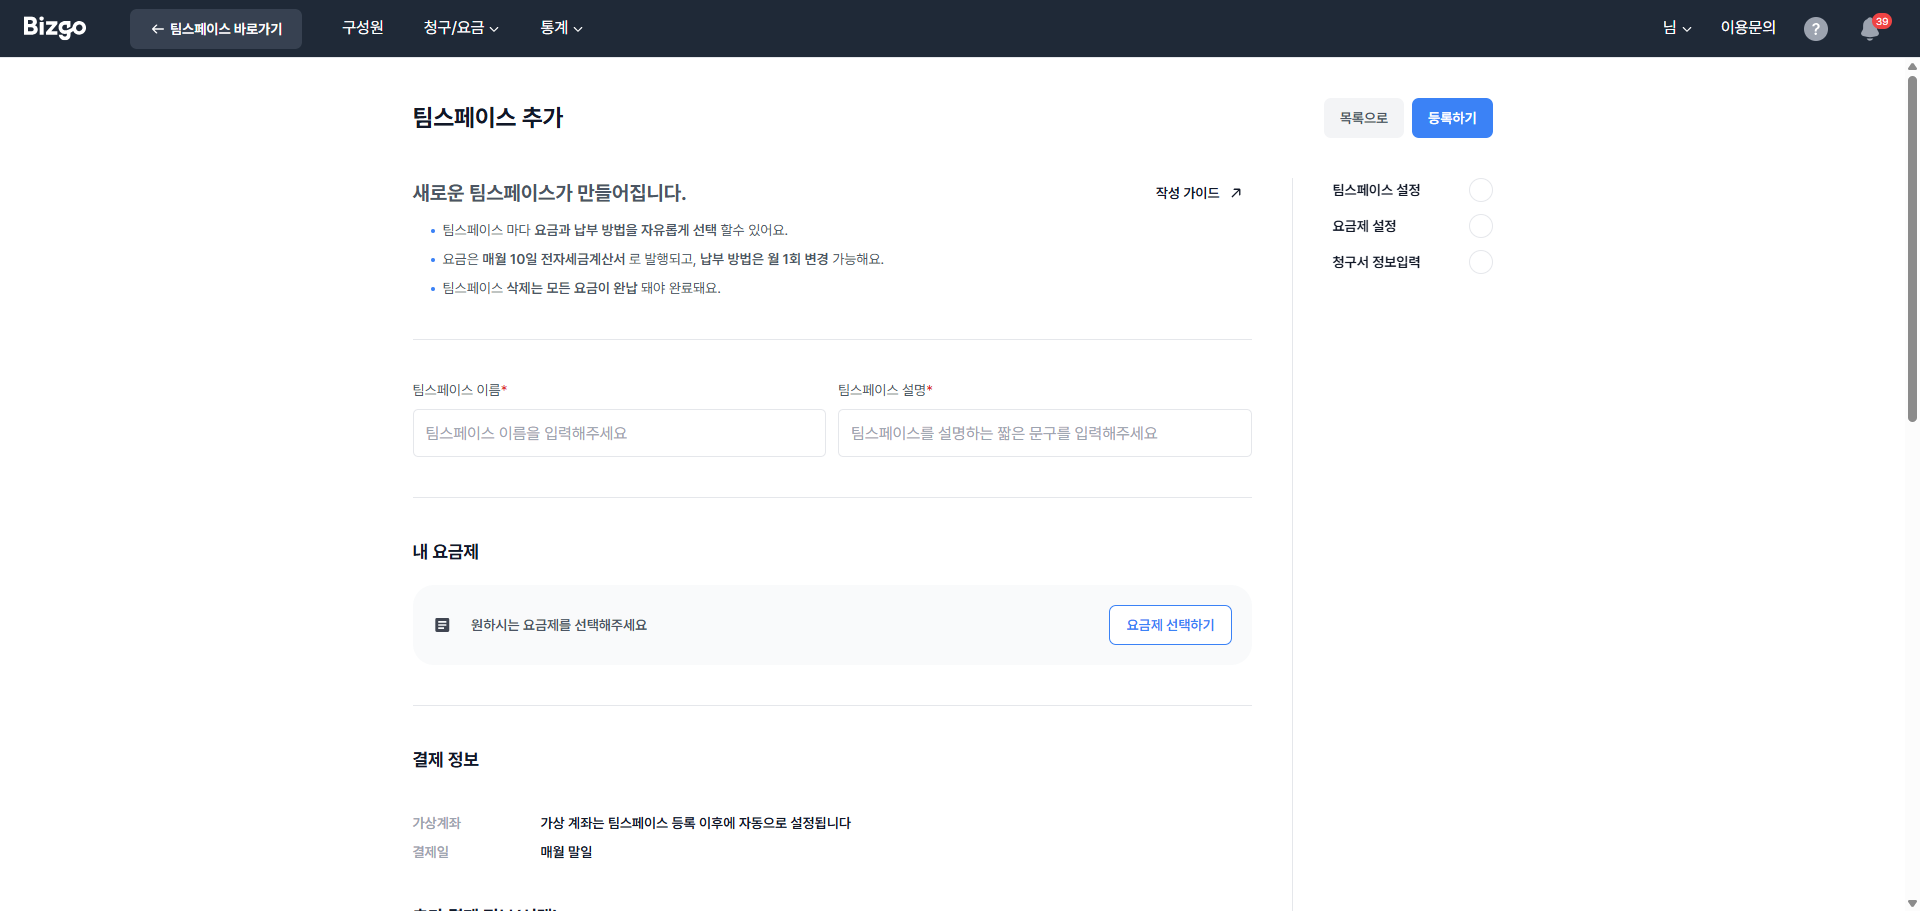
Manage a team space
To review a team space's basic information and payment details, click the Settings (설정) button in the right-hand column of the team space list. You can check basic information such as the team space ID, and you can change the team space name and whether web send is enabled.
To delete a team space, click Request deletion (삭제 요청) on the team space detail settings page. Deletion is approved only after all charges incurred by the team space have been paid in full.
You can also review the payment method, payment date, and billing contact registered for the team space. To change the payment method, click Change payment method (납부 방법 변경) on the right.
You can change the payment method once per month. If you change it between the 6th of the current month and the 5th of the following month, the new payment method applies starting with the current month's usage.
Electronic tax invoices are issued on the 10th of each month (or the preceding business day if that date is a holiday). The Bizgo billing statement is sent to your billing email address the day after the electronic tax invoice is issued (or the preceding business day if that date is a holiday).
Members (구성원)
The member feature provides multiple invited accounts under your signup account so that several people can use and manage the same resources. It prevents the security issues that come from sharing a single account, and by granting each person different team space access and permissions, it lets you run and manage the service more safely within the permissions you allow.
Account types
Signup account — the main account you receive after signing up and entering into a formal service agreement with Bizgo.
Invited account — a sub-account created under the signup account so that others can share the signup account's Bizgo resources.
Member roles
Members are assigned one of three roles: Master, Manager, or Member.
- Master (마스터) — the role granted to the company representative who applies for membership and manages the company's signup account. A Master can access and manage every menu in the console.
- Manager (매니저) — one of the roles granted to invited accounts. A Manager can use the key features needed to manage the service, such as registering sender numbers and sender profiles.
- Member (멤버) — one of the roles granted to invited accounts. A Member can use only a minimal set of features, such as web send.
Permissions for key features
| Feature | Master | Manager | Member |
|---|---|---|---|
| Invite members and change their settings | O | O | X |
| Create team spaces and change their settings | O | X | X |
| Issue KEYs and change their settings | O | X | X |
| Register sender numbers | O | O | X |
| Register sender profiles | O | O | X |
| Register Alimtalk templates | O | O | X |
| Apply for the 080 opt-out service | O | X | X |
| View and manage 080 opt-out numbers | O | O | X |
| Web send | O | O | O |
| View usage history | O | O | O |
| Statistics | O | O | O |
| View billing history and rate plans | O | O | O |
| Change billing information | O | X | X |
| Change company information | O | X | X |
| Request account closure | O | X | X |
Add a member
To add a member, go to Console > Members and click the Add member (구성원 추가) button on the right side of the page.
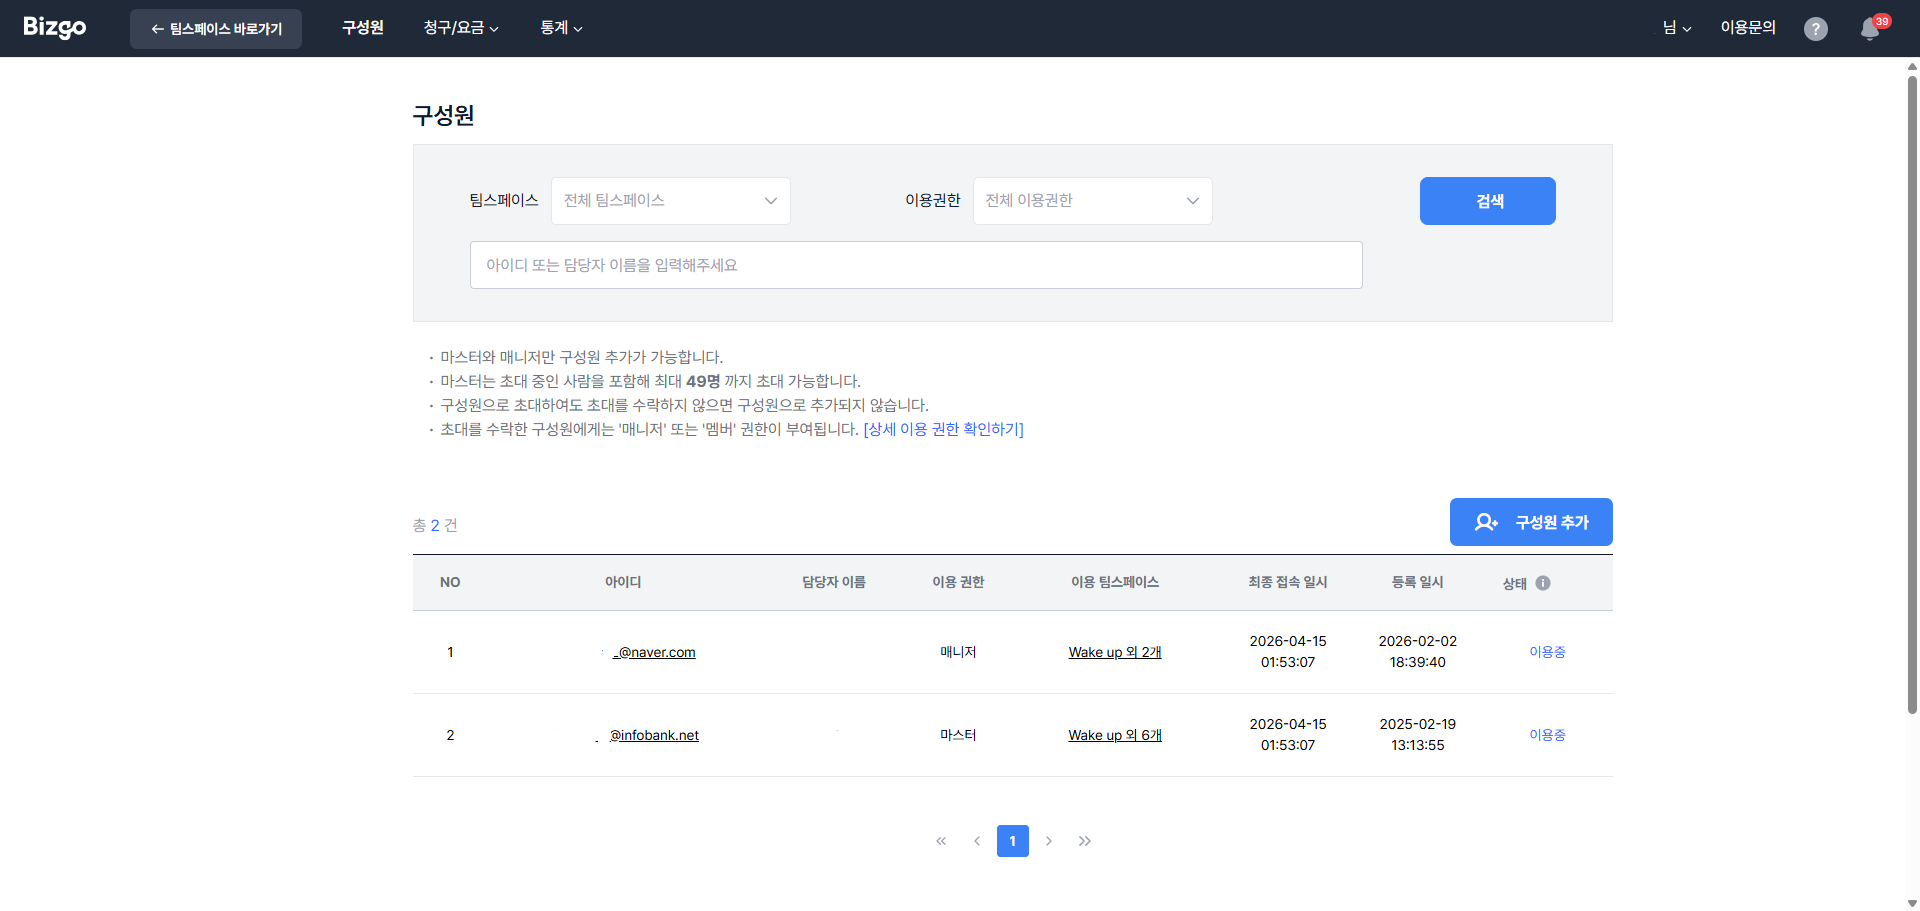
Invitation limit
Masters and Managers can add members. You can invite up to 49 people in total, including invitations still pending.
Manage members
To review or edit a member you have added, click the member's ID in the list on the Members page to open the Member settings (구성원 설정) page.
The member settings page shows basic information such as the contact's name, mobile number, role, and assigned team spaces. You can change the role and the assigned team spaces.
Editing your own profile
The contact name and mobile number can be changed by signing in with the invited account and going to Account management (계정 관리) > My information (내 정보).
Billing and charges (청구/요금)
Review and manage your billing history, billing information, and rate plans.
Billing history (청구 내역)
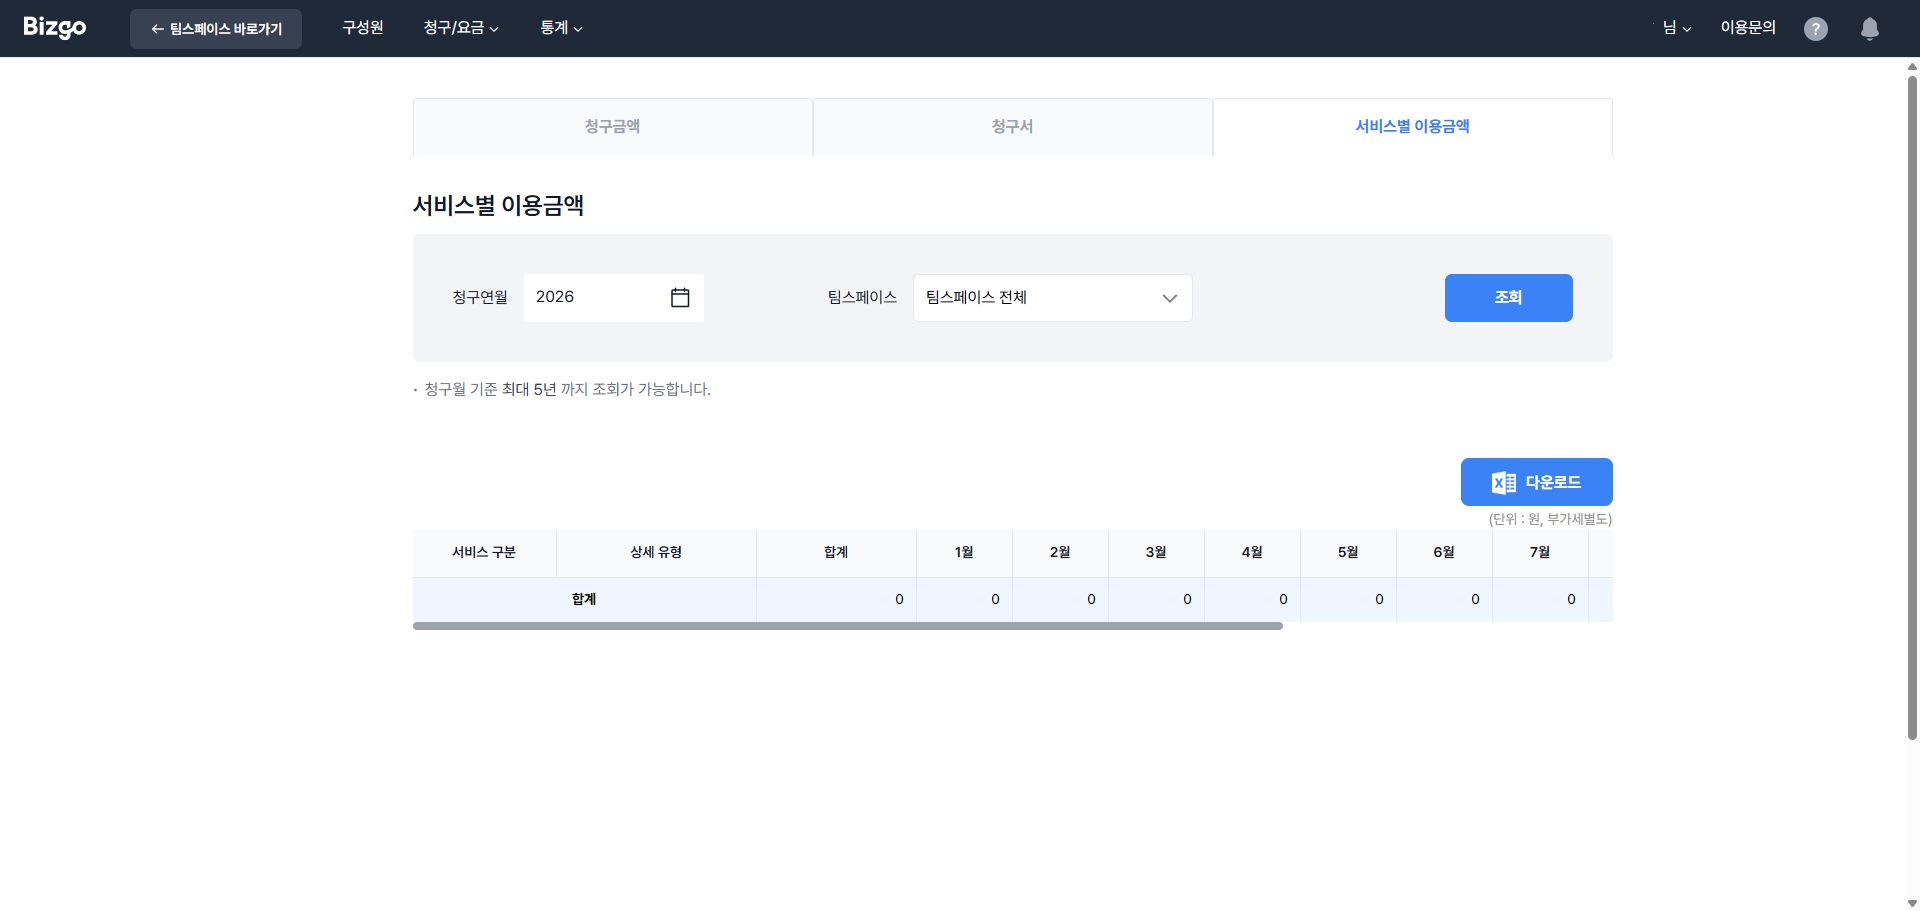
Go to Console > Billing and charges > Billing history. Billing history is split into three tabs: Billed amount (청구금액), Invoice (청구서), and Usage by service (서비스별 이용금액).
- Billed amount — see the billed amount and payment status for each team space at a glance
- Invoice — see the detailed billing breakdown
- Usage by service — see the amount charged per message type. If you use a CS Talk rate plan, CS Talk usage is shown here as well
Tax invoice issuance schedule
The tax invoice for the current month's usage is issued on the 10th of the following month (or the preceding business day if the billing date is not a business day), so it appears on the Billing history page around the 10th of the following month.
Billed amount
The billed amount (A) is the usage charge for the billing month including VAT. The overdue amount (B) is the accumulated unpaid balance from previous billing months. The rounding amount (C) is the amount excluded by rounding to units of 10 or 100 won. The total billed amount (A+B+C) is the total due for the billing month.
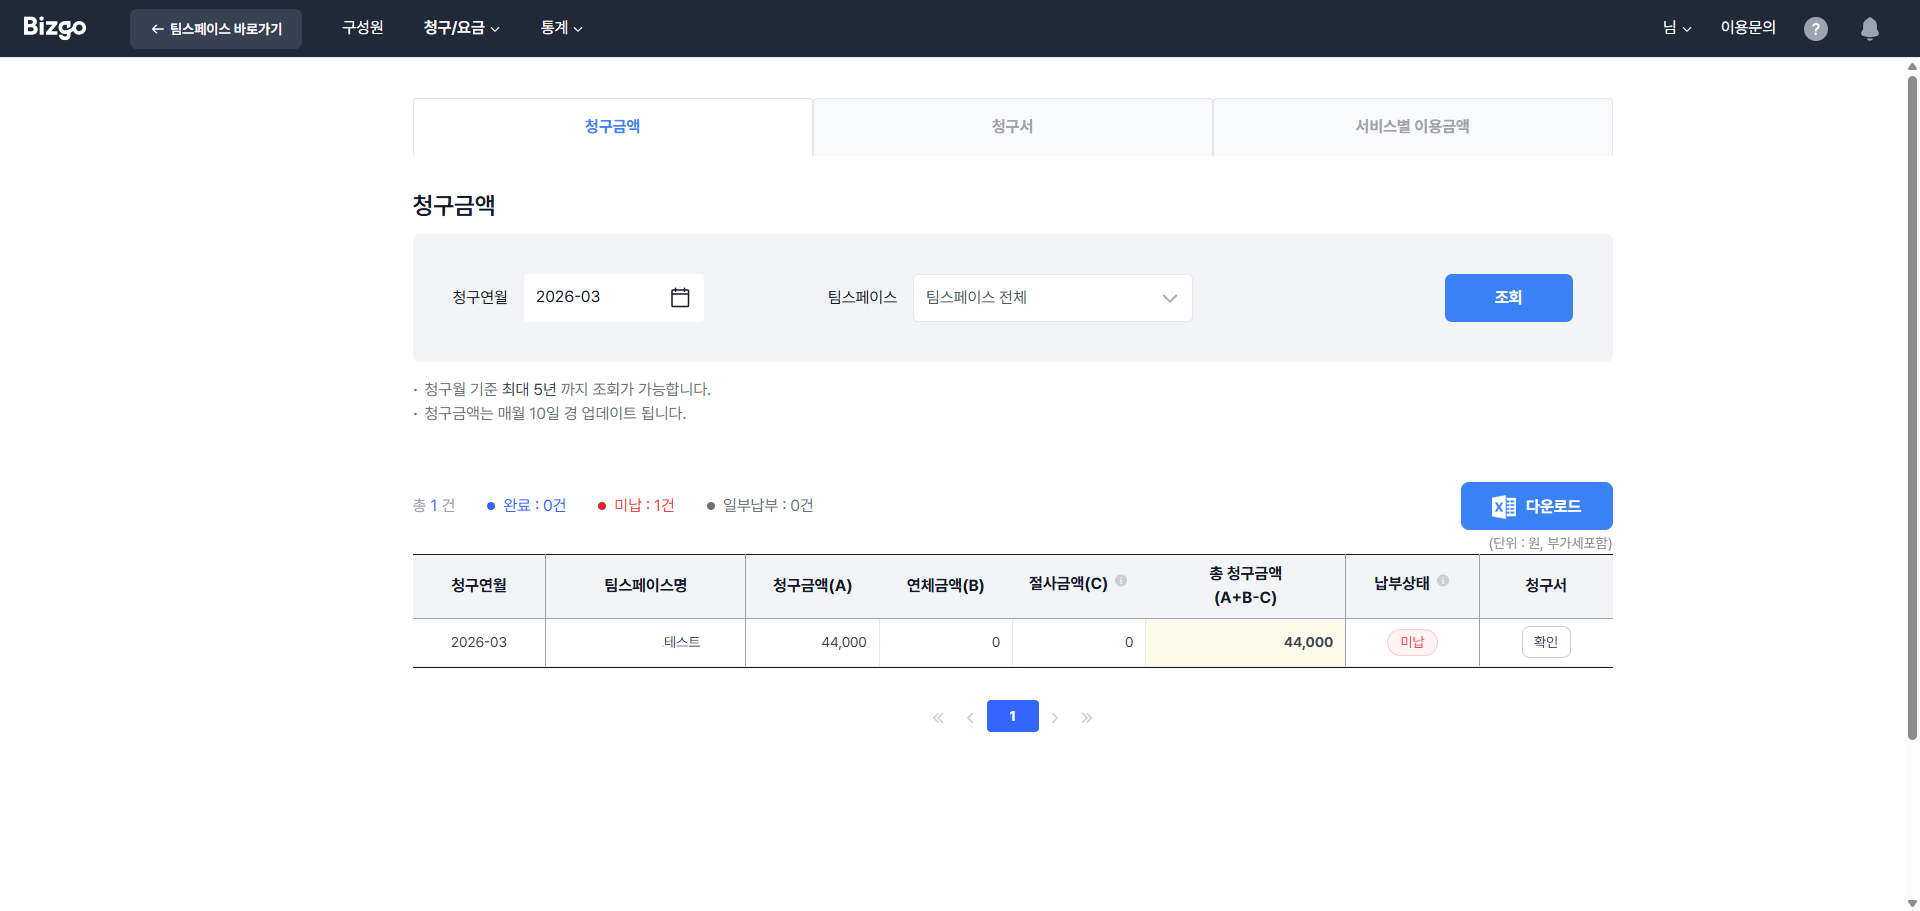
Invoice
Select the billing year/month and team space you want to look up, then click View (조회) to see the detailed billing breakdown. To print the billing history, click the Print (인쇄하기) button on the right of the invoice.
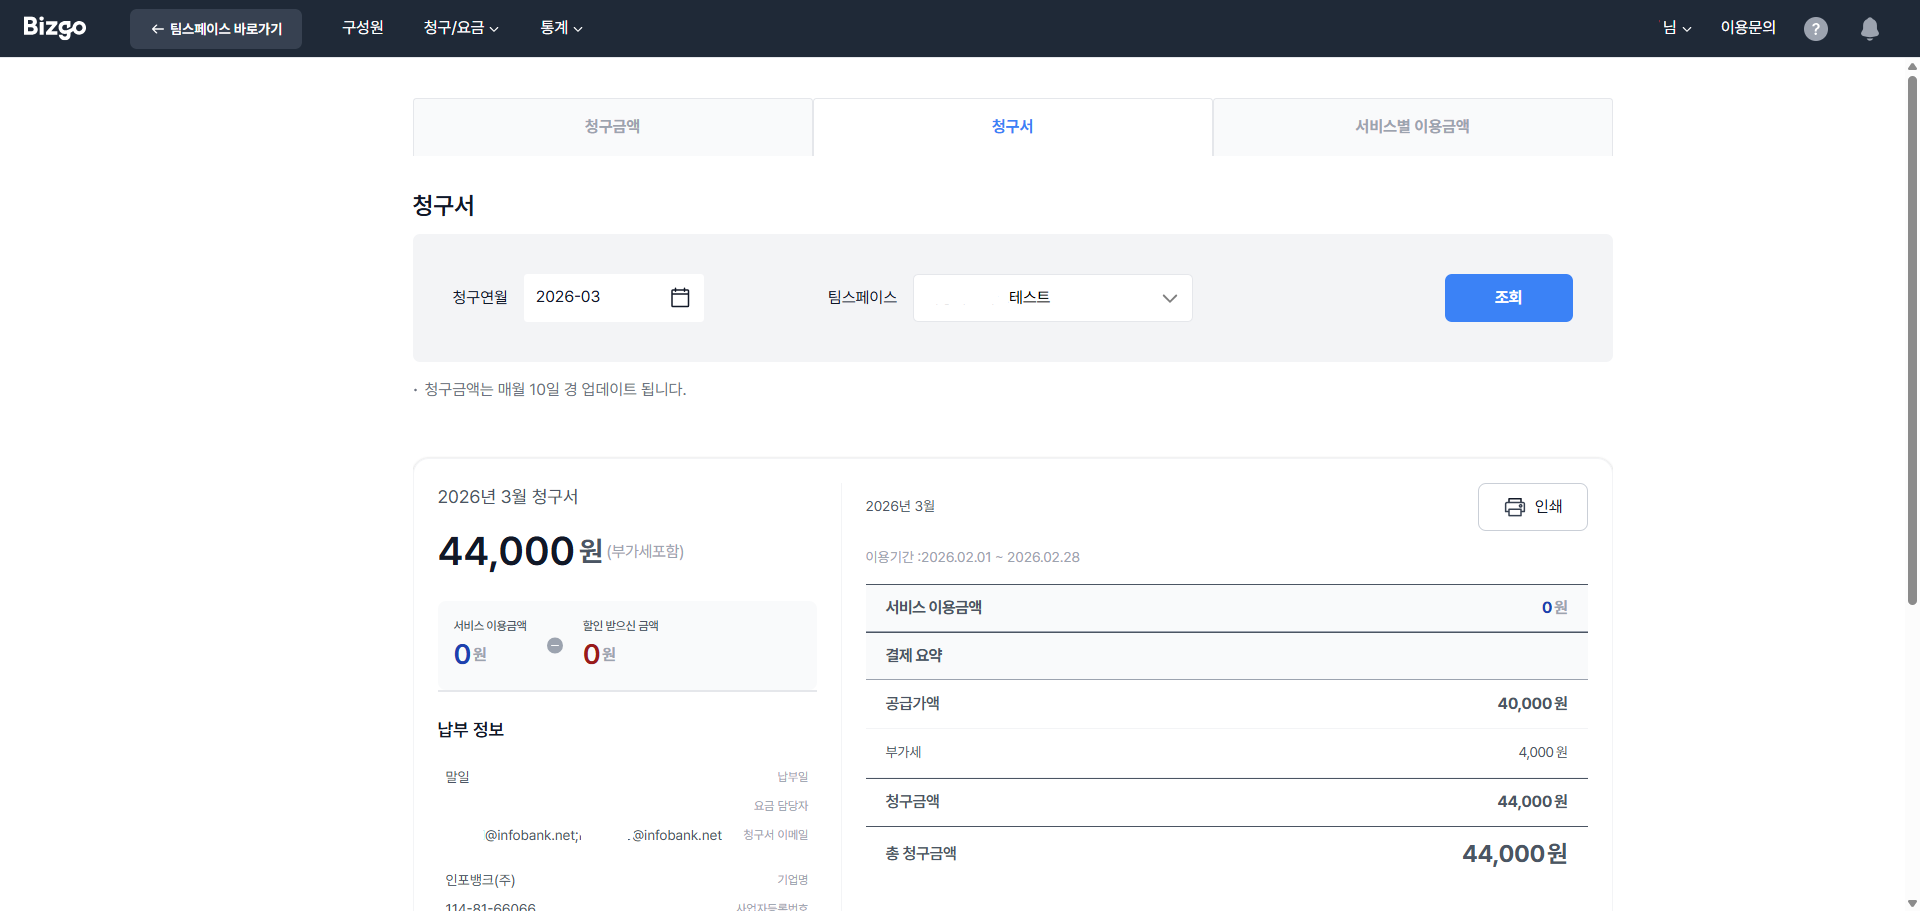
Usage by service
See the monthly charges per message type for each service, broken down by team space.
Billing information (청구 정보)
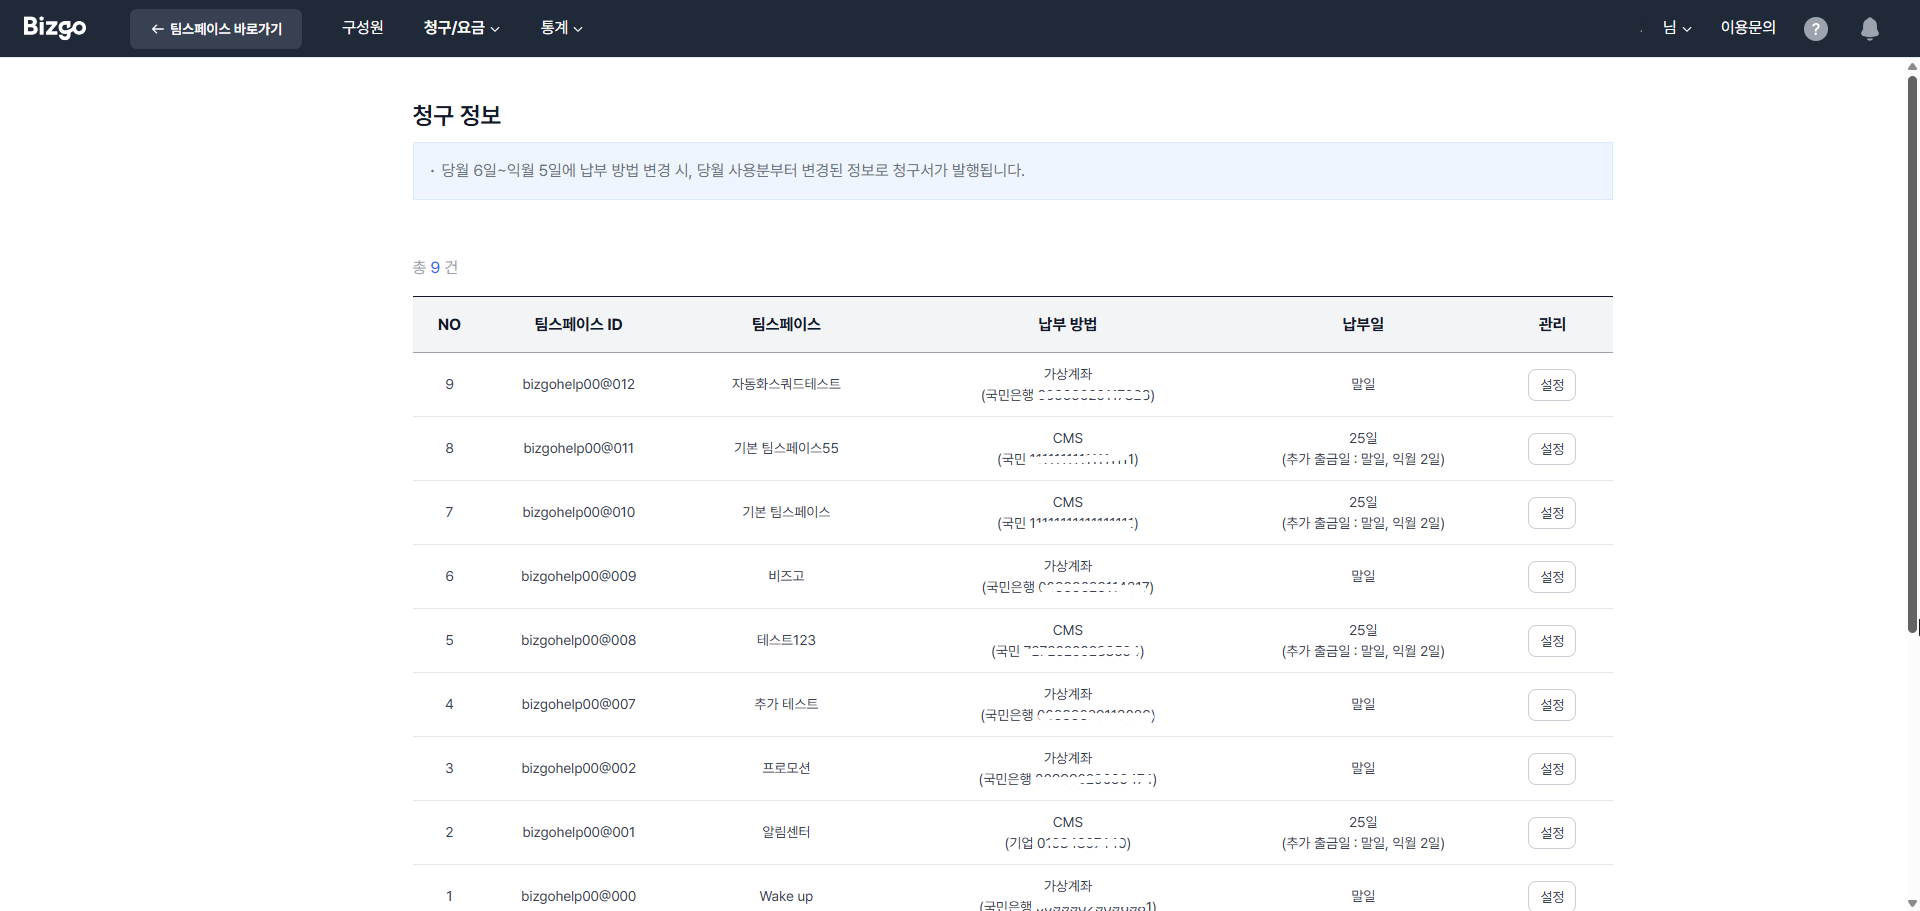
Review the billing information, including the payment method, for each team space. Click Settings to change the payment method and the billing contact.
When you can change the payment method
You can change the payment method for the current month's usage between the 6th of the current month and the 5th of the following month. (The payment method for a previous month's usage cannot be changed.)
How to change the payment method
- Go to Console > Billing and charges > Billing information.
- Click the Settings button for the team space you want to change.
- In the payment details section, click Change payment method.
- Choose either CMS direct debit (CMS 자동이체) or virtual account.
- If you choose CMS direct debit: click Fill out the CMS application (CMS 신청서 작성하기) and complete the application form. When it is complete, click Save (저장하기) and then Print out (출력하기). On the printed application, fill in the application date, applicant name, and account holder name, sign it, then scan and attach the file.
- Click Save changes (수정완료) to finish changing the payment method.
Rate plan (요금제)
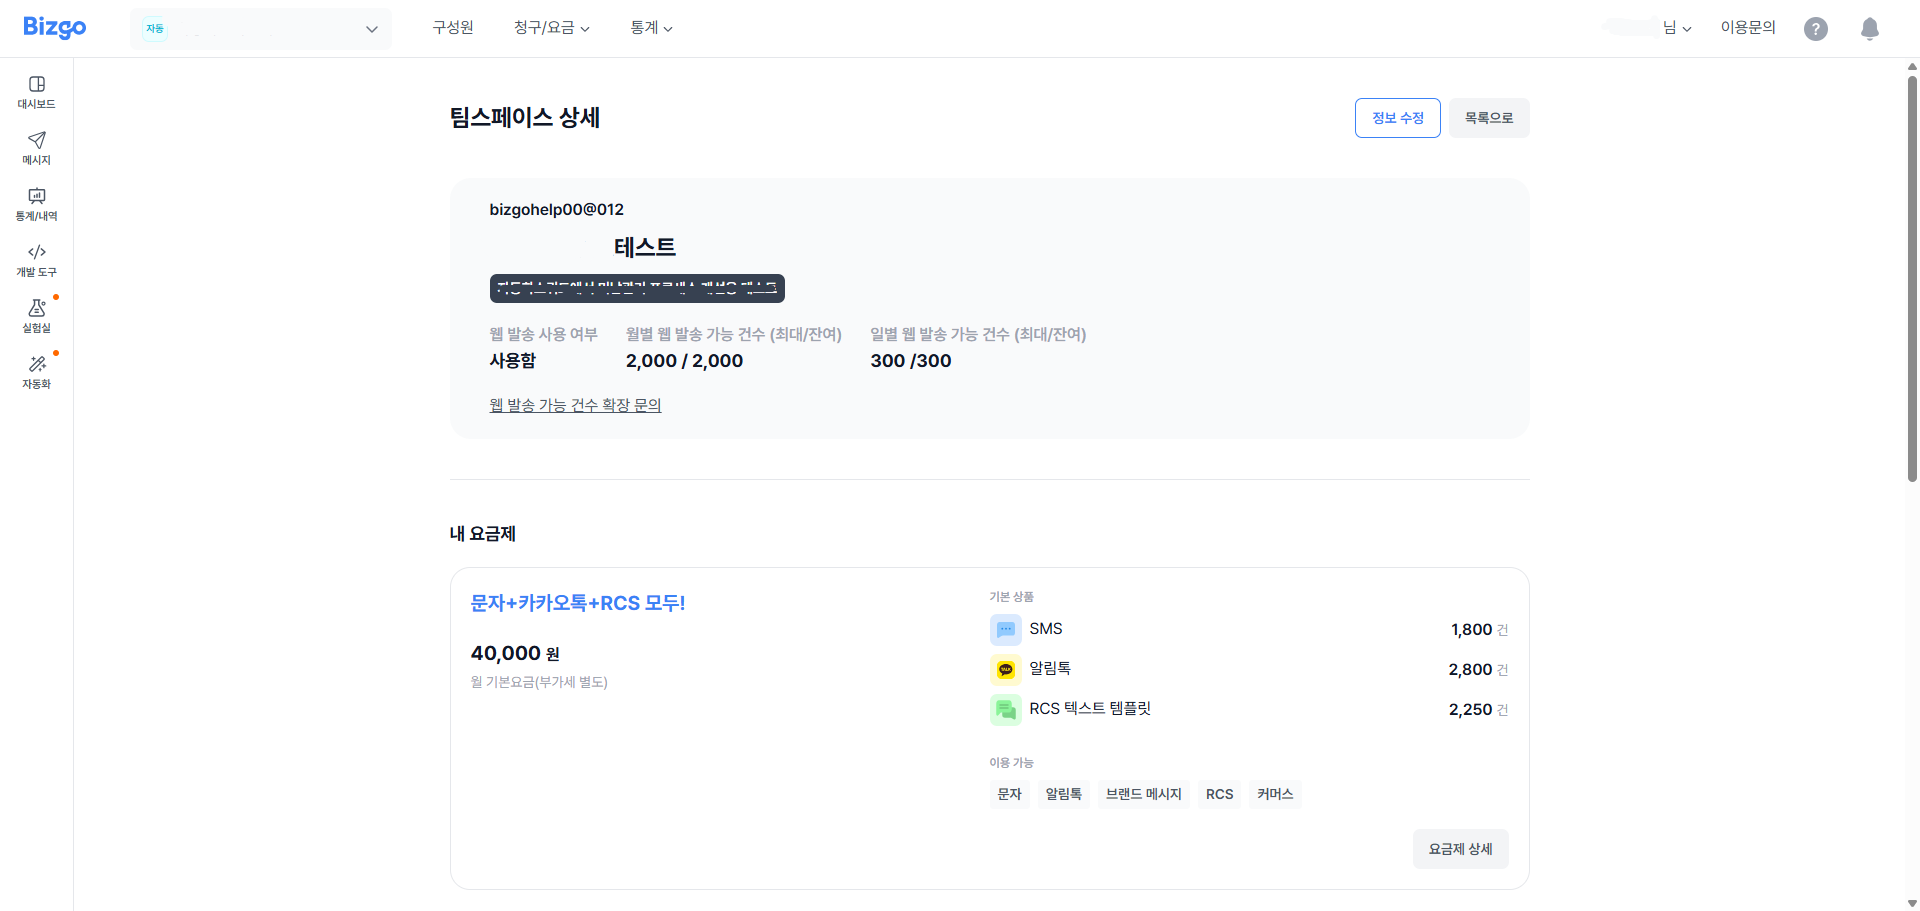
Review the rate plan in use for each team space.
CS Talk rate plan
You can select a CS Talk rate plan separately from your communication product plan. Selecting the plan issues an Omni key for CS Talk.
- It can be held alongside a communication product plan — you do not have to cancel your existing plan.
- Charges are based on the number of channels and chat rooms; adding a channel adds a per-channel fee.
- Unit prices vary by contract. Contact the Bizgo sales team for exact amounts.
CS Talk initial setup still needs a request
You can select the plan and issue the Omni key yourself in the console, but registering the Kakao channel and the initial setup for using CS Talk are still handled manually. Console features for setting consultation hours and system messages will be released in stages. Until then, please contact Bizgo customer support.
Change company information (기업 정보 변경)
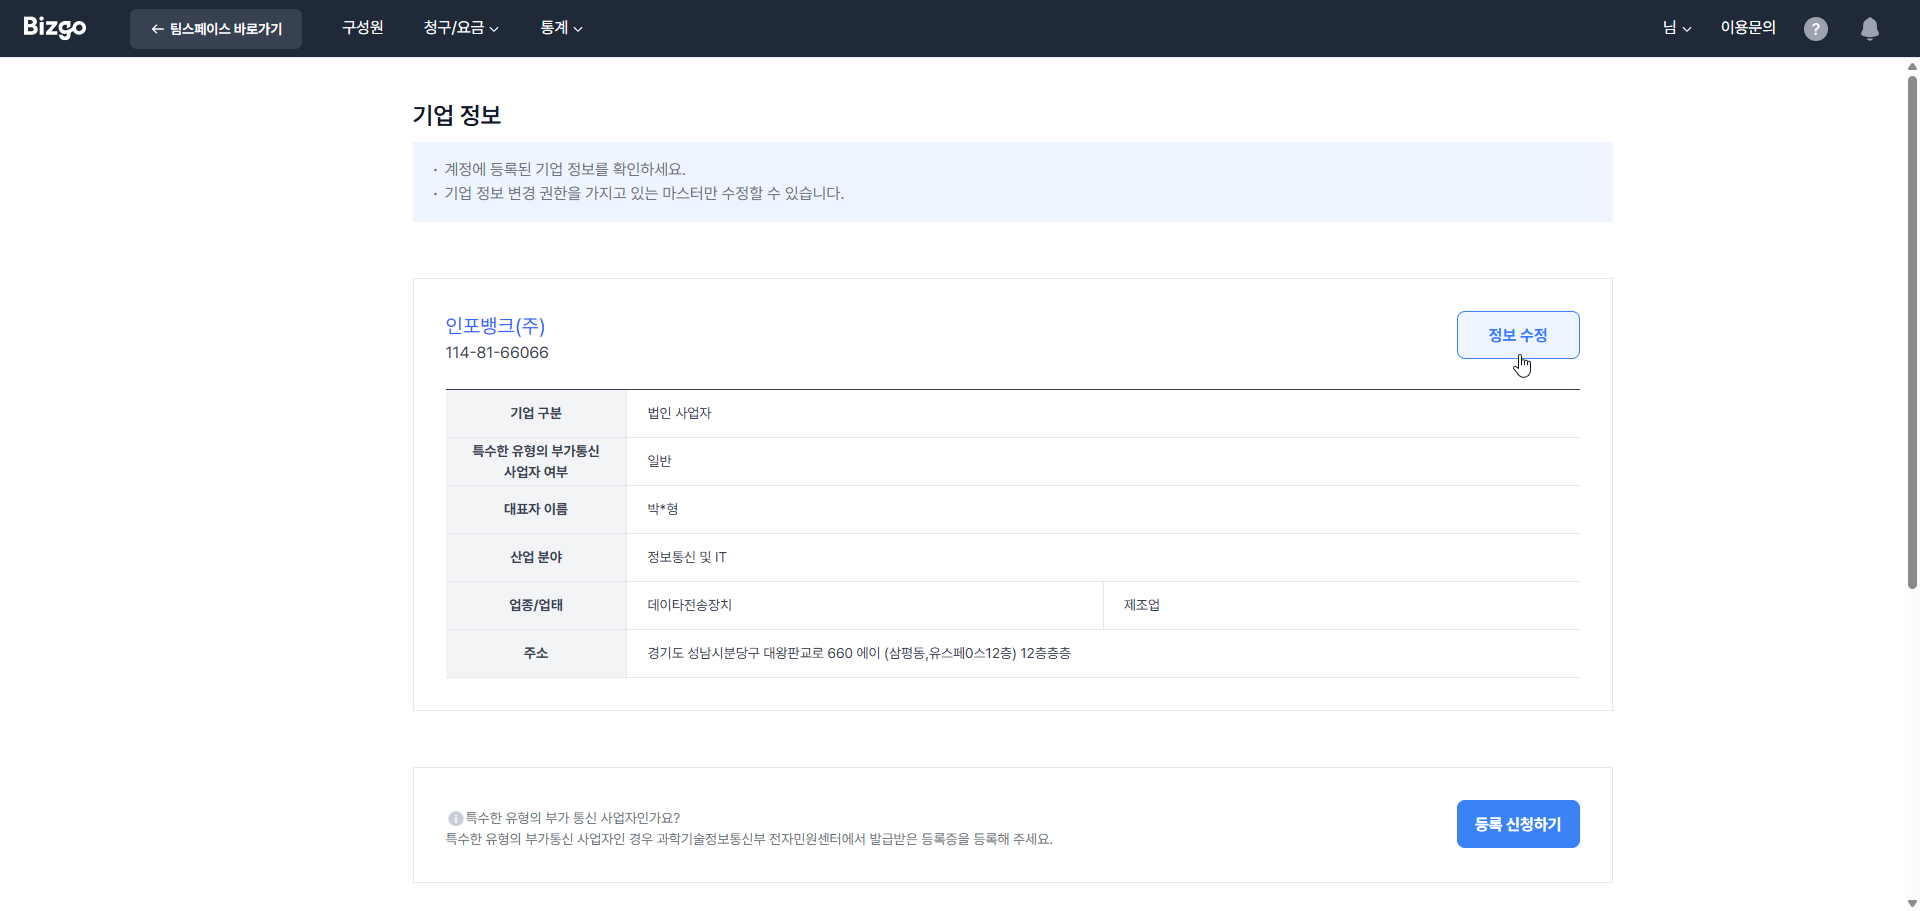
Review the company information registered on your account.
Edit permission and cautions
Only a Master, who holds the permission to change company information, can edit it.
Changes to the business registration number, business registration certificate, company name, or representative's name take effect after an administrator approval process. When the company information change completes, every registered sender number switches to an unusable state and message sending fails. To keep your service running smoothly, register new sender numbers under the updated business information in advance.
- Changes to the business registration number, business registration certificate, company name, or representative's name require an administrator to approve the submitted information and supporting documents.
- The business category/type (업종/업태) and address can be changed immediately, with no administrator approval.
- While the submitted information is being reviewed, Bizgo may request additional information or reject the request if there is a reasonable ground to do so.
Change my information (내 정보 변경)
Review and manage your own information.
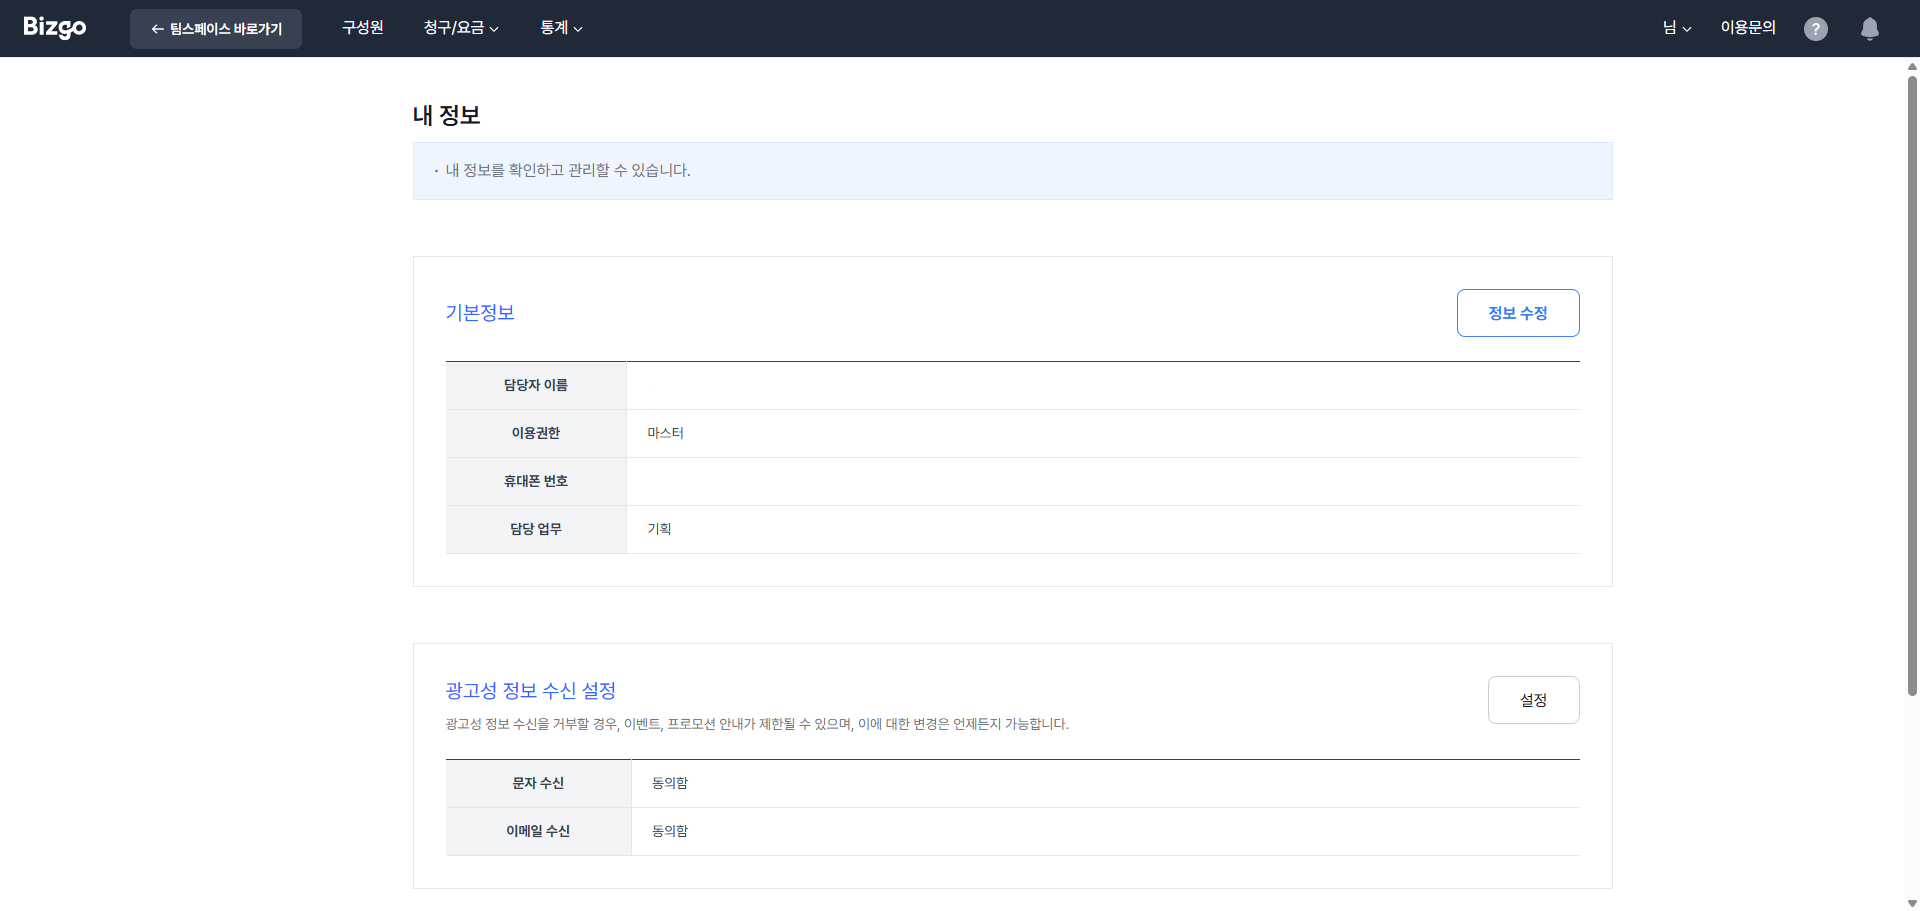
- Changes to the relationship between the company and the Master, or to the contact's name, take effect after an administrator approval process within 1 to 2 business days.
- The mobile number, landline number, email, and department can be changed immediately, with no administrator approval.
- While the submitted information is being reviewed, Bizgo may request additional information or reject the request if there is a reasonable ground to do so.
Security settings (보안설정)
Use security settings to manage your account more safely.
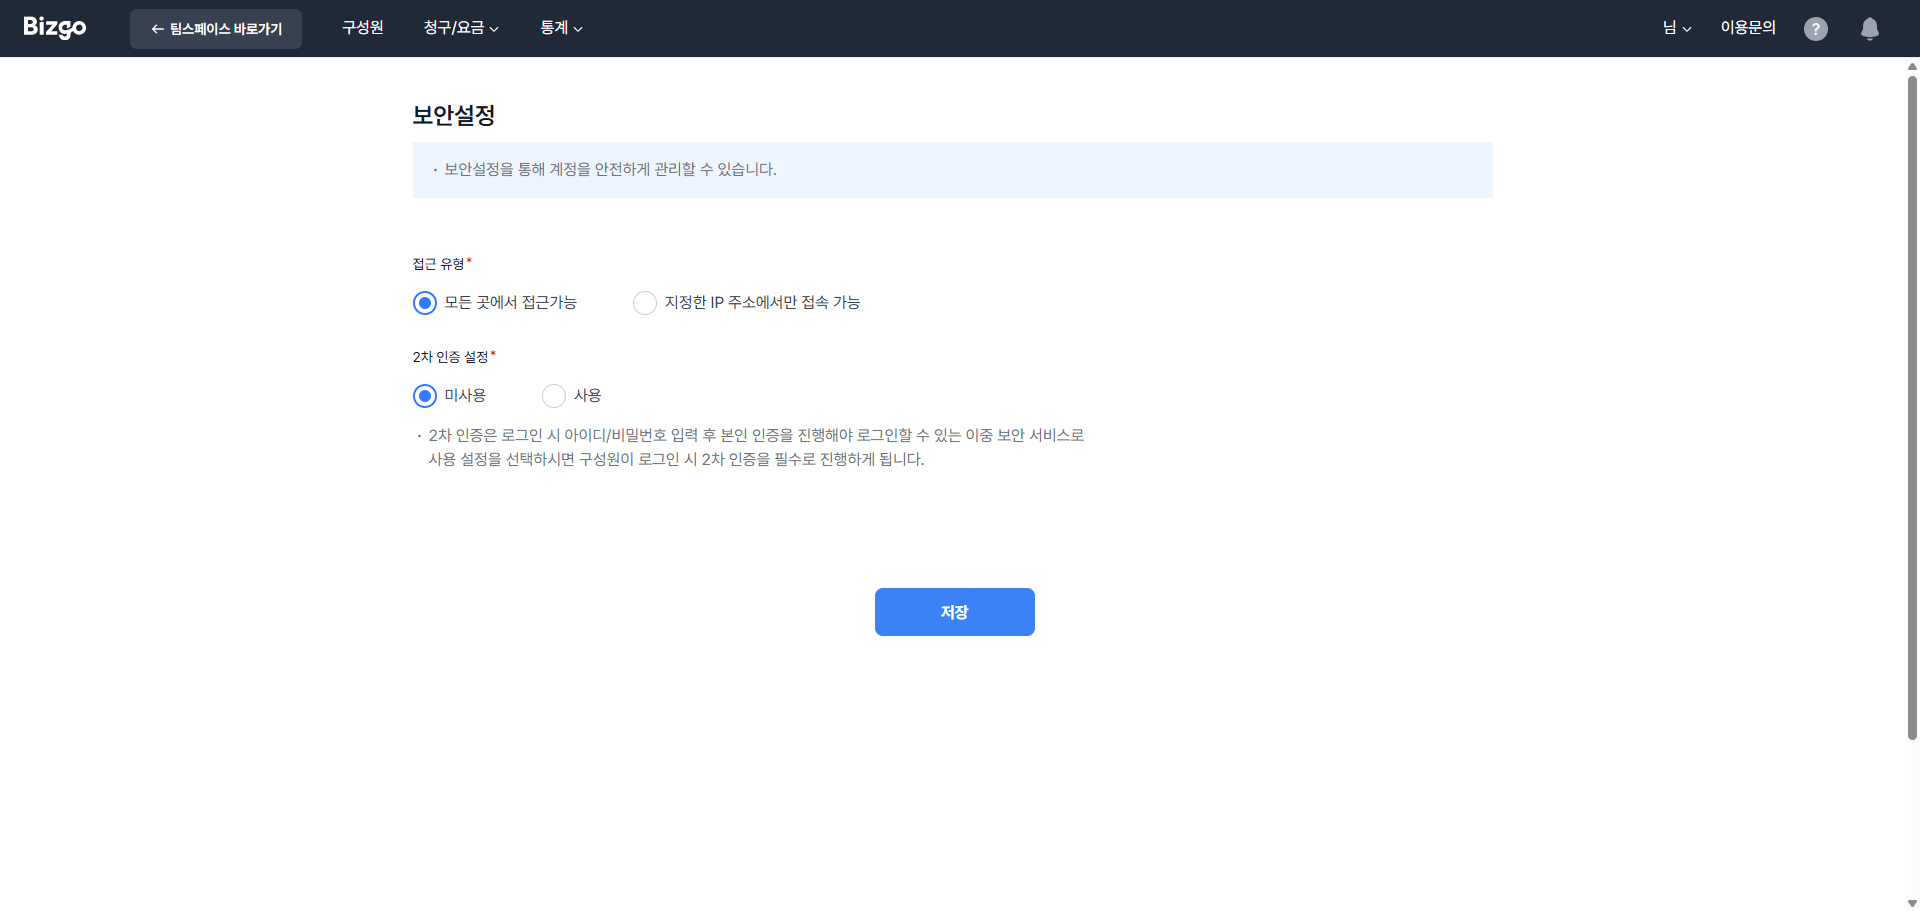
- You can restrict access so that only designated IPs can sign in. (Up to 50 allowed IPs)
- You can enable two-factor authentication, which requires identity verification after the ID and password are entered at sign-in.
Central management of member security
A Master can centrally control members' security permissions (two-factor authentication and access IP control).
Central control toggle
The central control toggle at the top of the Member management (구성원 관리) screen is visible only to Masters and lets you control members' access to their own security settings in bulk.
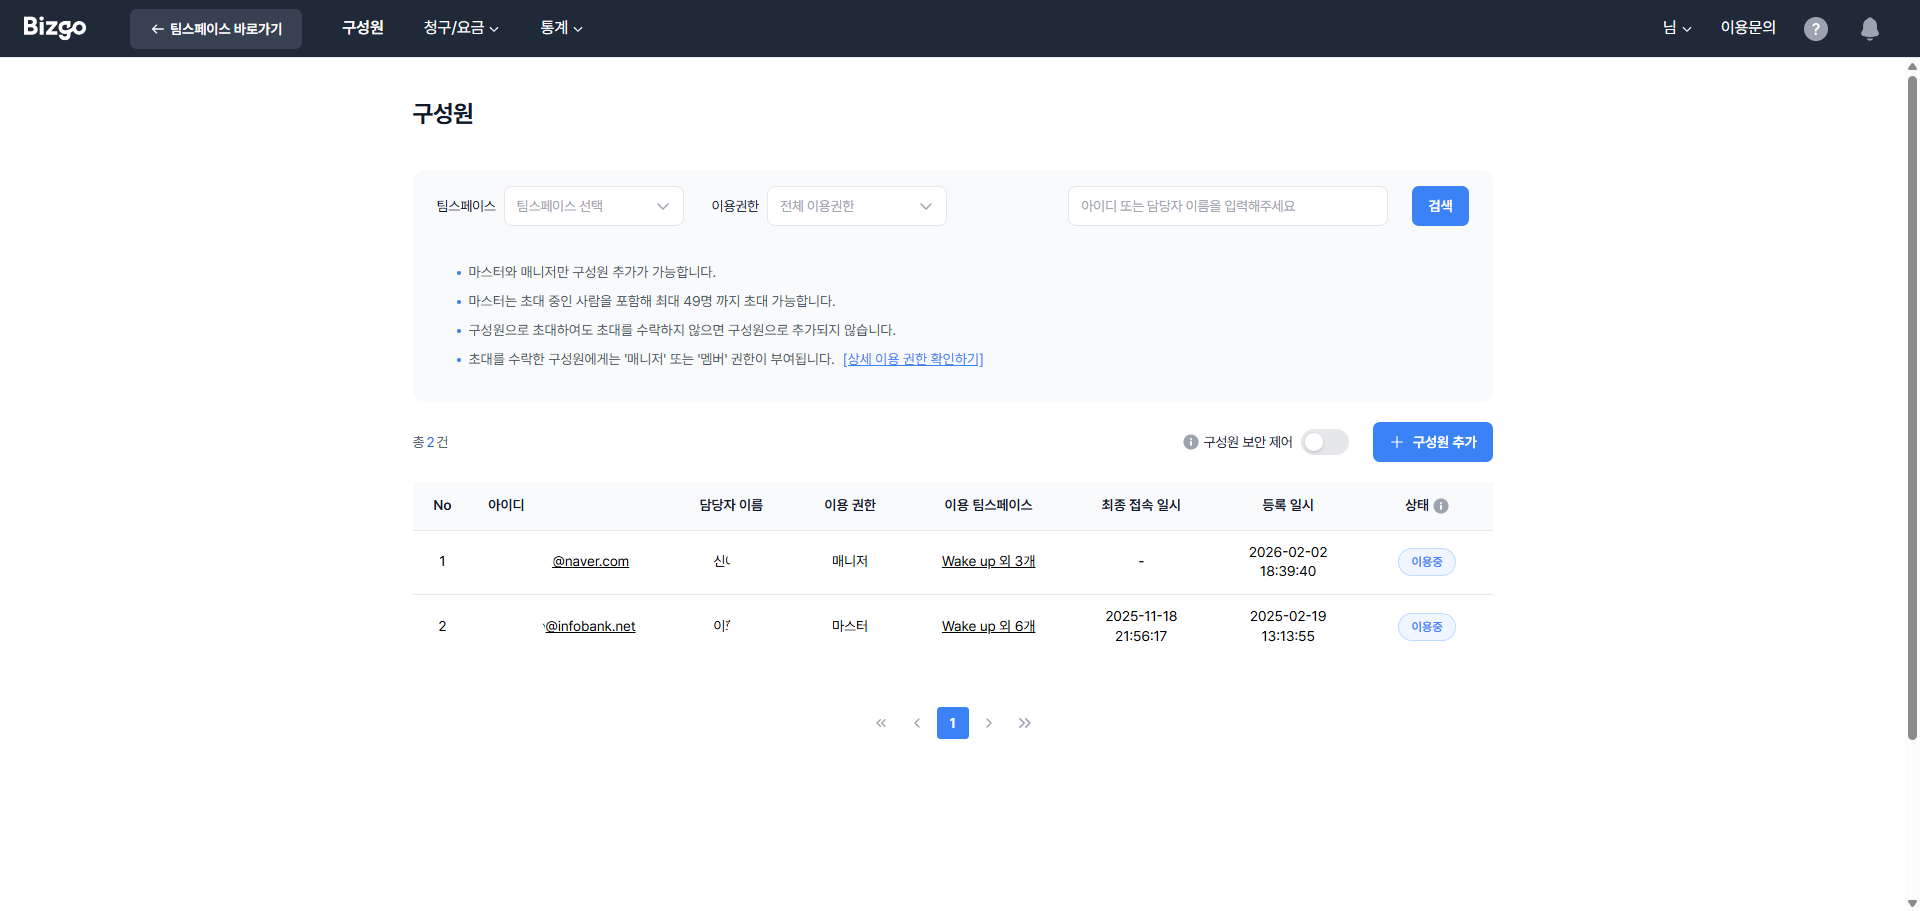
- Default: OFF
- When set to ON: other members are blocked from the Security settings (보안 설정) menu, and only the Master can manage members' security settings.
About enabling central control
When you set the central control toggle to ON, members are blocked from opening their own Security settings menu. Access is restricted even if they navigate to the URL directly.
Per-account security options
You can set security options per account in the 'Security options (보안 옵션)' section of the Invite/Edit member (구성원 초대/수정) screen. This section is visible only to Masters.
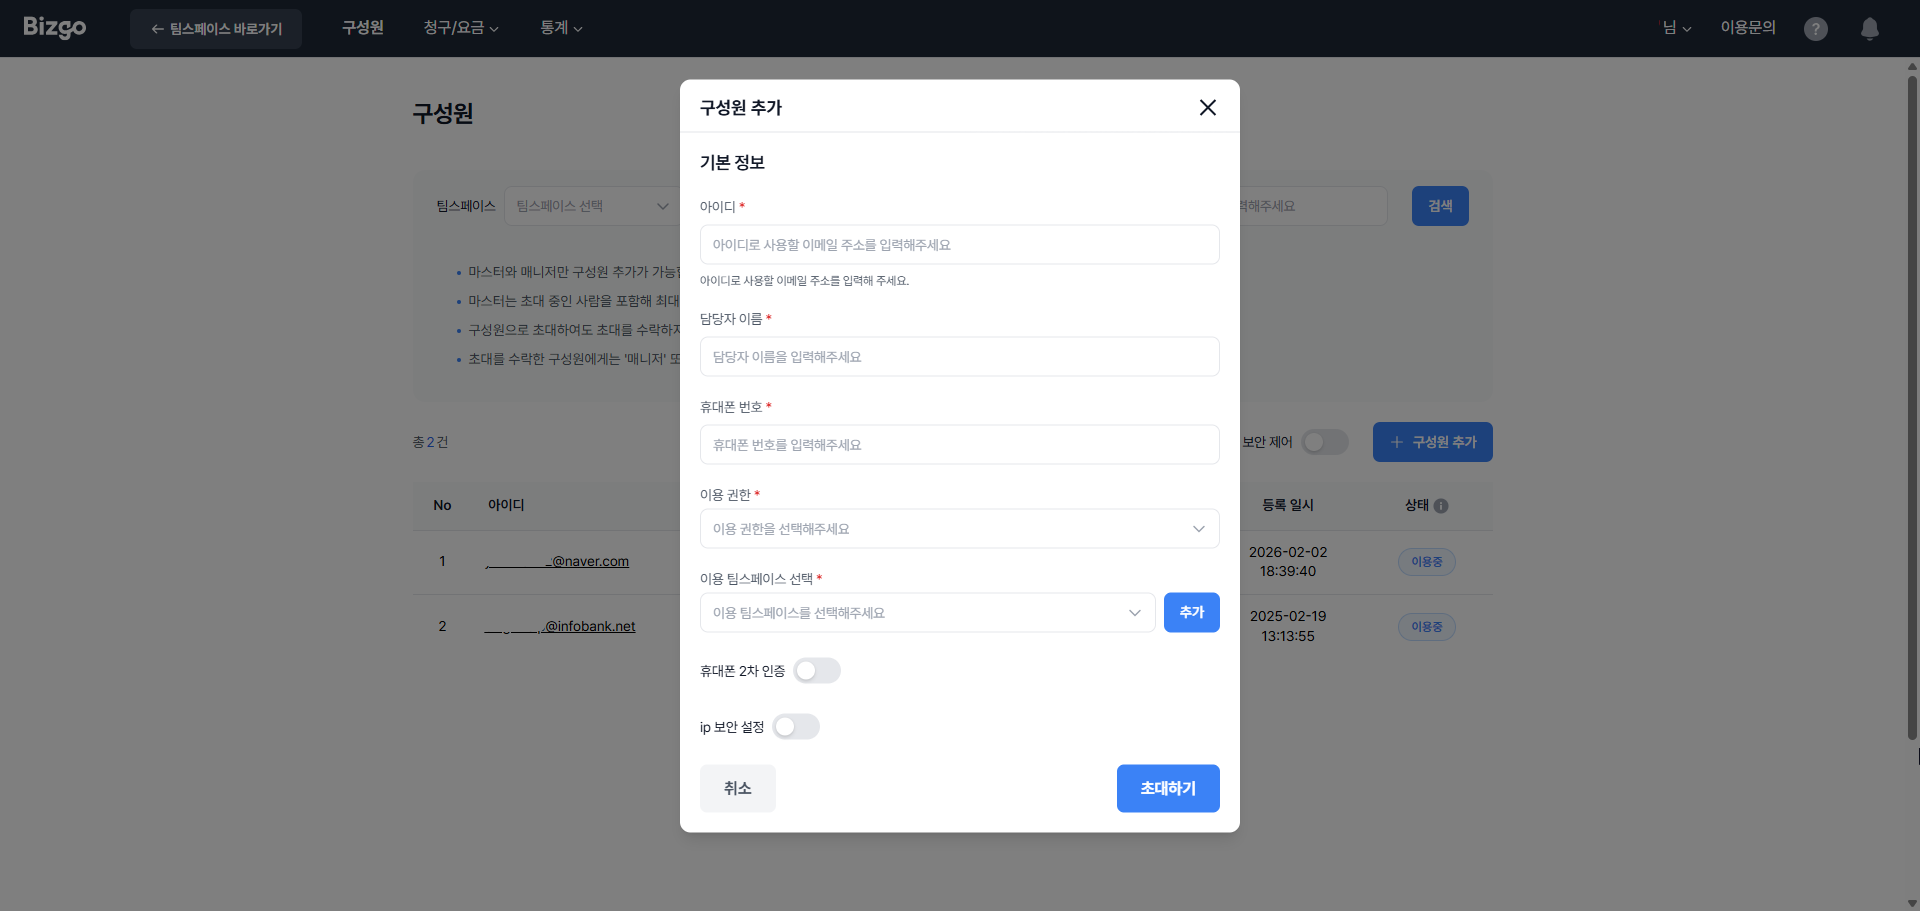
- Mobile two-factor authentication ON/OFF — requires that member to complete mobile identity verification after entering their ID and password at sign-in.
- Access IP control ON/OFF — allows that member to access the console only from specific IPs.
- When set to ON, an allowed-IP input field appears. (Required)
- Saving with no IP entered is not allowed, and the message "Enter at least one allowed IP." (허용 IP를 1개 이상 입력해주세요.) is displayed.
- If the IP format is invalid, the message "This is not a valid IPv4 or CIDR format." (올바른 IPv4 또는 CIDR 형식이 아닙니다.) is displayed on that line.
- You can register up to 50 IPs.
UI behavior rules
| Case | Behavior |
|---|---|
| Central control toggle OFF | Members manage their own Security settings menu |
| Central control toggle ON | Members' Security settings menu is disabled with a tooltip; direct URL access is blocked |
| Save attempted with no IP entered | Cannot save + "Enter at least one allowed IP." |
| Invalid IP format | Red border on that line + "This is not a valid IPv4 or CIDR format." |
Security feature permissions
| Feature | Master | Member |
|---|---|---|
| View/change the central control toggle | O | X |
| Set per-account security options | O | X |
| Access the Security settings menu (when central control is ON) | O | X |
Next steps
- To actually send a message → Web send
- To set up your API key → Configure your environment